
:max_bytes(150000):strip_icc():format(webp)/GettyImages-527803604-ad6f389c89ff4be1b953a3c2cdc64c09.jpg)
"2024 Approved Step-by-Step Your Path to Excellent Video Tutorials"
Step-by-Step: Your Path to Excellent Video Tutorials
Ultimate Guide To Making Video Tutorials

Max Wales
Mar 27, 2024• Proven solutions
Sharing knowledge with millions of people, or with employees is no longer a distant dream because the Internet provides us with simple methods of distributing the content we create. Anyone who wants to help others by showing them how to use a software or perform any other computer-based task can easily do so by making a video tutorial. But, how to make a how-to tutorial video?
![]()

The All-in-One Screen Recorder & Video Editor
- Record desktop screen, voiceover, and webcam simultaneously
- Edit recorded clips quickly with a wide range of professional tools
- Built-in plentiful templates and effects
- Export to MP4, MOV, MKV, GIF and multiple formats
For Win 7 or later (64-bit)
For macOS 10.12 or later
 Secure Download
Well, you don’t need the expensive camera equipment to produce your first video tutorial since a simple screen recording software will enable you to capture all actions you take on your computer. If you’d like to find out more about making video tutorials you’ve come to the right place because, in this guide, we will take you through each step of how to make a video tutorial. So let’s get started.
- Preparing Before Making Video Tutorial
- Using Right Screen Recording Software for Step-by-Step Tutorial
- Recording Professional Audio
- Capturing Tutorial Video
- Editing Recorded Tutorial Video
- Sharing the Video Tutorial With Your Audiences
- Summary for Next Tutorial Video
Part 1: Preparing for the Tutorial Making Process [3 Tips]
The amount of video content uploaded to the Internet on a daily basis is staggering, to say the least. That’s why your video tutorials need to offer something unique in order to stand out in the sea of similar content. The process of making a tutorial starts long before you hit the record button, and here are a few tips that will help you be prepared for the challenges you might face while making your first video tutorial.
1. Define the Target Audience and Pick the Right Topics
Who are the people you are trying to reach? Finding the answer to this simple question is going to help you solve a variety of common issues video content producers have to deal with. By defining the target audience you’ll be able to discover the best way to approach them.
What’s more, once you understand who the viewers of your tutorials are, you’ll be able to pick the subjects that spark the most interest within the group you’re targeting. It goes without saying that knowing everything there is to know about the topics you’re covering is an absolute must if you are hoping to attract large audiences to your videos.
2. Make a Content Plan
The best way to approach the process of tutorial video production is to define your goals and the course of action long before you start recording. You should write down all the ideas and concepts you have in your head. Once you’ve formulated the concept you’ll be able to see how many videos you have to make in order to cover all the ins and outs of a topic.
Try to find natural stopping points or thematic units in your list and decide how many videos you’ll have to create so you can offer a comprehensive and informative view on the subject. Including too much information in one video may discourage the viewers to follow the tutorial until the end. You should take into consideration the concept of the cognitive load while deciding how long your videos should be. This concept points out that there’s a limit to how much and how fast an average person can learn, so offering too much information in a single video can end up being counterproductive.
If the topic of your video tutorial is complex you should provide explanations through practical examples, even if it takes a lot of screen time, rather than jumping from one subject to another. Here are a few tips that will help you figure out how to structure your video tutorial series.
Your concept must have a clear beginning, middle and the end: This is a basic rule of storytelling that helps you guide the viewer through the topic of your tutorials. You should use the same principle when recording each video in the series.
How much time a certain topic demands: Covering more than one topic in a video is possible, although before you decide to do so, you should make sure that the topics you want to include in the tutorial have something in common.
How much information is too much: Keeping the viewer’s attention glued to what’s going on in the tutorial is your primary goal. That’s why you need to find the right measure of information you provide in each video. By offering less information in each video, you’re giving viewers the time to process it and understand it better.
Once you’ve created thematic units you can proceed to write a script for each video. These scripts don’t have to be detailed, you can just create a few bullet points to guide you through the video.
3. Record in a Clean Work Environment
Everything displayed on your computer’s monitor is going to be recorded, so before you start a screen capturing session make sure that all of your private data is well outside the work environment you’ll be using in the video. Instead of wasting time on concealing private information in the post-production, you can save time by controlling what is visible in the portion of the screen you are capturing.
Part 2: Choosing Best Screen Recorder for Video Tutorial Making
Having the right tools for a job is as equally important as knowing exactly how to do a certain job. There are so many different screen recorders on the market at the moment, that choosing the right one isn’t always such an easy task. Most free software products that offer the screencasting feature have limitations that may prevent you from creating a high-quality tutorial.
If you want to capture videos at high frame rates, select the region of the screen you’re recording by yourself or record high-resolution footage we recommend using Wondershare’s Filmora Scrn . Besides featuring powerful screen capturing tools, the software also has a video editing mode, that allows you to edit your videos immediately after you finish a screencasting session. You can use this software to record all your desktop activities on Mac and PC computers for free, and you can purchase the perpetual license to use it for just $29.99 or a one-year license at $19.99.
Part 3: Audio Recording: A Few Tips for Recording Better Audio
Video tutorials largely depend on narration, because you have to use your voice to explain what is going on in the video. That’s why you have to pay special attention to the quality of sound in your videos. Tutorials with poor audio quality have fewer chances of attracting large audiences, simply because most people don’t want to watch a video if they can’t understand what you are saying. Here’s how you can improve the quality of audio in your video tutorials.
1. Use the right Microphone
Whether or not you should record audio with an external microphone is not the real question you should be asking. The real issue is which type of external microphone you should use. Omnidirectional microphones pick up background noises easily, so in order to record clear and natural narration, you should use a unidirectional microphone that only picks up sounds that are coming from one direction.
2.Add Background Music if necessary
Music can help you create a pleasant atmosphere in your video tutorials and it can partially cover the background noise. There are numerous websites that grant you access to royalty free music, which means that it shouldn’t be too hard to find the track you want to include in the tutorial. You should just make sure that the voiceover is clearly audible because you don’t want the music to be louder than the narrator’s voice.
3. Record in an optimized acoustic environment
Sometimes background noise can completely destroy the audio recording you captured. So, in order to avoid this turn off all home appliances that create atmospheric noises. In addition, the room in which you are recording should have great acoustics, because even the slightest reverb can influence the sound quality.
Part 4: Capturing a Video Tutorial
Note: There are so many screen recording software available on the market as we described before. But here, we will take Filmora Scrn as an example.
Once you’ve prepared a clean working environment, attached the external microphone to your computer, it is time to start your first screencasting session. You can begin by launching Filmora Scrn and selecting the Quick Capture option from the software’s welcome window.
1. Designate the region of the screen you’d like to capture
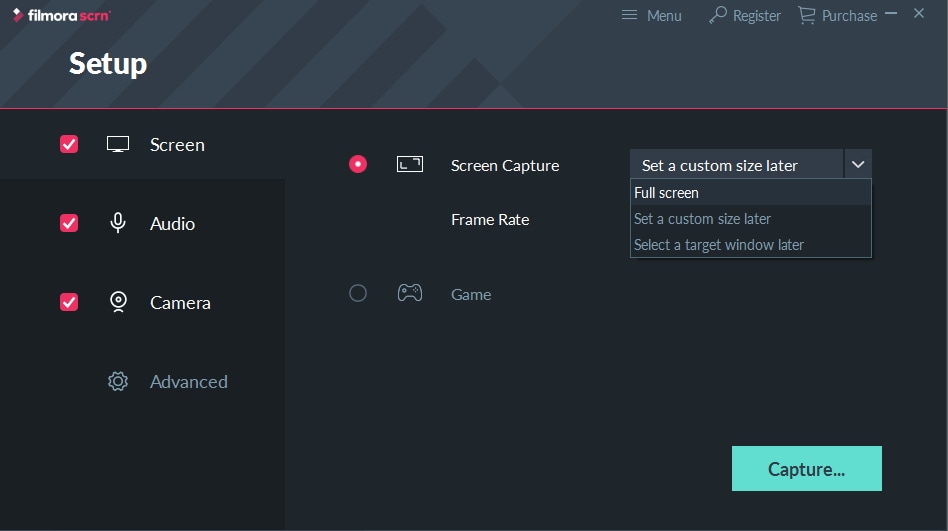
When the Quick Capture mode opens you should click on the Setting icon in order to adjust the recording parameters. The Setup window will pop up, so you should click on the Screen option and make sure that Screen Capture option is selected. The drop-down menu located next to the Screen Capture feature offers three different alternatives. You can either select Full Screen, Set a custom size later or Select a target window later options depending on your current needs. You can also set the preferred frame rate from the drop-down menu located directly below the Screen Capture option.
2. Adjust the camera settings
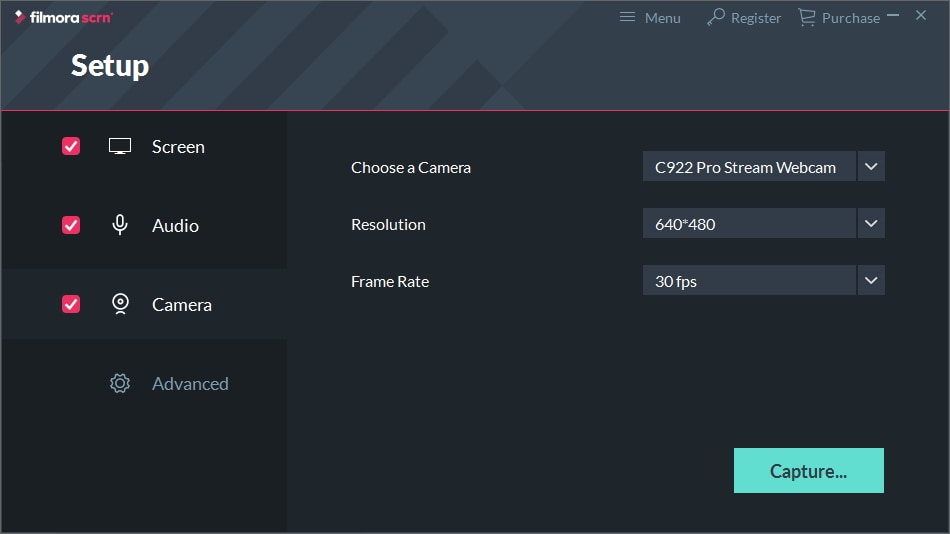
Filmora Scrn enables you to capture footage from a webcam while recording the screen. If you decide that you want to use a webcam in your video tutorial, you should click on the Camera icon on the left side of the Setup window and then proceed to select the camera you’d like to use and choose the resolution and the frame rate.
3. Adjust the audio settings
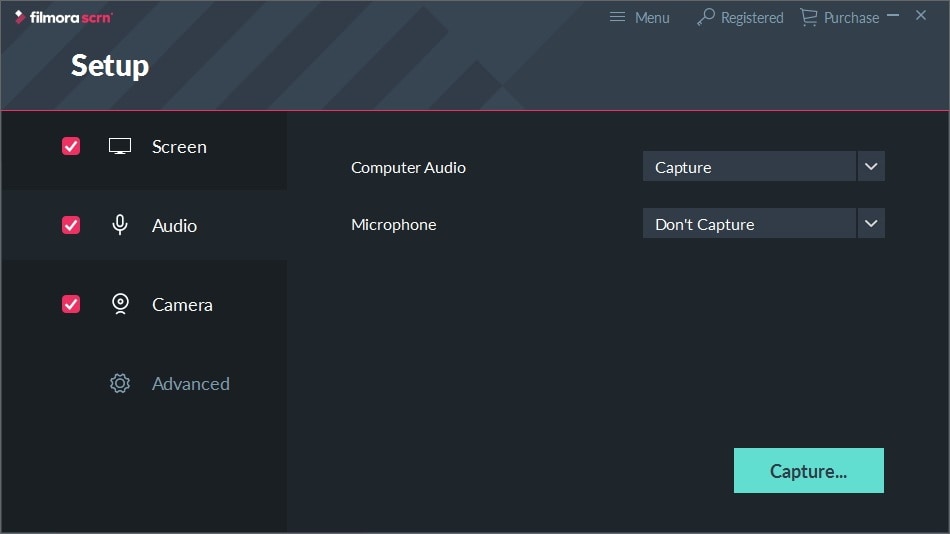
Click on the Audio icon in the Setup window to access the audio options. The software enables you to record system audio and the audio from a microphone simultaneously, so if you want to capture sound from both sources, make sure to select the Capture option from the Computer Audio drop-down menu. Afterward, you should choose the microphone you want to use during the screen recording session, in the drop-down menu located directly below.
Hit the Capture button to exit the Setup window and adjust the sound volume for the microphone in the software’s main window. Then simply hit the record button to start capturing your video tutorial. While you’re recording you can add markers to the video by clicking on the M icon on the Filmora Scrn’s widget. Click on the Record button once more to complete the screencasting session.
Part 5: Editing the Recorded Video Tutorial
The video file you just created will be imported into the software’s video editing mode seconds after you stop recording. You’ll be able to find it in Filmora Scrn’s Media Bin and you just need to drag and drop it to the timeline to start editing it.
1. Cut or Trim the footage
After you’ve placed the video clip on the editor’s timeline, you can remove all unwanted parts from it. Simply drag the Playhead to the part of the video where you want to make a cut and click on the Split icon located in the editor’s toolbar. If you’d like to remove just a couple of frames, you can just drag one end of the clip and get rid of the unwanted material.
2. Speed up parts of the clip that are not important
Time is of the essence in each video tutorial you create because the viewers might get bored if some parts of the video are too long. You can easily solve this problem by speeding up portions of the video that don’t contain vital information. Just click on the clip on the timeline to select it and head over to the Transform menu on the right side of the Filmora Scrn’s editor. Locate the Speed menu and insert the new value into the Speed box.
3. Zoom in on important info
Tutorials often contain a lot of information, so if you’d like to highlight something you find important, simply use the zoom in feature.
4. Add transitions
Jumping from one shot to the other can be visually unpleasant. Fortunately, you can insert transitions and make switching between shots much smoother. All you have to do is head over to the Transitions folder and drag the transition you like to the appropriate spot on the timeline.
5. Use Effects and Callouts
Most video editing software products, including Filmora Scrn, provide a lot of effects that can make your video tutorials more visually attractive. Furthermore, you can add callouts if you want to draw the viewer’s attention to a, particularly important detail.
6. Add text boxes to guide your viewers
You can easily provide information about your upcoming video tutorials by adding text overlays to your videos. You just have to select the font, size, or color of the text and find the best place for it on the screen. Try to keep text you use in a video as short as possible, because too much text may distract the viewer.
Part 6: Sharing the Video Tutorial With Your Audiences
After you’ve completed the video editing process, you should export the video in a file format that can be easily be uploaded to the Internet.
1. Where to upload a video tutorial?
The most obvious choice is YouTube because it is the world’s largest video sharing platform. However, options such as Vimeo or even Facebook may produce equally impressive results. The eLearning websites, like Udemy , or Skillshare are also worth considering if your plan is to produce video tutorials on a professional level.
2. Optimize the video description
Using keywords in the video description will secure better search results. Choose keywords that are directly related to the topic your video is covering, because you will gain nothing if the video appears in search results for unrelated subjects. There are a lot of different tools online you can use to discover the best keywords for your video tutorials, including the Google AdWords Keyword Planner Tool.
3. Write a related blog post
One of the best ways to promote your video tutorials is to write blogs about the topics you are covering because you can use the videos to offer more info about the subject. That way you’ll direct readers towards the tutorial and you’ll be able to generate more traffic.
Part 7: Summarize and Improve for Next Video Tutorial
Don’t expect your first video tutorial to be a major success, that’s going to attract millions of views. But what you can do is keep track of the number of hits the video got, pay attention to the comments, suggestions or critique and try to do better in the next video. There are many different tools you can use to monitor a video’s performance, including YouTube Analytics if you’re using this platform.
Developing your video making skills and using the feedback you get to increase the quality of the content you’re producing is probably the most important aspect of the entire process. Failing to find ways to improve the video tutorials you’re making may result in a low number of views and their overall poor performance on the Internet, so you should do everything in your power to constantly find new ways of reaching new audiences and delivering high-quality tutorials to your audience.
Conclusion
The process of creating a video tutorial is rather simple since you only have to designate the region of the screen you’d like to capture, make sure that the microphone is functioning properly and hit the record button. The Internet offers plenty of opportunities to share your work with millions of people and to help them learn new skills or solve problems that are preventing them from moving forward in their careers. So, develop your content plan and start making your video tutorials. Was the information we provided useful? Let us know in the comments below.
Max Wales
Max Wales is a writer and a lover of all things video.
Follow @Max Wales
Max Wales
Mar 27, 2024• Proven solutions
Sharing knowledge with millions of people, or with employees is no longer a distant dream because the Internet provides us with simple methods of distributing the content we create. Anyone who wants to help others by showing them how to use a software or perform any other computer-based task can easily do so by making a video tutorial. But, how to make a how-to tutorial video?
![]()
The All-in-One Screen Recorder & Video Editor
- Record desktop screen, voiceover, and webcam simultaneously
- Edit recorded clips quickly with a wide range of professional tools
- Built-in plentiful templates and effects
- Export to MP4, MOV, MKV, GIF and multiple formats
For Win 7 or later (64-bit)
For macOS 10.12 or later
Secure Download
Well, you don’t need the expensive camera equipment to produce your first video tutorial since a simple screen recording software will enable you to capture all actions you take on your computer. If you’d like to find out more about making video tutorials you’ve come to the right place because, in this guide, we will take you through each step of how to make a video tutorial. So let’s get started.
- Preparing Before Making Video Tutorial
- Using Right Screen Recording Software for Step-by-Step Tutorial
- Recording Professional Audio
- Capturing Tutorial Video
- Editing Recorded Tutorial Video
- Sharing the Video Tutorial With Your Audiences
- Summary for Next Tutorial Video
Part 1: Preparing for the Tutorial Making Process [3 Tips]
The amount of video content uploaded to the Internet on a daily basis is staggering, to say the least. That’s why your video tutorials need to offer something unique in order to stand out in the sea of similar content. The process of making a tutorial starts long before you hit the record button, and here are a few tips that will help you be prepared for the challenges you might face while making your first video tutorial.
1. Define the Target Audience and Pick the Right Topics
Who are the people you are trying to reach? Finding the answer to this simple question is going to help you solve a variety of common issues video content producers have to deal with. By defining the target audience you’ll be able to discover the best way to approach them.
What’s more, once you understand who the viewers of your tutorials are, you’ll be able to pick the subjects that spark the most interest within the group you’re targeting. It goes without saying that knowing everything there is to know about the topics you’re covering is an absolute must if you are hoping to attract large audiences to your videos.
2. Make a Content Plan
The best way to approach the process of tutorial video production is to define your goals and the course of action long before you start recording. You should write down all the ideas and concepts you have in your head. Once you’ve formulated the concept you’ll be able to see how many videos you have to make in order to cover all the ins and outs of a topic.
Try to find natural stopping points or thematic units in your list and decide how many videos you’ll have to create so you can offer a comprehensive and informative view on the subject. Including too much information in one video may discourage the viewers to follow the tutorial until the end. You should take into consideration the concept of the cognitive load while deciding how long your videos should be. This concept points out that there’s a limit to how much and how fast an average person can learn, so offering too much information in a single video can end up being counterproductive.
If the topic of your video tutorial is complex you should provide explanations through practical examples, even if it takes a lot of screen time, rather than jumping from one subject to another. Here are a few tips that will help you figure out how to structure your video tutorial series.
Your concept must have a clear beginning, middle and the end: This is a basic rule of storytelling that helps you guide the viewer through the topic of your tutorials. You should use the same principle when recording each video in the series.
How much time a certain topic demands: Covering more than one topic in a video is possible, although before you decide to do so, you should make sure that the topics you want to include in the tutorial have something in common.
How much information is too much: Keeping the viewer’s attention glued to what’s going on in the tutorial is your primary goal. That’s why you need to find the right measure of information you provide in each video. By offering less information in each video, you’re giving viewers the time to process it and understand it better.
Once you’ve created thematic units you can proceed to write a script for each video. These scripts don’t have to be detailed, you can just create a few bullet points to guide you through the video.
3. Record in a Clean Work Environment
Everything displayed on your computer’s monitor is going to be recorded, so before you start a screen capturing session make sure that all of your private data is well outside the work environment you’ll be using in the video. Instead of wasting time on concealing private information in the post-production, you can save time by controlling what is visible in the portion of the screen you are capturing.
Part 2: Choosing Best Screen Recorder for Video Tutorial Making
Having the right tools for a job is as equally important as knowing exactly how to do a certain job. There are so many different screen recorders on the market at the moment, that choosing the right one isn’t always such an easy task. Most free software products that offer the screencasting feature have limitations that may prevent you from creating a high-quality tutorial.
If you want to capture videos at high frame rates, select the region of the screen you’re recording by yourself or record high-resolution footage we recommend using Wondershare’s Filmora Scrn . Besides featuring powerful screen capturing tools, the software also has a video editing mode, that allows you to edit your videos immediately after you finish a screencasting session. You can use this software to record all your desktop activities on Mac and PC computers for free, and you can purchase the perpetual license to use it for just $29.99 or a one-year license at $19.99.
Part 3: Audio Recording: A Few Tips for Recording Better Audio
Video tutorials largely depend on narration, because you have to use your voice to explain what is going on in the video. That’s why you have to pay special attention to the quality of sound in your videos. Tutorials with poor audio quality have fewer chances of attracting large audiences, simply because most people don’t want to watch a video if they can’t understand what you are saying. Here’s how you can improve the quality of audio in your video tutorials.
1. Use the right Microphone
Whether or not you should record audio with an external microphone is not the real question you should be asking. The real issue is which type of external microphone you should use. Omnidirectional microphones pick up background noises easily, so in order to record clear and natural narration, you should use a unidirectional microphone that only picks up sounds that are coming from one direction.
2.Add Background Music if necessary
Music can help you create a pleasant atmosphere in your video tutorials and it can partially cover the background noise. There are numerous websites that grant you access to royalty free music, which means that it shouldn’t be too hard to find the track you want to include in the tutorial. You should just make sure that the voiceover is clearly audible because you don’t want the music to be louder than the narrator’s voice.
3. Record in an optimized acoustic environment
Sometimes background noise can completely destroy the audio recording you captured. So, in order to avoid this turn off all home appliances that create atmospheric noises. In addition, the room in which you are recording should have great acoustics, because even the slightest reverb can influence the sound quality.
Part 4: Capturing a Video Tutorial
Note: There are so many screen recording software available on the market as we described before. But here, we will take Filmora Scrn as an example.
Once you’ve prepared a clean working environment, attached the external microphone to your computer, it is time to start your first screencasting session. You can begin by launching Filmora Scrn and selecting the Quick Capture option from the software’s welcome window.
1. Designate the region of the screen you’d like to capture
When the Quick Capture mode opens you should click on the Setting icon in order to adjust the recording parameters. The Setup window will pop up, so you should click on the Screen option and make sure that Screen Capture option is selected. The drop-down menu located next to the Screen Capture feature offers three different alternatives. You can either select Full Screen, Set a custom size later or Select a target window later options depending on your current needs. You can also set the preferred frame rate from the drop-down menu located directly below the Screen Capture option.
2. Adjust the camera settings
Filmora Scrn enables you to capture footage from a webcam while recording the screen. If you decide that you want to use a webcam in your video tutorial, you should click on the Camera icon on the left side of the Setup window and then proceed to select the camera you’d like to use and choose the resolution and the frame rate.
3. Adjust the audio settings
Click on the Audio icon in the Setup window to access the audio options. The software enables you to record system audio and the audio from a microphone simultaneously, so if you want to capture sound from both sources, make sure to select the Capture option from the Computer Audio drop-down menu. Afterward, you should choose the microphone you want to use during the screen recording session, in the drop-down menu located directly below.
Hit the Capture button to exit the Setup window and adjust the sound volume for the microphone in the software’s main window. Then simply hit the record button to start capturing your video tutorial. While you’re recording you can add markers to the video by clicking on the M icon on the Filmora Scrn’s widget. Click on the Record button once more to complete the screencasting session.
Part 5: Editing the Recorded Video Tutorial
The video file you just created will be imported into the software’s video editing mode seconds after you stop recording. You’ll be able to find it in Filmora Scrn’s Media Bin and you just need to drag and drop it to the timeline to start editing it.
1. Cut or Trim the footage
After you’ve placed the video clip on the editor’s timeline, you can remove all unwanted parts from it. Simply drag the Playhead to the part of the video where you want to make a cut and click on the Split icon located in the editor’s toolbar. If you’d like to remove just a couple of frames, you can just drag one end of the clip and get rid of the unwanted material.
2. Speed up parts of the clip that are not important
Time is of the essence in each video tutorial you create because the viewers might get bored if some parts of the video are too long. You can easily solve this problem by speeding up portions of the video that don’t contain vital information. Just click on the clip on the timeline to select it and head over to the Transform menu on the right side of the Filmora Scrn’s editor. Locate the Speed menu and insert the new value into the Speed box.
3. Zoom in on important info
Tutorials often contain a lot of information, so if you’d like to highlight something you find important, simply use the zoom in feature.
4. Add transitions
Jumping from one shot to the other can be visually unpleasant. Fortunately, you can insert transitions and make switching between shots much smoother. All you have to do is head over to the Transitions folder and drag the transition you like to the appropriate spot on the timeline.
5. Use Effects and Callouts
Most video editing software products, including Filmora Scrn, provide a lot of effects that can make your video tutorials more visually attractive. Furthermore, you can add callouts if you want to draw the viewer’s attention to a, particularly important detail.
6. Add text boxes to guide your viewers
You can easily provide information about your upcoming video tutorials by adding text overlays to your videos. You just have to select the font, size, or color of the text and find the best place for it on the screen. Try to keep text you use in a video as short as possible, because too much text may distract the viewer.
Part 6: Sharing the Video Tutorial With Your Audiences
After you’ve completed the video editing process, you should export the video in a file format that can be easily be uploaded to the Internet.
1. Where to upload a video tutorial?
The most obvious choice is YouTube because it is the world’s largest video sharing platform. However, options such as Vimeo or even Facebook may produce equally impressive results. The eLearning websites, like Udemy , or Skillshare are also worth considering if your plan is to produce video tutorials on a professional level.
2. Optimize the video description
Using keywords in the video description will secure better search results. Choose keywords that are directly related to the topic your video is covering, because you will gain nothing if the video appears in search results for unrelated subjects. There are a lot of different tools online you can use to discover the best keywords for your video tutorials, including the Google AdWords Keyword Planner Tool.
3. Write a related blog post
One of the best ways to promote your video tutorials is to write blogs about the topics you are covering because you can use the videos to offer more info about the subject. That way you’ll direct readers towards the tutorial and you’ll be able to generate more traffic.
Part 7: Summarize and Improve for Next Video Tutorial
Don’t expect your first video tutorial to be a major success, that’s going to attract millions of views. But what you can do is keep track of the number of hits the video got, pay attention to the comments, suggestions or critique and try to do better in the next video. There are many different tools you can use to monitor a video’s performance, including YouTube Analytics if you’re using this platform.
Developing your video making skills and using the feedback you get to increase the quality of the content you’re producing is probably the most important aspect of the entire process. Failing to find ways to improve the video tutorials you’re making may result in a low number of views and their overall poor performance on the Internet, so you should do everything in your power to constantly find new ways of reaching new audiences and delivering high-quality tutorials to your audience.
Conclusion
The process of creating a video tutorial is rather simple since you only have to designate the region of the screen you’d like to capture, make sure that the microphone is functioning properly and hit the record button. The Internet offers plenty of opportunities to share your work with millions of people and to help them learn new skills or solve problems that are preventing them from moving forward in their careers. So, develop your content plan and start making your video tutorials. Was the information we provided useful? Let us know in the comments below.
Max Wales
Max Wales is a writer and a lover of all things video.
Follow @Max Wales
Also read:
- "Clearing Dark Frames on Video Capture Software"
- "\"[New] Step-by-Step Screen Shot on Android Devices for 2024\""
- "\"SplitCam Dissection Top in the Video Realm, In 2024\""
- "[Updated] In 2024, Top 5 Innovative Multimedia Collaboration Services"
- "[New] Android's Finest MOBA Battles Compilation (#10 Edition) for 2024"
- "In 2024, Optimal List of 10 Excellent Spotify Audio Recorders"
- "[New] PC & Mac's Leading Choice in Screen Recording Tools for 2024"
- "[New] In 2024, Ideal Mac Recording Solutions for Efficient Documentation"
- "[Updated] EliteScreenSnap for Windows X/XP for 2024"
- "\"ScreenCapture Simplified The Comprehensive CamStudio Review\""
- "In 2024, Exploring Top Videography Apps for Enhanced Win11 Experience"
- "Finest Racing Games Roundup (Top 5) for 2024"
- "\"[Updated] In 2024, Narrative Nuance in Voiceovers Mastering the Art of Storytelling on PPTs\""
- "\"[New] 2024 Approved Unlocking Your HP Laptop's Full Screen Capture Capabilities\""
- "\"[New] Secure Your Screen Content - Mastering the EZvide Technique for 2024\""
- "\"[New] 2024 Approved FBX Gameplay Snapshot Techniques\""
- "In 2024, Precision Capturing for Your PS3 Gaming Adventures"
- "[Updated] IO Screen Recorder User Manual Overview for 2024"
- "\"[Updated] In 2024, XChange Reviews Top Tools & Substitutes\""
- "\"Advanced Scripts Engineering Countdown Timers in Broadcast Tools for 2024\""
- "\"[New] 2024 Approved PixelGrabber W11 Simplest Screen to Video Converter\""
- "\"[Updated] Unmatched Guide The Ultimate 11 Streaming Recorders for 2024\""
- "\"[Updated] 2024 Approved Leading 10-Best List for FREE Video Conferencing & Desktop Sharing\""
- "The Best Screen Capture Tools for Creative Professionals for 2024"
- "\"[Updated] In 2024, PC/Mac/Phone Step-by-Step Guide to Movie Capture\""
- "\"[Updated] 2024 Approved Best GIF Recorders for Capturing Animated GIFs on Windows\""
- "\"[Updated] In 2024, Design Mastery Building an MC Village Home\""
- "Ultimate Screen Recorder Guide – Apeak vs Others for 2024"
- "[New] In 2024, Essential Methods for Livestreaming Sporting Action Successfully"
- "\"NoWorryCapture - Quick and Easy Win11 Recordings\""
- "In 2024, How To Record LOL Gameplay?(3 Methods)"
- "[New] Speech Clarity Achieved by Google's Advanced Conversion"
- "[Updated] In 2024, Persistent Screen Recording Device"
- "[New] Explore Android's Best MOBA Experiences in #10"
- "\"[Updated] 2024 Approved Simplified Strategies for Google Voice Call Records\""
- "[New] Guide to the Best Free Video Conferencing Software for Corporate and Educational Sectors"
- "Improve Your Video Editing with These 5 OBS Solutions"
- "\"[New] Simplified HP Laptop Screen Recording - Four Effective Ways\""
- "\"[New] Ultimate Escapades Our Selection of Best Action-Adventures for 2024\""
- "\"In 2024, Reviewing Window Recording - The Sprout Experience\""
- "\"[Updated] 2024 Approved Removing Inaudible Voices From OBS Recording\""
- "[Updated] In 2024, Best Practices for Saving Screen and Webcam Chats"
- Updated 2024 Approved Free MKV Trimming Software Top 10 Picks
- How to Unlock Realme V30 Phone without PIN
- Why Your Motorola Moto G14 Screen Might be Unresponsive and How to Fix It | Dr.fone
- Updated News Beats and Melodies The Ultimate Background Playlist
- Updated In 2024, Background Blur Made Easy Top Free Online Photo Editing Resources
- Navigating Through Various Audio Recorders From Apowersoft Alternatives to Best Practices for 2024
- Updated 2024 Approved The Top 10 Free Online Subtitle Software Options
- How to Fix Android.Process.Media Has Stopped on Tecno Spark 10 4G | Dr.fone
- In 2024, Amazing Ways to Find Suitable Animated Graphic Maker
- Overview of the Best Tecno Pova 6 Pro 5G Screen Mirroring App | Dr.fone
- Updated In 2024, Top 5 Best Audio Video Mixers
- New 2024 Approved Top 10 Banned Anime Around the World and Why
- New 2024 Approved Master Effortless Audio Enhancement with These 7 Online Audio Processors
- Updated In 2024, The Best Way to Convert MP4 to MP3 Expert-Approved Converters
- New Discover the Leading Podcast Hosting Sites
- In 2024, Eliminate Filmora Watermark Free and Paid Methods
- Top 10 AirPlay Apps in Tecno Camon 20 Premier 5G for Streaming | Dr.fone
- New The Best Video Editing Software for Those New to Video Production for 2024
- 2024 Approved Top 10 Animation Video Creators for Mobile Devices
- 3 Ways to Change Location on Facebook Marketplace for Lava Yuva 2 | Dr.fone
- In 2024, Downloading SamFw FRP Tool 3.0 for Samsung Galaxy M34 5G
- Updated How to Analyze an Editorial Cartoon Easily
- Easy steps to recover deleted photos from Smart 8 Pro.
- The Complete Guide to Vivo Y55s 5G (2023) FRP Bypass Everything You Need to Know
- In 2024, Top 15 Augmented Reality Games Like Pokémon GO To Play On Honor X8b | Dr.fone
- Recommended Best Applications for Mirroring Your Honor Magic 5 Screen | Dr.fone
- Ways to trade pokemon go from far away On Samsung Galaxy F15 5G? | Dr.fone
- AVS Video Editor 2023 An In-Depth Analysis and Review
- In 2024, Unlocking iPhone XR Passcode without a Computer
- Universal Unlock Pattern for Xiaomi 13 Ultra
- Leading 10 Voice Alteration Software Mastering Female Tones From Male Vocals for 2024
- 5 Ways to Reset Nubia Red Magic 9 Pro+ Without Volume Buttons | Dr.fone
- How to Change/Fake Your Oppo F23 5G Location on Viber | Dr.fone
- Title: "2024 Approved Step-by-Step Your Path to Excellent Video Tutorials"
- Author: Rowling
- Created at : 2024-05-18 13:53:21
- Updated at : 2024-05-19 13:53:21
- Link: https://remote-screen-capture.techidaily.com/2024-approved-step-by-step-your-path-to-excellent-video-tutorials/
- License: This work is licensed under CC BY-NC-SA 4.0.
