
:max_bytes(150000):strip_icc():format(webp)/how-to-set-up-speech-to-text-on-android-0-928c48ab121248f9aa543a136d971f9a.jpg)
Guide to Set up Zoom Meetings
Guide to Set up Zoom Meetings
How to Set Up a Zoom Meeting

Richard Bennett
Mar 27, 2024• Proven solutions
You may need to learn how to set up a Zoom meeting when you are on a leave or are told to work from home, but still need to communicate with your colleagues in order to discuss on serious topics and/or to take import decisions.
Available for Mac, iOS, Android, Windows, and Linux platforms, Zoom lets you easily overcome the barriers of distance as the app allows free video conferencing with up to 100 participants irrespective of their geographical location. The limit of 100 participants can be increased to 300 and 1000 with the paid Business and Enterprise Plus subscription plans respectively.
Going further, this guide explains in detail how to set up a Zoom call or conference, and how to make the entire meeting session simplified and more useful by making minor adjustments to the app. Besides, you will also learn how to set up a Zoom meeting in Outlook and Google Calendar, or how to schedule Zoom meetings for the future.
- Part 1: How to Set Up Zoom Meeting
- Part 2: Tips for Better Zoom Meeting Setup
- Part 3: Schedule and Set Up a Zoom Meeting for the Future
- Part 4: How to Set Up Zoom Meetings on Google Calendar
- Part 5: Set Up a Zoom Meeting in Outlook
You may also like: 8 Best Video Conference App for Android and iPhone (Picked)
Part 1: How to Set Up Zoom Meeting
The good news is, if you are merely a participant of a Zoom meeting that has been hosted by someone else, you don’t necessarily need to download and install the app. You can join the conference by following the URL using your favorite web browser, and typing in the meeting ID and password you are provided with via email or any other method chosen by the host.
On the other hand, if it’s you who is hosting a conference (in other words, starting a conference and want to invite others to join the meeting), Zoom must be installed on your device.
You can learn how to set up a Zoom meeting right from the scratch by following the steps given below:
Step 1: Download and Install Zoom
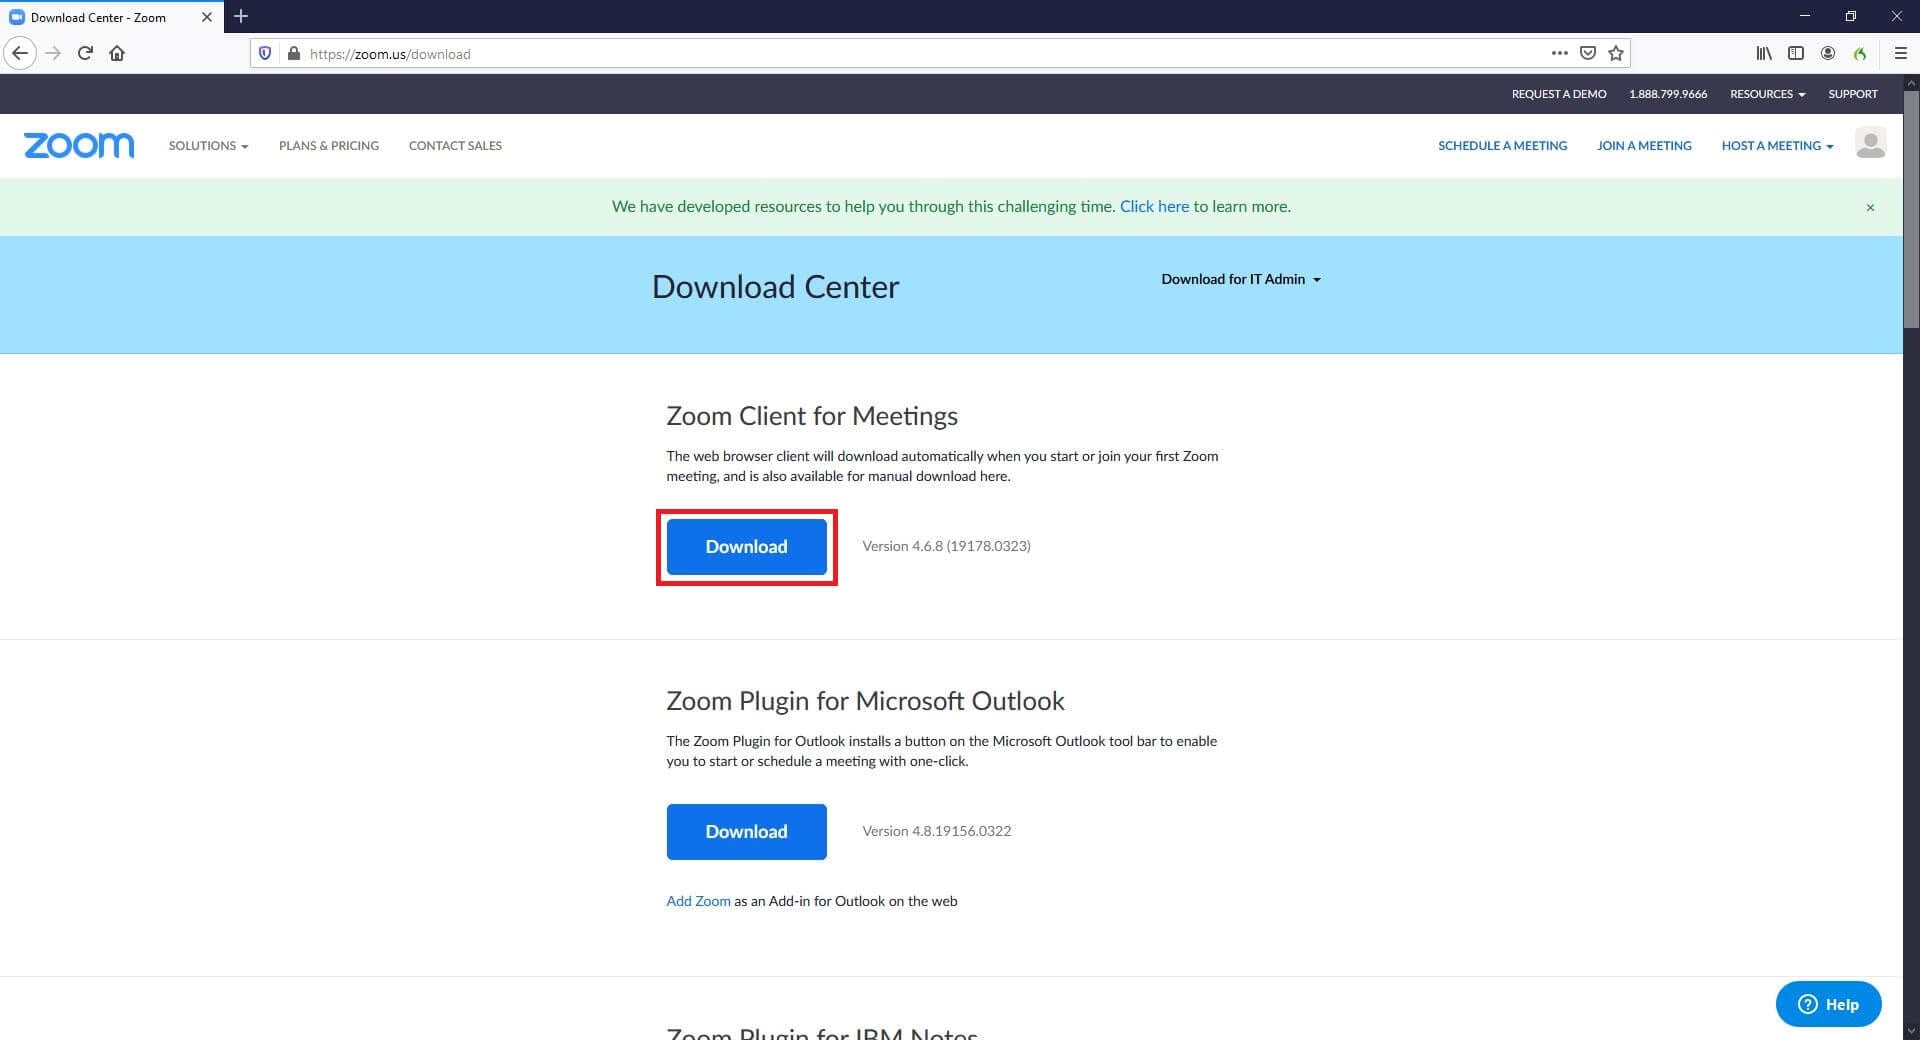
Launch your favorite web browser (Mozilla Firefox here) on your computer (a Windows 10 PC is used here), go to https://zoom.us/download , click Download, and follow the on-screen instructions to download Zoom to your local hard drive. Post this, use the ZoomInstaller.exe file to install the program, and then proceed to the next step.
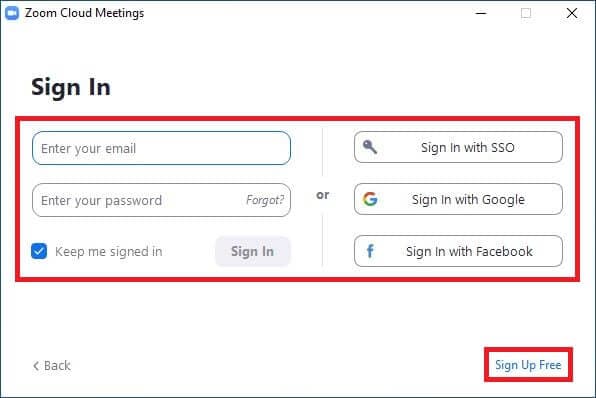
Step 2: Launch Zoom and Sign Up
Double-click the Zoom shortcut icon on the desktop, click Sign In, and use any of the options given in the right section of the next box to sign up for a free Zoom account. Once this is done, back on the box, enter your email address and password you signed up with in their corresponding fields in the left, and click Sign In to access your Zoom account.
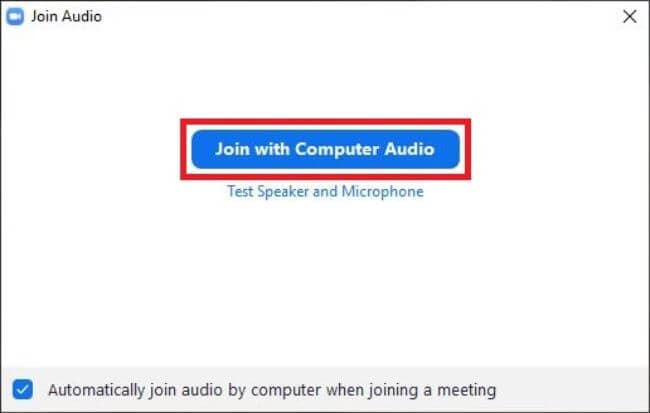
Step 3: Set Up New Meeting
Click New Meeting on the main interface, wait while the app connects to the server, and optionally click Join with Computer Audio to use voice and audio during the conference.
Next, click Invite from the bottom of the screen, go to the Email tab from the top of the next box that comes up, click your email service provider (Gmail for this example), enter the email addresses of the desired participants in the To field on the email draft box, and click Send.
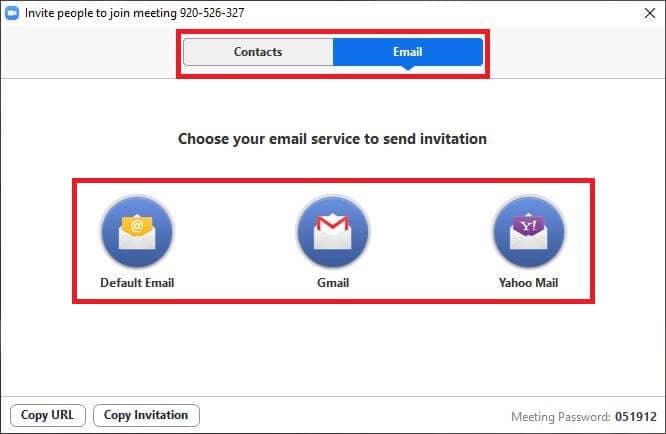
Note: Alternatively, you can use the Contacts tab to invite the participants who are already added in your contact list, or use the Copy URL or Copy Invitation buttons at the bottom to send the invitation manually.
As the target participants receive the mail, they can use the URL and the meeting ID and password to join the Zoom conference. During the process, they can either download the app using the link that the browser displays, or click join from your browser that appears when you click, click here, and follow along using your web browser without installing the program.
Part 2: Tips for Better Zoom Meeting Setup
Learning how to set up a Zoom meeting is fairly easy alright, but do you know that the Zoom meetings can be optimized to get the best remote discussion experience?
Following are a few tips that would help you improve the quality of the conferences, and make the visuals more professionals and/or pleasing to the eyes:
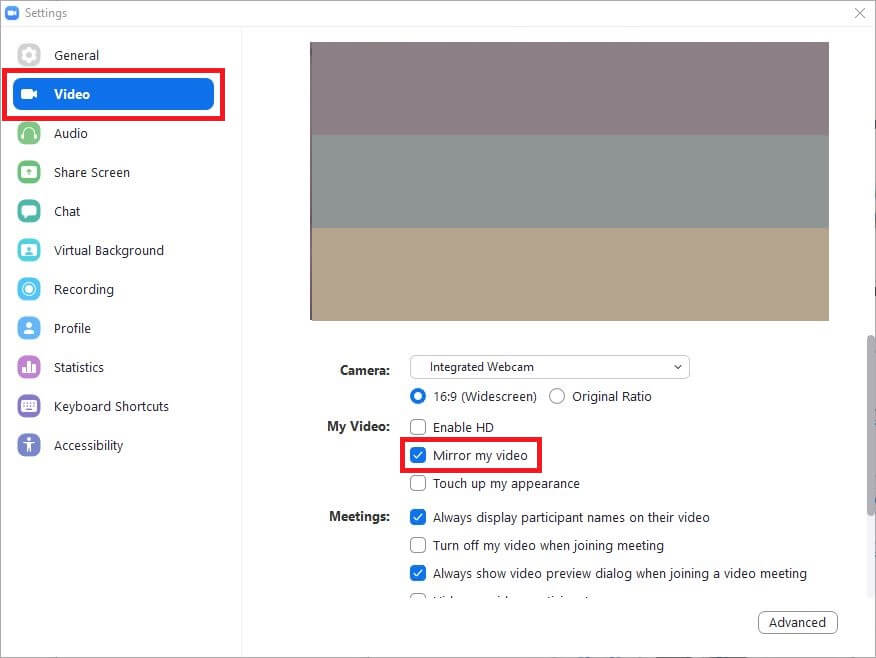
1. Mirror Effect
Enabled by default, the mirror effect lets you flip the video display that the webcam/camera of your device captures during the conference. You can enable or disable the feature by clicking the Settings icon from the top-right corner of the Zoom window (when not in a conference), selecting Video from the left pane, and checking or unchecking the Mirror my video box from the right respectively.
Want to flip or mirror your video footage after recording? Try Filmora to Flip Video Quickly and Easily.
2. Appearance Touchup
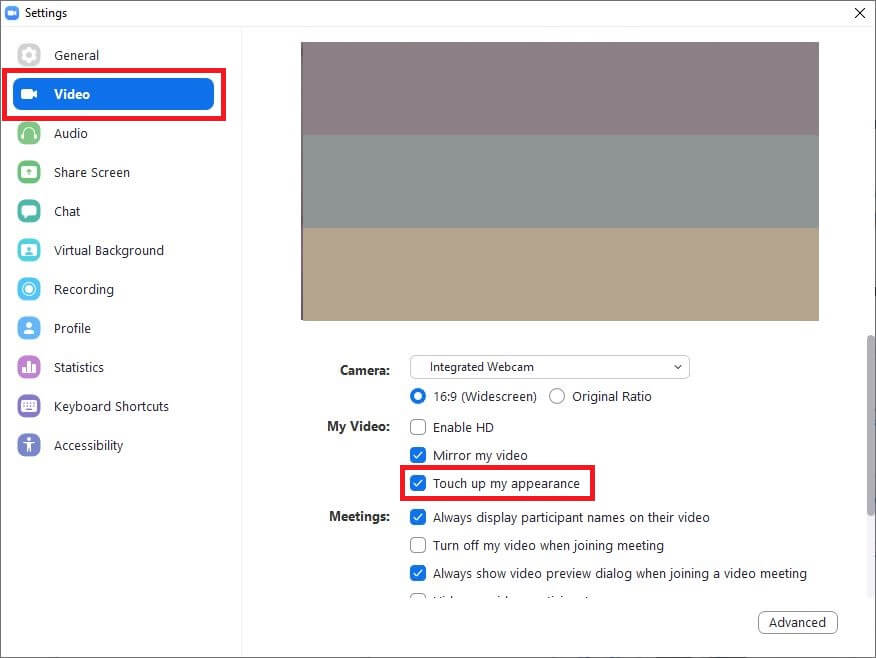
This feature makes the visuals captured by your webcam or camera less crispy. This comes in handy when you don’t want to distract other participants of the meeting with the imperfections your clothes or sleepy face have when you’re right out of the bed. You can enable or disable this function by checking or unchecking the Touch up my appearance box present in the right section of the Video category on the Settings window respectively.
3. Virtual Backgrounds
Virtual backgrounds let you hide those untidy and wrinkled bedsheets or wet towels that are usually scattered around when you’re at home. When enabled, you can choose a pleasant scene or environment that is visible to other participants during your video conferences.
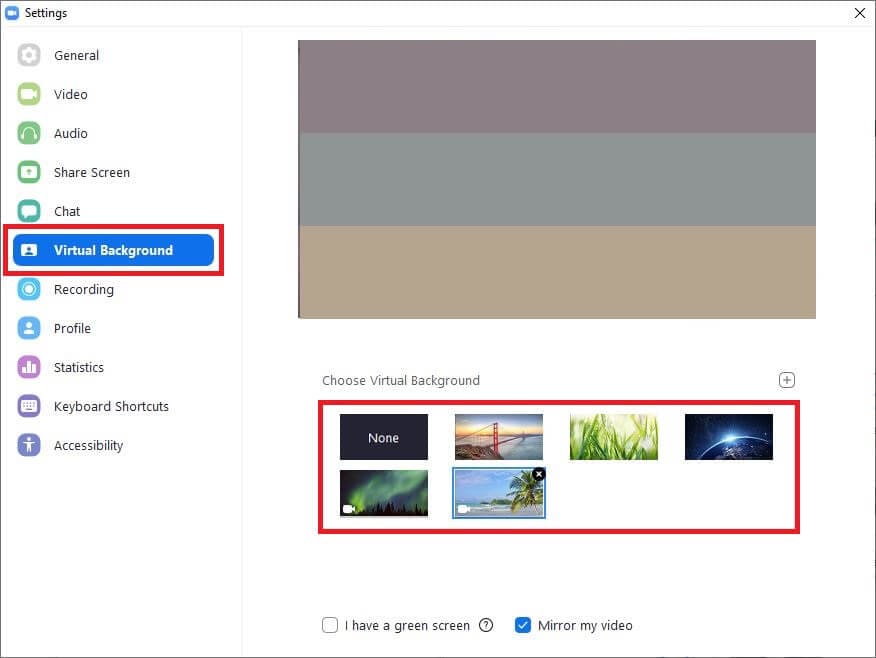
To select virtual background, you can go to the Settings box, click Virtual Background category from the left pane, and choose your preferred background from the right. Zoom might take a while to download the required packs if you’re using the feature for the first time. If you’ve a physical green screen background, you can check I have a green screen, and then select the correct color for it.
Bonus: green screen is widely used in filming and TV shows, you can get more info about this magical skill in Green Screen Tutorial .
4. Prevent Screen Sharing
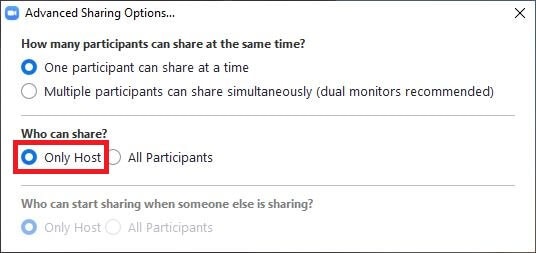
You can keep all the mischievous or ignorant participants from sharing their screen deliberately or accidentally while you’re discussing a serious matter. To do this, while you are in an ongoing conference, click the up-facing arrow next to the Share Screen option from the bottom of the camera window, click Advanced Sharing Options, and select the Only Host radio button from the Who can share section on the box that appears next.
5. Mute Participants
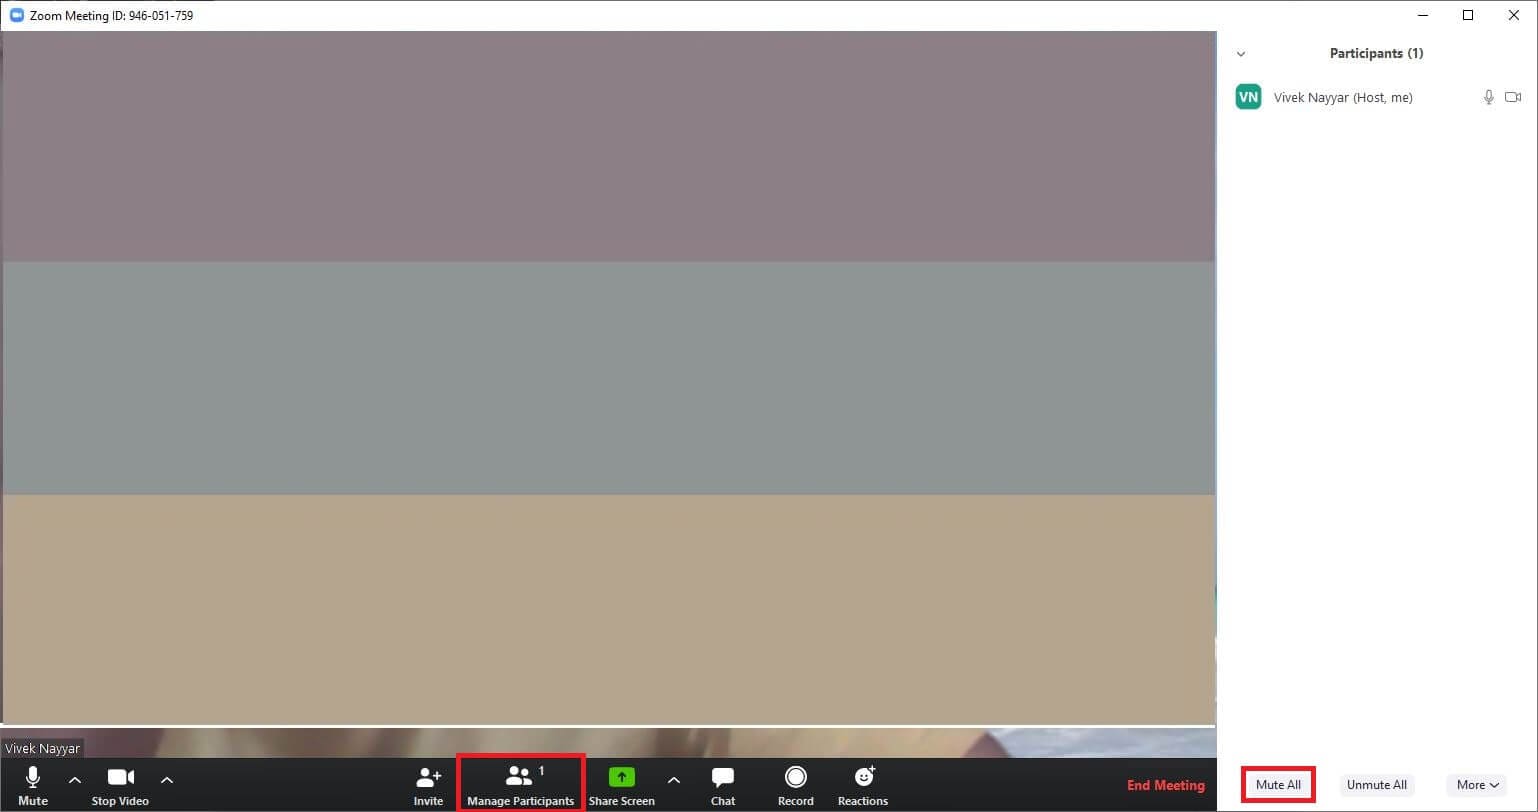
You can prevent all the participants from turning your sophisticated and professional ambiance into a fish market by muting all the of them in one go. To do this, click Manage Participants from the bottom of the camera screen during an ongoing meeting, and click Mute All from the bottom-left corner of the Participants pane that appears in the right. Alternatively, you can click the Mute button present next to each participant’s name in the Participants pane to mute them individually.
Part 3: How to Schedule and Set Up a Zoom Meeting for the Future [Desktop Client]
As a host you can even schedule a conference with Zoom. You can learn how to set up a Zoom meeting for the future by following the instructions given below:
Step 1: Get to the Schedule Meeting Box
Launch Zoom (a Windows 10 computer is used here), and click Schedule from the left section of the interface to open the Schedule meeting box.
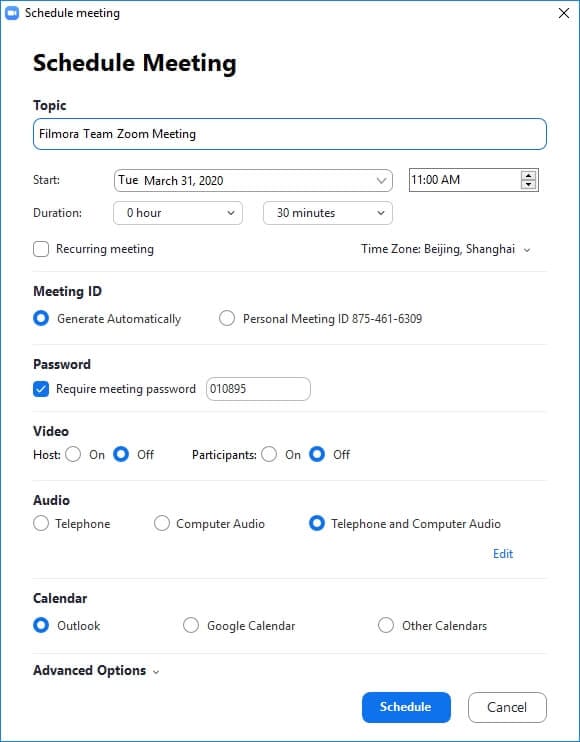
Step 2: Schedule a Meeting
Use the Start drop-down calendar to select a future date you want to schedule a meeting on, use the adjacent box to choose your preferred time of the meeting, play with other self-explanatory options to configure the meeting preferences as needed, and click Schedule from the bottom to schedule a meeting.
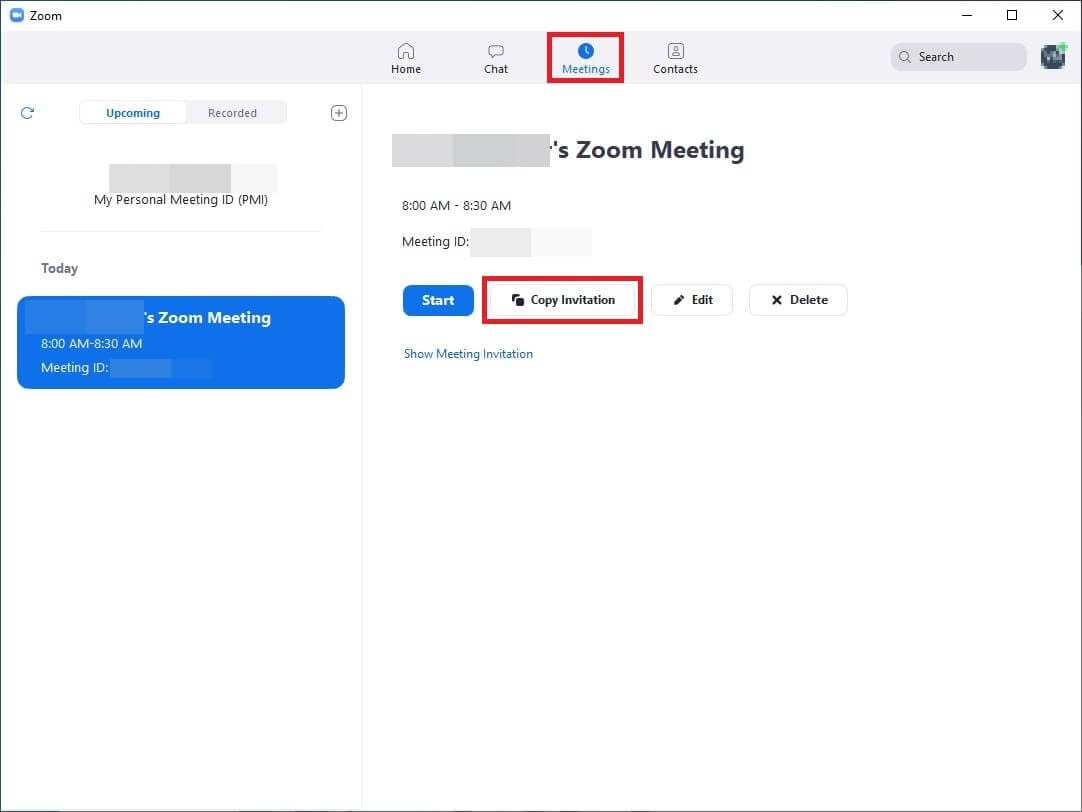
Step 3: Invite Participants to the Scheduled Meeting
Click Meetings from the top of the Zoom’s interface, ensure that the scheduled meeting is selected in the left pane, and click the Copy Invitation button from the right to copy the invitation URL and the meeting ID and password to the clipboard. Next, open your favorite web browser, sign in to your email account, compose an email for all the participants you want to invite, paste the copied content in the message box, and send the invitation to the recipients.
Part 4: How to Set Up Zoom Meetings on Google Calendar
In order to set up a Zoom meeting, you don’t always have to launch the program, and you can get the job done right from Google Calendar itself. However, you must have a Zoom ID, and you must also be signed in to it in order to create an event that leads to a conference.
Need to Sync Zoom meetings to your Calendar? We’ve figured out how to do that on desktop/iPhone/Android phones, you can check it here: Syncing Zoom to Your Calendar
The entire process of how to set up a Zoom meeting with Google Calendar is explained below:
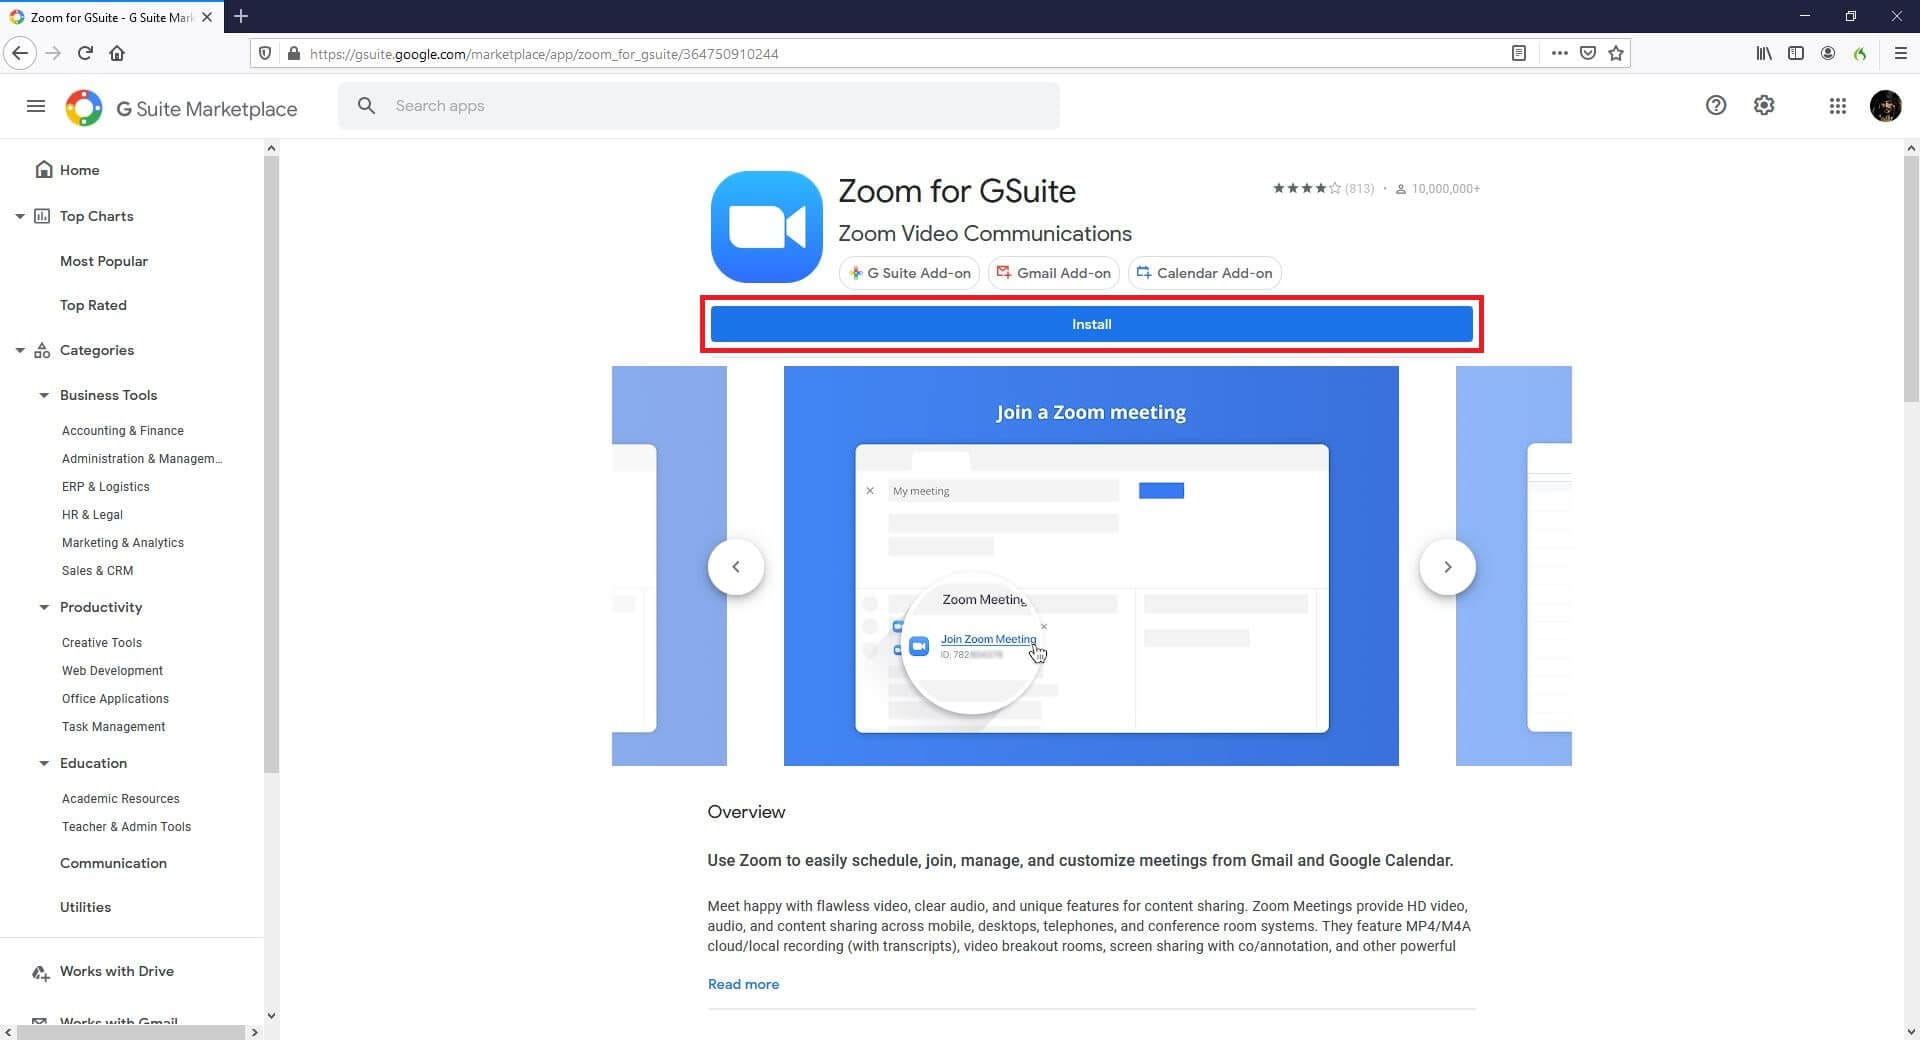
Step 1: Install Zoom for GSuite Add-on
Start your favorite web browser, go to https://gsuite.google.com/marketplace/app/zoom%5Ffor%5Fgsuite/364750910244 , click Install, click CONTINUE from the bottom-right corner of the Get ready to install box that comes up next, and follow the on-screen instructions go install Zoom for GSuite on the browser.
Step 2: Launch Google Calendar and Sign In to Zoom Account
Open a new tab on your browser, sign in to your Google account (Gmail is used here for demonstration), click the Google apps icon from the top-right corner, click Calendar from the available programs, click the Zoom icon from the right most pane and sign in to your Zoom account.
Step 3: Create Event and Set Up Zoom Meeting
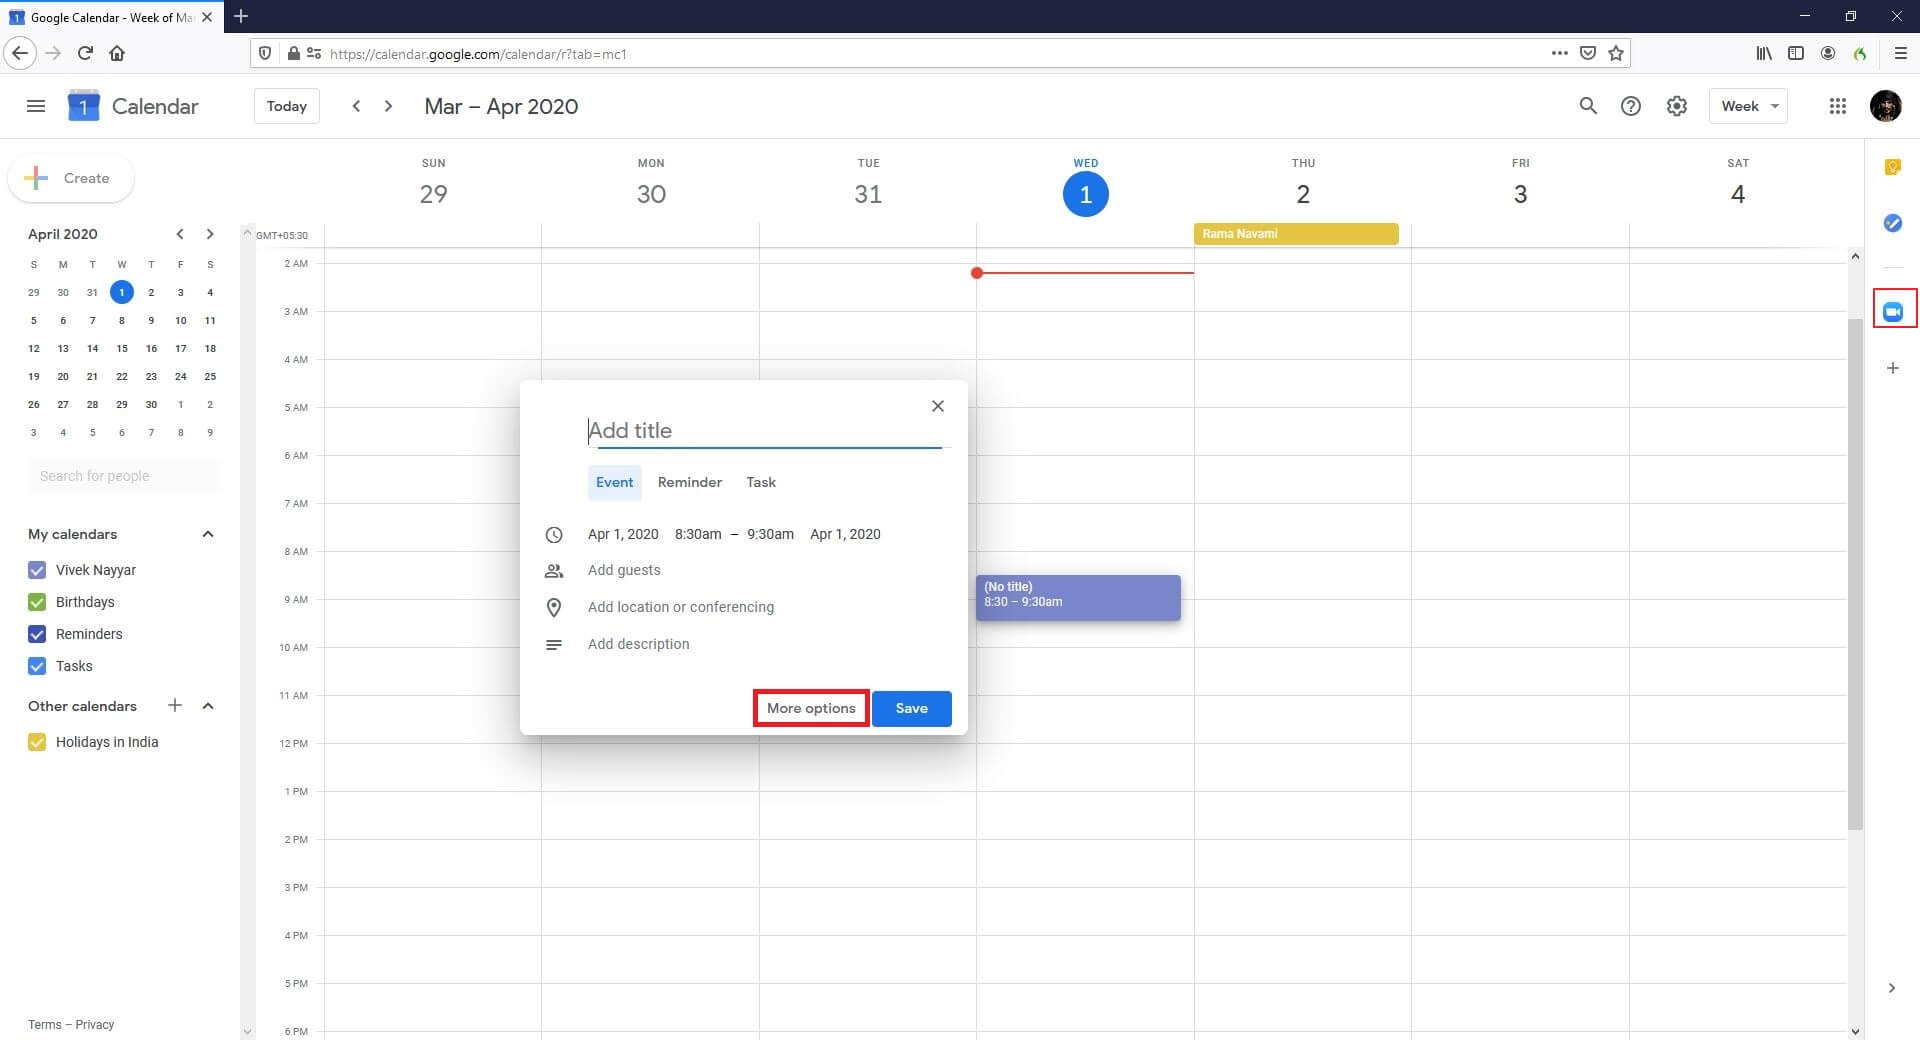
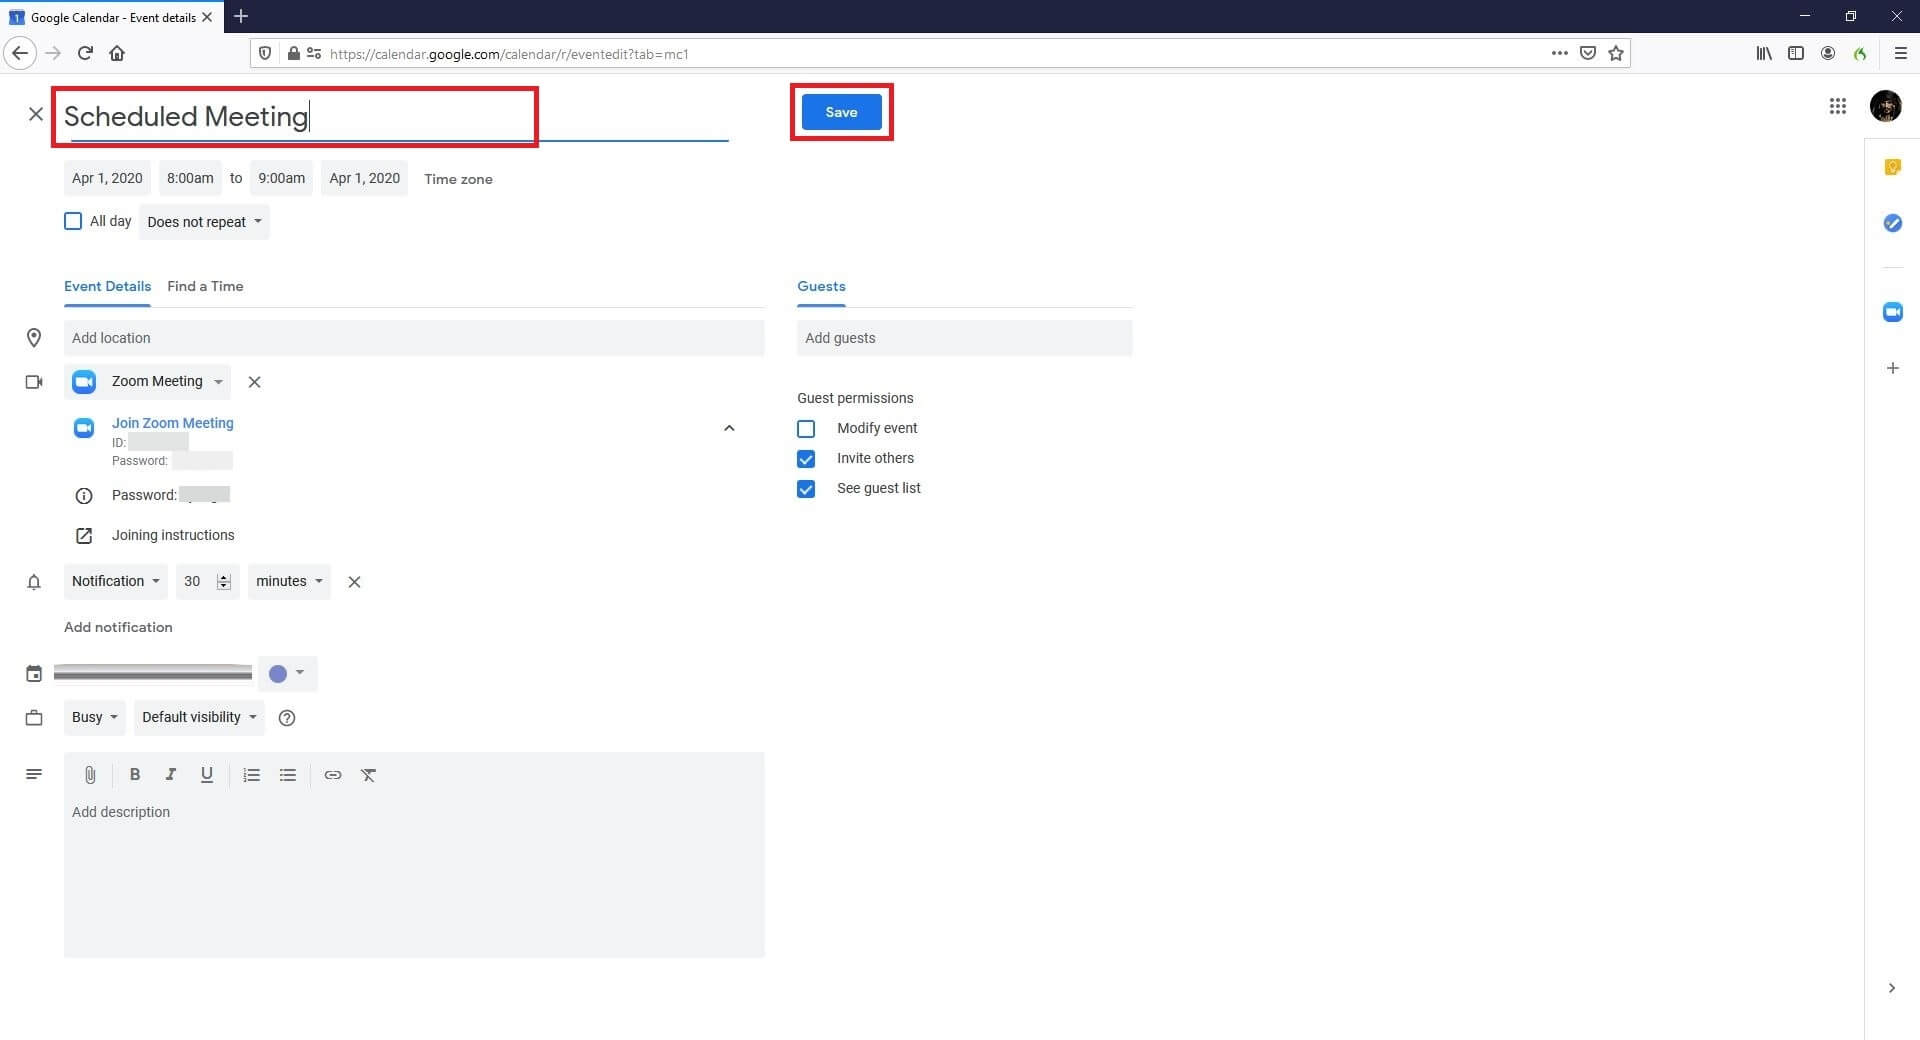
Select your preferred date in the calendar at the left, from the main window, click your preferred time slot of the day you want to host a conference, click More options from the bottom of the event creation box that comes up, select Zoom Meeting from the Add conferencing drop-down list, enter a name of the event in the Add title field at the top, and click Save.
Note: You may need to click Try again for a couple of times to successfully schedule a meeting if you see the Failed to create conference message for some reason.
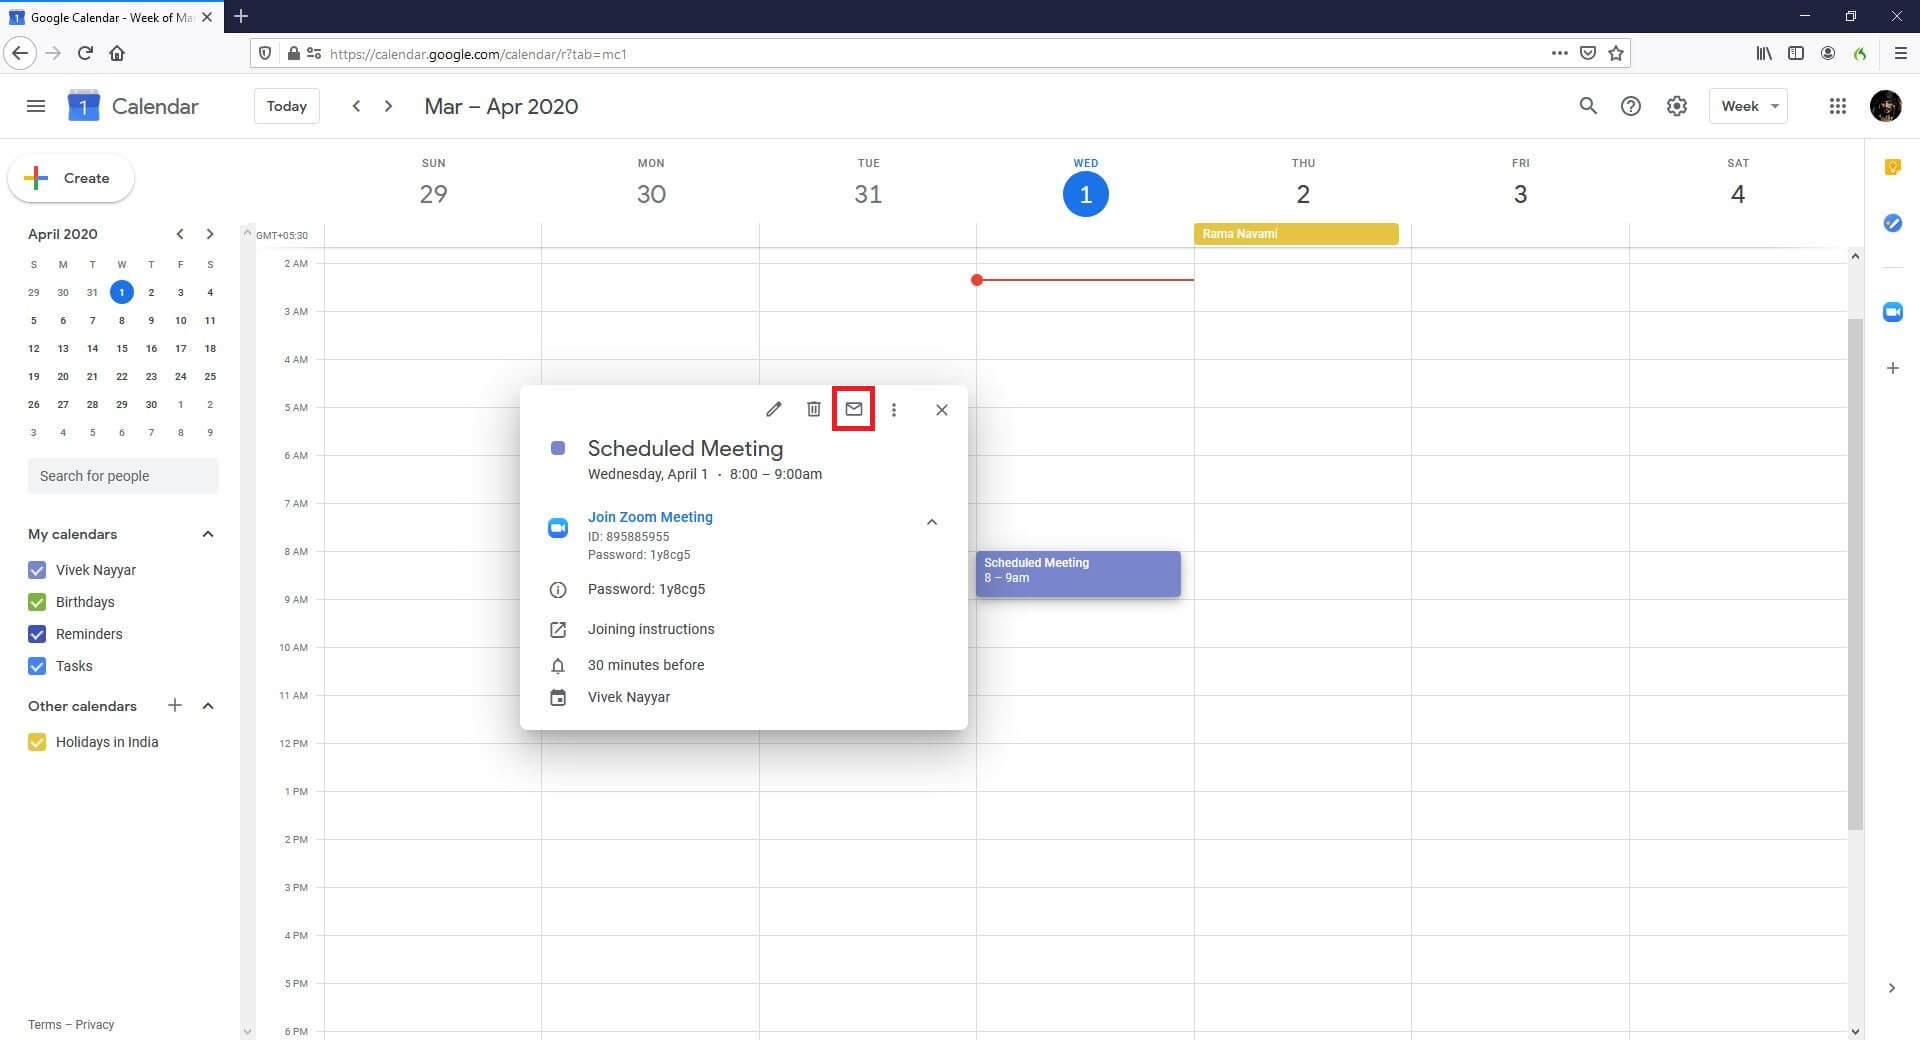
To invite participants to join the meeting, get back to Google Calendar, click the event you just created, click Joining instructions, from the tab that opens up next, copy the entire text message, get back to the Google Calendar tab, click the Mail icon from the top of the event box, paste the invitation details in the message space, and click Send from the bottom-right corner to send the mail to the recipients you want to invite to the meeting.
Part 5: How to Set Up a Zoom Meeting in Outlook
Zoom even lets you set up a meeting in Outlook. Although the desktop version of Outlook can also be used for the purpose, you must have a mapped and synced MS Exchange account to do so. Therefore, the steps given below explain how to set up a Zoom meeting in Outlook (web version):
Step 1: Install Zoom Add-in for Outlook
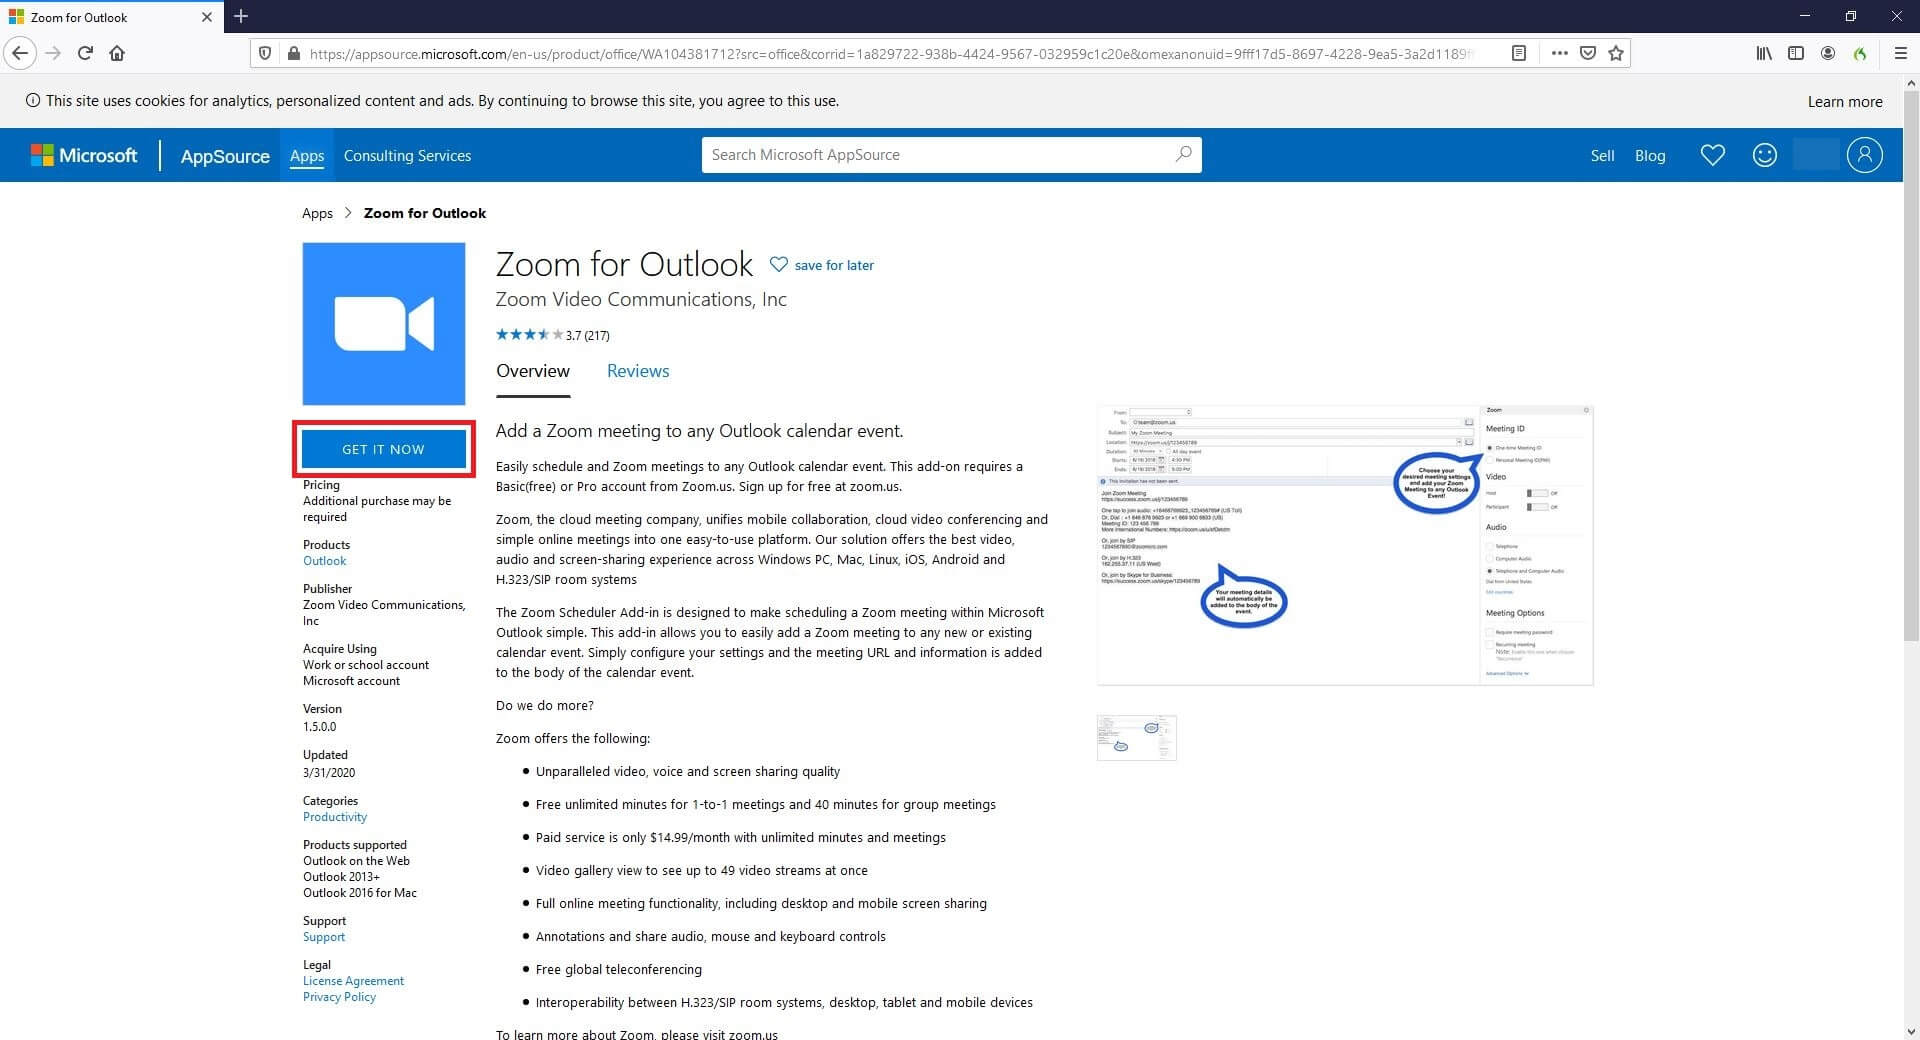
Launch your favorite web browser, click here to go to the Zoom for Outlook add-in page, click GET IT NOW from the left, and follow the on-screen instructions to sign in to your Microsoft Outlook account and install the add-in.
Step 2: Get to Event’s Calendar Box
Go to your Microsoft Outlook account using your web browser, click the Calendar icon from the bottom, on the main window, click the block representing the date you want to schedule a Zoom meeting, and click More options from the bottom-right corner of the box that pops up to go to the Calendar box.
Step 3: Schedule a Zoom Meeting
Click the More icon (with three dots aligned horizontally) from the top, go to Zoom, and click Add a Zoom Meeting. Notice how the message box automatically populates with all the information related to the invitation including the URL, meeting ID, and the joining password.
We’ve composed an article about schedule a zoom meeting on different devices, you can check it here: How to Schedule Meetings on Zoom?
Note: You may need to sign in to your Zoom account if not already done yet. You will be prompted to do so with a link present above the message box. Next, type the participants’ IDs in the Invite attendees field (the IDs must be added to your Microsoft Outlook account’s contact list before they can be added here), and click Save from the top-right corner to schedule a Zoom meeting.
Conclusion
The process of how to set up a Zoom meeting is simple, and to learn how to set up a Zoom meeting in Outlook is even simpler. However, for the latter you need to install an add-in that is freely available from the vendor’s official website. Same is the case when you want to use Google Calendar to set up and/or schedule a Zoom meeting with the participants. To conclude, being one of the cheapest solutions (i.e. free in most scenarios) for virtual business meetings and video conferences, Zoom is appreciated by almost all the corporate professionals around the globe.
Richard Bennett
Richard Bennett is a writer and a lover of all things video.
Follow @Richard Bennett
Richard Bennett
Mar 27, 2024• Proven solutions
You may need to learn how to set up a Zoom meeting when you are on a leave or are told to work from home, but still need to communicate with your colleagues in order to discuss on serious topics and/or to take import decisions.
Available for Mac, iOS, Android, Windows, and Linux platforms, Zoom lets you easily overcome the barriers of distance as the app allows free video conferencing with up to 100 participants irrespective of their geographical location. The limit of 100 participants can be increased to 300 and 1000 with the paid Business and Enterprise Plus subscription plans respectively.
Going further, this guide explains in detail how to set up a Zoom call or conference, and how to make the entire meeting session simplified and more useful by making minor adjustments to the app. Besides, you will also learn how to set up a Zoom meeting in Outlook and Google Calendar, or how to schedule Zoom meetings for the future.
- Part 1: How to Set Up Zoom Meeting
- Part 2: Tips for Better Zoom Meeting Setup
- Part 3: Schedule and Set Up a Zoom Meeting for the Future
- Part 4: How to Set Up Zoom Meetings on Google Calendar
- Part 5: Set Up a Zoom Meeting in Outlook
You may also like: 8 Best Video Conference App for Android and iPhone (Picked)
Part 1: How to Set Up Zoom Meeting
The good news is, if you are merely a participant of a Zoom meeting that has been hosted by someone else, you don’t necessarily need to download and install the app. You can join the conference by following the URL using your favorite web browser, and typing in the meeting ID and password you are provided with via email or any other method chosen by the host.
On the other hand, if it’s you who is hosting a conference (in other words, starting a conference and want to invite others to join the meeting), Zoom must be installed on your device.
You can learn how to set up a Zoom meeting right from the scratch by following the steps given below:
Step 1: Download and Install Zoom
Launch your favorite web browser (Mozilla Firefox here) on your computer (a Windows 10 PC is used here), go to https://zoom.us/download , click Download, and follow the on-screen instructions to download Zoom to your local hard drive. Post this, use the ZoomInstaller.exe file to install the program, and then proceed to the next step.
Step 2: Launch Zoom and Sign Up
Double-click the Zoom shortcut icon on the desktop, click Sign In, and use any of the options given in the right section of the next box to sign up for a free Zoom account. Once this is done, back on the box, enter your email address and password you signed up with in their corresponding fields in the left, and click Sign In to access your Zoom account.
Step 3: Set Up New Meeting
Click New Meeting on the main interface, wait while the app connects to the server, and optionally click Join with Computer Audio to use voice and audio during the conference.
Next, click Invite from the bottom of the screen, go to the Email tab from the top of the next box that comes up, click your email service provider (Gmail for this example), enter the email addresses of the desired participants in the To field on the email draft box, and click Send.
Note: Alternatively, you can use the Contacts tab to invite the participants who are already added in your contact list, or use the Copy URL or Copy Invitation buttons at the bottom to send the invitation manually.
As the target participants receive the mail, they can use the URL and the meeting ID and password to join the Zoom conference. During the process, they can either download the app using the link that the browser displays, or click join from your browser that appears when you click, click here, and follow along using your web browser without installing the program.
Part 2: Tips for Better Zoom Meeting Setup
Learning how to set up a Zoom meeting is fairly easy alright, but do you know that the Zoom meetings can be optimized to get the best remote discussion experience?
Following are a few tips that would help you improve the quality of the conferences, and make the visuals more professionals and/or pleasing to the eyes:
1. Mirror Effect
Enabled by default, the mirror effect lets you flip the video display that the webcam/camera of your device captures during the conference. You can enable or disable the feature by clicking the Settings icon from the top-right corner of the Zoom window (when not in a conference), selecting Video from the left pane, and checking or unchecking the Mirror my video box from the right respectively.
Want to flip or mirror your video footage after recording? Try Filmora to Flip Video Quickly and Easily.
2. Appearance Touchup
This feature makes the visuals captured by your webcam or camera less crispy. This comes in handy when you don’t want to distract other participants of the meeting with the imperfections your clothes or sleepy face have when you’re right out of the bed. You can enable or disable this function by checking or unchecking the Touch up my appearance box present in the right section of the Video category on the Settings window respectively.
3. Virtual Backgrounds
Virtual backgrounds let you hide those untidy and wrinkled bedsheets or wet towels that are usually scattered around when you’re at home. When enabled, you can choose a pleasant scene or environment that is visible to other participants during your video conferences.
To select virtual background, you can go to the Settings box, click Virtual Background category from the left pane, and choose your preferred background from the right. Zoom might take a while to download the required packs if you’re using the feature for the first time. If you’ve a physical green screen background, you can check I have a green screen, and then select the correct color for it.
Bonus: green screen is widely used in filming and TV shows, you can get more info about this magical skill in Green Screen Tutorial .
4. Prevent Screen Sharing
You can keep all the mischievous or ignorant participants from sharing their screen deliberately or accidentally while you’re discussing a serious matter. To do this, while you are in an ongoing conference, click the up-facing arrow next to the Share Screen option from the bottom of the camera window, click Advanced Sharing Options, and select the Only Host radio button from the Who can share section on the box that appears next.
5. Mute Participants
You can prevent all the participants from turning your sophisticated and professional ambiance into a fish market by muting all the of them in one go. To do this, click Manage Participants from the bottom of the camera screen during an ongoing meeting, and click Mute All from the bottom-left corner of the Participants pane that appears in the right. Alternatively, you can click the Mute button present next to each participant’s name in the Participants pane to mute them individually.
Part 3: How to Schedule and Set Up a Zoom Meeting for the Future [Desktop Client]
As a host you can even schedule a conference with Zoom. You can learn how to set up a Zoom meeting for the future by following the instructions given below:
Step 1: Get to the Schedule Meeting Box
Launch Zoom (a Windows 10 computer is used here), and click Schedule from the left section of the interface to open the Schedule meeting box.
Step 2: Schedule a Meeting
Use the Start drop-down calendar to select a future date you want to schedule a meeting on, use the adjacent box to choose your preferred time of the meeting, play with other self-explanatory options to configure the meeting preferences as needed, and click Schedule from the bottom to schedule a meeting.
Step 3: Invite Participants to the Scheduled Meeting
Click Meetings from the top of the Zoom’s interface, ensure that the scheduled meeting is selected in the left pane, and click the Copy Invitation button from the right to copy the invitation URL and the meeting ID and password to the clipboard. Next, open your favorite web browser, sign in to your email account, compose an email for all the participants you want to invite, paste the copied content in the message box, and send the invitation to the recipients.
Part 4: How to Set Up Zoom Meetings on Google Calendar
In order to set up a Zoom meeting, you don’t always have to launch the program, and you can get the job done right from Google Calendar itself. However, you must have a Zoom ID, and you must also be signed in to it in order to create an event that leads to a conference.
Need to Sync Zoom meetings to your Calendar? We’ve figured out how to do that on desktop/iPhone/Android phones, you can check it here: Syncing Zoom to Your Calendar
The entire process of how to set up a Zoom meeting with Google Calendar is explained below:
Step 1: Install Zoom for GSuite Add-on
Start your favorite web browser, go to https://gsuite.google.com/marketplace/app/zoom%5Ffor%5Fgsuite/364750910244 , click Install, click CONTINUE from the bottom-right corner of the Get ready to install box that comes up next, and follow the on-screen instructions go install Zoom for GSuite on the browser.
Step 2: Launch Google Calendar and Sign In to Zoom Account
Open a new tab on your browser, sign in to your Google account (Gmail is used here for demonstration), click the Google apps icon from the top-right corner, click Calendar from the available programs, click the Zoom icon from the right most pane and sign in to your Zoom account.
Step 3: Create Event and Set Up Zoom Meeting
Select your preferred date in the calendar at the left, from the main window, click your preferred time slot of the day you want to host a conference, click More options from the bottom of the event creation box that comes up, select Zoom Meeting from the Add conferencing drop-down list, enter a name of the event in the Add title field at the top, and click Save.
Note: You may need to click Try again for a couple of times to successfully schedule a meeting if you see the Failed to create conference message for some reason.
To invite participants to join the meeting, get back to Google Calendar, click the event you just created, click Joining instructions, from the tab that opens up next, copy the entire text message, get back to the Google Calendar tab, click the Mail icon from the top of the event box, paste the invitation details in the message space, and click Send from the bottom-right corner to send the mail to the recipients you want to invite to the meeting.
Part 5: How to Set Up a Zoom Meeting in Outlook
Zoom even lets you set up a meeting in Outlook. Although the desktop version of Outlook can also be used for the purpose, you must have a mapped and synced MS Exchange account to do so. Therefore, the steps given below explain how to set up a Zoom meeting in Outlook (web version):
Step 1: Install Zoom Add-in for Outlook
Launch your favorite web browser, click here to go to the Zoom for Outlook add-in page, click GET IT NOW from the left, and follow the on-screen instructions to sign in to your Microsoft Outlook account and install the add-in.
Step 2: Get to Event’s Calendar Box
Go to your Microsoft Outlook account using your web browser, click the Calendar icon from the bottom, on the main window, click the block representing the date you want to schedule a Zoom meeting, and click More options from the bottom-right corner of the box that pops up to go to the Calendar box.
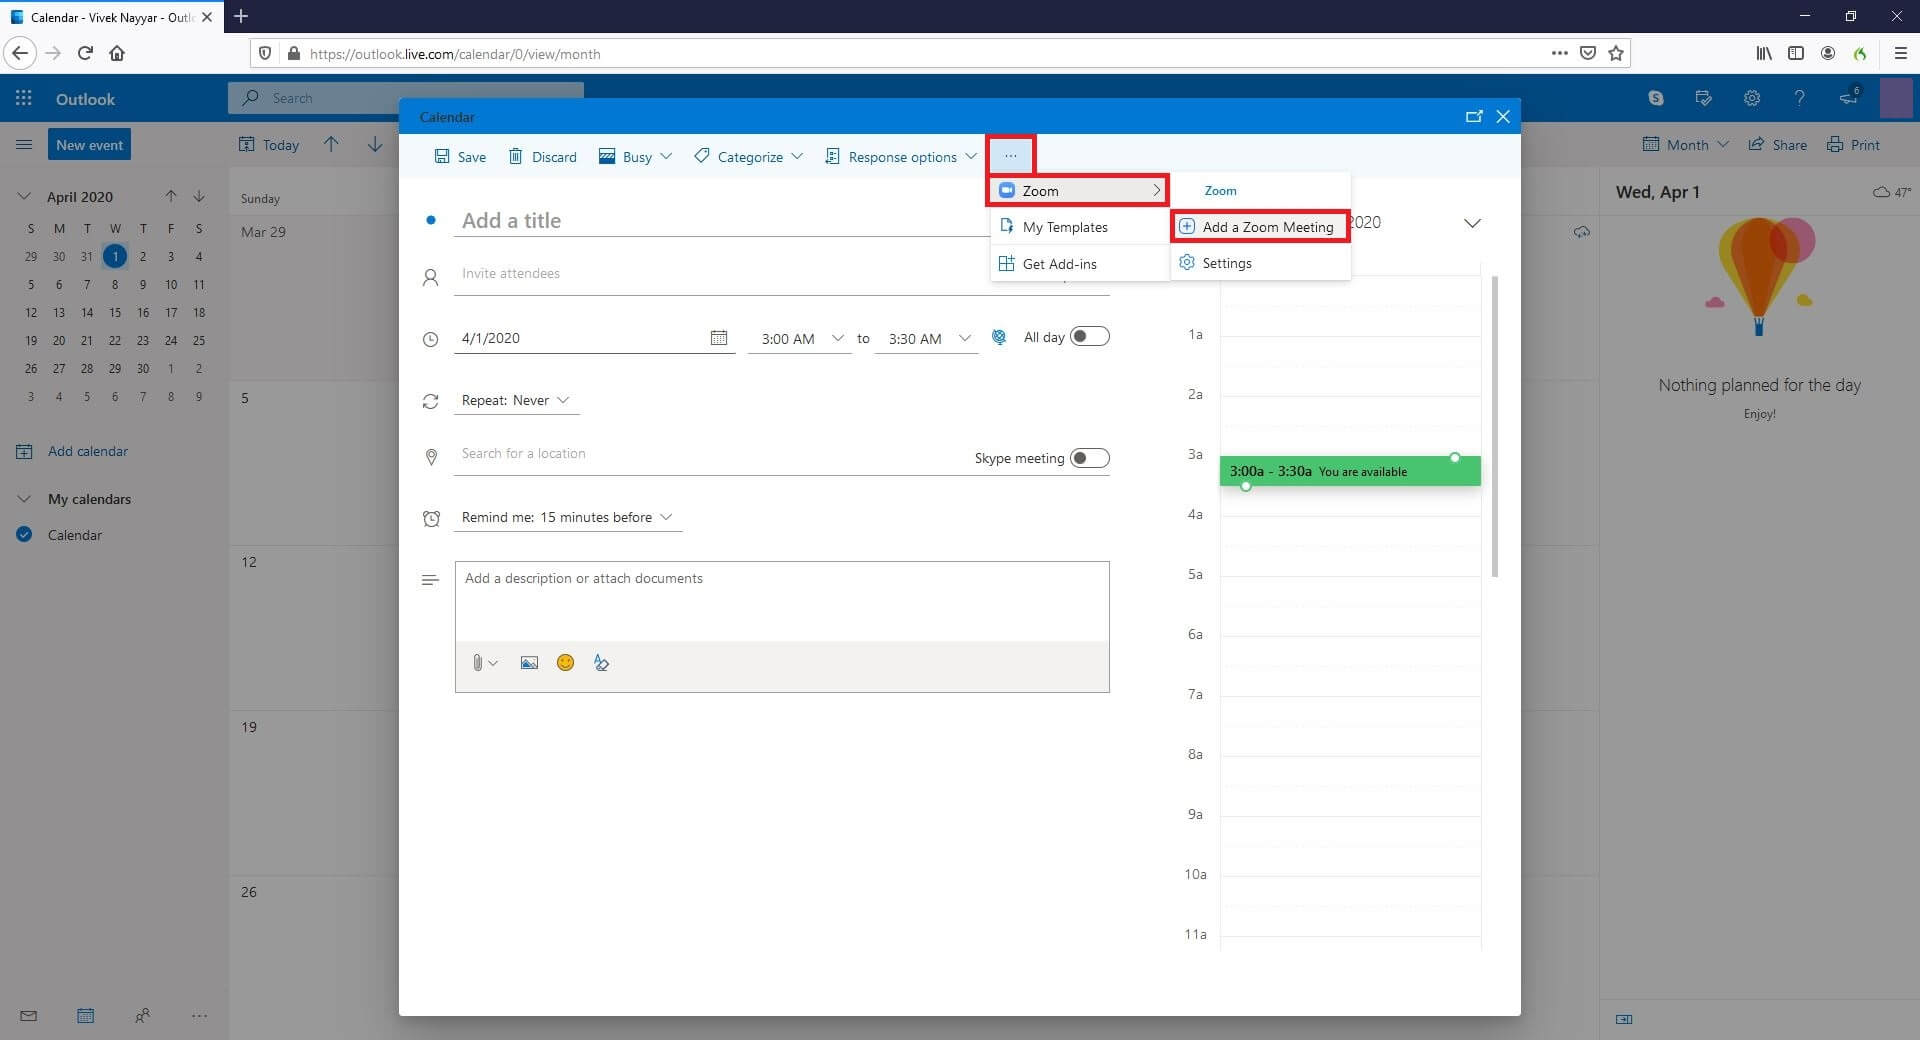
Step 3: Schedule a Zoom Meeting
Click the More icon (with three dots aligned horizontally) from the top, go to Zoom, and click Add a Zoom Meeting. Notice how the message box automatically populates with all the information related to the invitation including the URL, meeting ID, and the joining password.
We’ve composed an article about schedule a zoom meeting on different devices, you can check it here: How to Schedule Meetings on Zoom?
Note: You may need to sign in to your Zoom account if not already done yet. You will be prompted to do so with a link present above the message box. Next, type the participants’ IDs in the Invite attendees field (the IDs must be added to your Microsoft Outlook account’s contact list before they can be added here), and click Save from the top-right corner to schedule a Zoom meeting.
Conclusion
The process of how to set up a Zoom meeting is simple, and to learn how to set up a Zoom meeting in Outlook is even simpler. However, for the latter you need to install an add-in that is freely available from the vendor’s official website. Same is the case when you want to use Google Calendar to set up and/or schedule a Zoom meeting with the participants. To conclude, being one of the cheapest solutions (i.e. free in most scenarios) for virtual business meetings and video conferences, Zoom is appreciated by almost all the corporate professionals around the globe.
Richard Bennett
Richard Bennett is a writer and a lover of all things video.
Follow @Richard Bennett
Also read:
- "\"[Updated] 2024 Approved Top Choices Premier Mac Video Capture Apps\""
- "\"Rapid Routines Saving Presentations PPT-Wise for 2024\""
- "\"High-Quality Android Screen Recorders Ranked #1 to #5 for 2024\""
- "\"[Updated] Professional Analysis Full Potential of ScreenFlow for Mac for 2024\""
- "[New] Advanced Mac Recording Apps That Beat Bandicam's Offering for 2024"
- "\"Tech for Everyone Experts' Analysis\""
- "\"2024 Approved Top Picks Review Best 4K Capture Gadgets and Apps\""
- "[Updated] Detailed Steps for a Flawless PS3 Gameplay Recording Process"
- "[Updated] In 2024, The Ultimate Skype Recorder Guide"
- "\"[Updated] 2024 Approved Free Capture Precision Best Apps for Windows Desktop Recording\""
- "[Updated] New Users on the Road to Zoom Room Mastery for 2024"
- "\"[Updated] 2024 Approved The Quest for Perfect Playback APS4 Capturing Essentials for Enthusiasts\""
- "\"[Updated] Breaking Down Barriers Combining OBS with Zoom for 2024\""
- "How to Reset and Fix OBS Fullscreen Issue"
- "[New] In 2024, Exploring Screen Recording Tools Beyond Apowersoft"
- "[New] Strategies for Replaying Group Conversations for 2024"
- "\"[New] High-Definition Screenshots Best Apps for W11/W10 Users for 2024\""
- "3 Best iPad Voice Memo and Capture Software for 2024"
- "The Best iOS Alternatives to Play Timeless PSP Game Classics"
- "\"In 2024, VLC Capture A Comprehensive Recording Tutorial\""
- "\"[New] The Ultimate Guide OBS Streams to Facebook Success for 2024\""
- "[Updated] QuickCapture Ultimate Scan for 2024"
- "\"Top Picks Choosing the Ideal Screen Capture Solution - ShowMore\""
- "\"2024 Approved Quick Quota Video + Voice Mix\""
- "\"[New] Elite Selection Personal Video Replay Software (12)\""
- "[New] Top Screen Grabber Software in the Windows 10 Arena for 2024"
- "[New] Preventing Frames Gaps for Flawless Video Captures for 2024"
- "\"[New] Affordable, High-Resolution Monitors for PC & Laptop Games for 2024\""
- "In 2024, Expert's Guide to Recording MP4 Videos"
- "\"[Updated] Windows' Best Video Conferencing Apps, #2-#1\""
- "In 2024, The Ultimate Guide to Selecting Screen Recorder Software"
- "\"From Silence to Clarity Recording on Your iPhone Easy Way\""
- "\"In 2024, Saga Selection The Top 10 Best Action-Adventure Games\""
- "\"[Updated] Bandicam Revolutionizing Screen Capture for Modern Media\""
- "\"[Updated] 2024 Approved Essential Simple Shelter Strategies in MC\""
- "Unlocking the Secrets to Perfect Zoom Recordings for 2024"
- "\"[New] 2024 Approved The Best of the Best Crafting a Top 5 Racing Game Selection\""
- "[New] Advanced Tips for Accurate and Smooth HP Laptop Screen Capture for 2024"
- "\"[Updated] Optimizing Your HP Experience Expert Guide to Screen Capture\""
- "\"[New] 2024 Approved A-List Nintendo Switch Fighter Titles (Max 156)\""
- "\"[New] Leverage the Best Free Pc Sound Capturer – X-Recorder for 2024\""
- "The Ultimate Checklist for Mastering Bandicam in the New Year for 2024"
- "\"[Updated] 2024 Approved Convenient Techniques for Saving YouTube Videos\""
- "\"[New] In 2024, Scholarly Selection Pinpointing Top 10 Teaching Equipment Options\""
- "[Updated] How to Stream on YouTube & Twitch with OBS for 2024"
- New 2024 Approved Slow Down Time Using Windows Live Movie Makers Slow Motion Feature
- Xiaomi Redmi K70E Camera Not Working Unexpected Error? Fix It Now | Dr.fone
- Updated 2024 Approved AVCHD Video Editing Made Easy Top 5 Software Solutions
- How to Change your Vivo Y36i Location on Twitter | Dr.fone
- Ultimate Guide from Samsung Galaxy A54 5G FRP Bypass
- Thinking About Changing Your Netflix Region Without a VPN On Motorola Moto G13? | Dr.fone
- 2024 Approved Top 8 Speech-to-Text Tools Compatible with Windows & macOS Systems
- 2024 Approved The Cream of the Crop Top Android Apps on Google Play
- In 2024, 10 Easy-to-Use FRP Bypass Tools for Unlocking Google Accounts On Honor Magic 6
- Updated From Widescreen to Vertical The Essential Guide to Resizing Social Media Videos
- Updated The Ultimate Guide to Free VOB Video Editing Tools for 2024
- How to Successfully Bypass iCloud Activation Lock from Apple iPhone 6 Plus
- Updated 2024 Approved Enriched Sound Experience Synthesizing Audio Waves and Animating Them for Premiere Pro Audience
- New Subtle Soundscape Selection for Video Creators
- Video Editors Paradise 10 Essential Software Solutions for 2024
- Updated Mastering the Art of Video Framing for 2024
- How to Unlock Nubia Z50S Pro Phone without Any Data Loss
- How To Change Google Pixel 8 Lock Screen Password?
- Ultimate Guide to Catch the Regional-Located Pokemon For Honor Magic 6 Pro | Dr.fone
- Updated Adobe Showdown After Effects vs Premiere Pro - Which One Reigns Supreme?
- Forgot Pattern Lock? Heres How You Can Unlock Xiaomi Redmi A2 Pattern Lock Screen
- Can I recover permanently deleted photos from Sony
- Updated The Leading Free Platforms for Professional Vocal Enhancement Techniques
- New The Article Shall Offer an Overview to Create a Promising Sports Intro and Edit a YouTube Outro for a Sports Channel. There Will Also Be Three Recommended Apps to Download Background Music for Exercise
- Updated The Best Free Video Editing Tools for Chromebooks in Year for 2024
- New 2024 Approved Education Perks Get Final Cut Pro at a Fraction of the Cost
- Updated Get Your Glitch On The Best Free Online Generators and Tools for 2024
- New In 2024, Unique Vocal Plugins for Zoom The Top 6 Apps That Make Your Conversations Memorable
- New In 2024, Voice Eradication Made Simple A Comprehensive Guide to Deleting Singers From Audio Files in Audacity
- Title: Guide to Set up Zoom Meetings
- Author: Rowling
- Created at : 2024-05-19 23:33:39
- Updated at : 2024-05-20 23:33:39
- Link: https://remote-screen-capture.techidaily.com/guide-to-set-up-zoom-meetings/
- License: This work is licensed under CC BY-NC-SA 4.0.
