
In 2024, Integrating Snaps Smoothly Into Your Zoom Schedule
Integrating Snaps Smoothly Into Your Zoom Schedule
How to Use Snap Camera on Zoom?

Richard Bennett
Mar 27, 2024• Proven solutions
With the rise of zoom meetings , video collaboration has become an everyday thing for employees. Not just this, Zoom video calls are letting people feel connected to one another. However, have you thought of making your zoom collaboration a bit fun by being a potato for a while?
Constant meetings can be tremendously stressful and tedious; that’s why you should think of ways to keep everyone in sync and let them laugh a bit by applying snap camera filters on Zoom! Sounds fun, right. This article will guide you on how to use the Snap camera on Zoom. Keep reading to find out how to get Snapchat filters on Zoom.
Snap camera filters’ popularity has grown exponentially. Indeed, you won’t be adding the Snap camera to serious meetings, but you can definitely try to be a bit funny when it comes to weekly meetings. Snap Camera can be set up on any PC as a dedicated program, and you can use it while you are on a Zoom call by applying different filters, which will change your and the background appearance.
- Part 1: Getting Snap Camera App on Desktop
- Part 2: Setting up Snap Camera for Zoom Meeting
- Part 3: Applying and Changing Snapchat Filters at Zoom Meeting
- Part 4: Using Snap Cam with Third-Party inputs
- Part 5: Best Snap Camera Filters and Lens for Zoom Meetings
- Part 6: Adding Video Filters on Zoom Meeting without Snap Camera

Part 1: Download and Install Snap Camera
Snap camera works as a virtual webcam. When you enable Snap camera to Zoom, it will augment it with the lens that you select. However, before applying Snap camera filters, you will first have to download and install the Snap camera app on the computer to use it on the Zoom app.
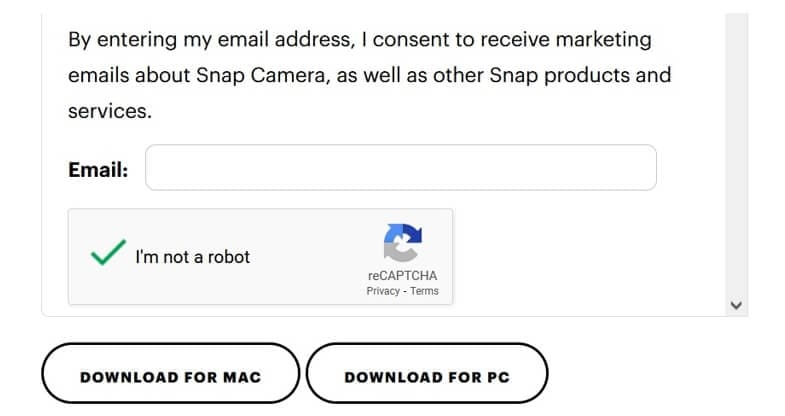
Step 1: To start using the Snap camera, click here to download it. You will see the Download for Mac and Download for PC options. Select the correct version.

Step 2: Once you download the Snap Camera, click on it and follow the instructions on screen to install and set up accordingly.
Here are the system requirements for install Snap camera:
- Operating System: Windows 10 (64-bit) or newer. If you are using Mac OS, it should be 10.11 or more recent.
- Minimum Hardware Requirement: AMD FX 4300 2.6Ghz with 4 GB RAM or Intel Core i3 2.5Ghz or higher is preferred. The graphics should be AMD Radeon HD 6450/ Nvidia GeForce 710/ Intel HD Graphics 4000. The screen resolution should be 1280x768 or higher.

WPS Office Premium ( File Recovery, Photo Scanning, Convert PDF)–Yearly
Part 2: How to Set up Snap Camera for Zoom?
To enable the Snap Camera for your Zoom video calls, you should set up them accordingly.
Step 1: Launch the Snap camera on your computer, and you will see a video stream.
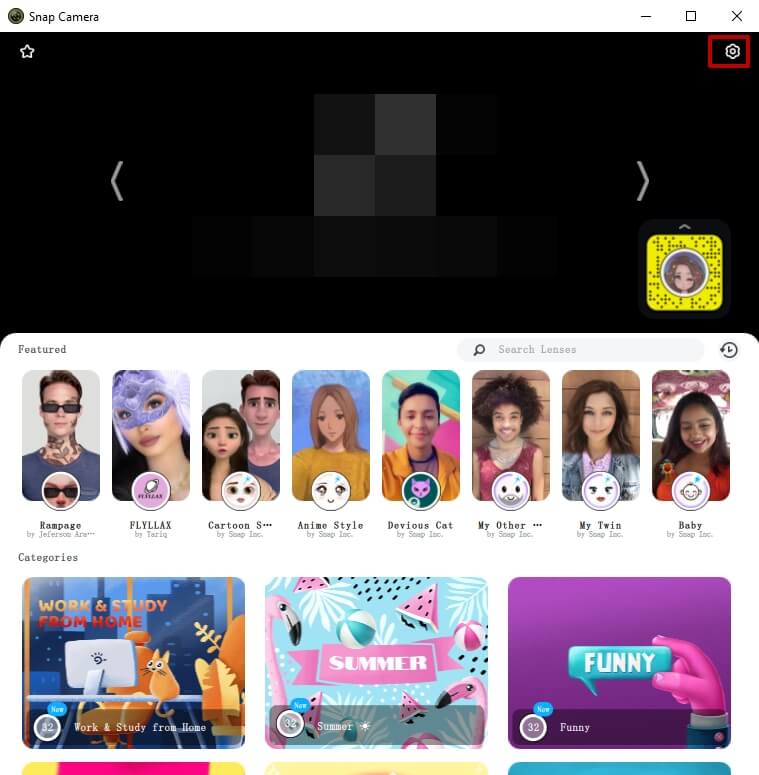
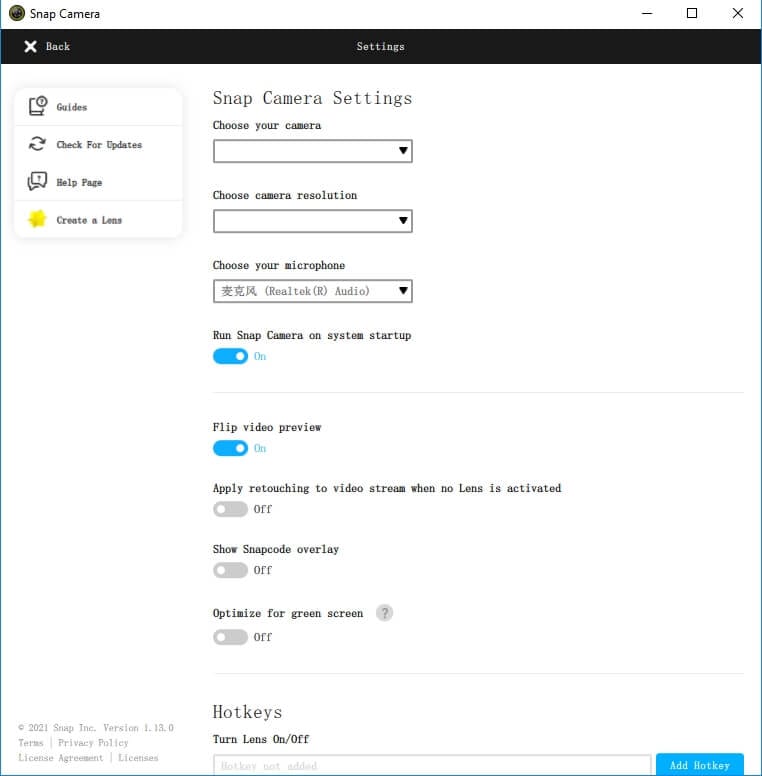
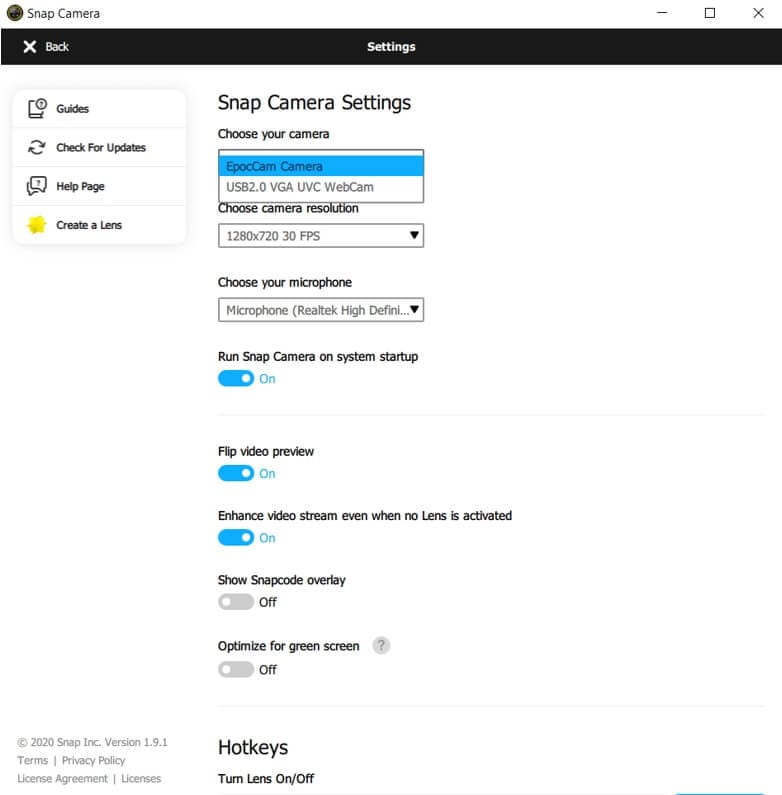
Step 2: Now, go to the Settings option (the gear symbol) and select the camera option. If you want, go ahead and alter the camera resolution.
Step 3: Now, you need to go back and select the lens that you want to use. Browse through all the community and featured lenses. There are many categories to choose from.
Step 4: After selecting the filter you want to use, launch Zoom, click the Setting icon. Go to the Video setting, under the Camera setting, select Snap Camera as the camera source. This will change the default camera to the Snap Camera. Whether you’re starting a new video meeting, or joining a Zoom meeting, you will appear with the Snap Camera lens.
Part 3: How to Apply and Change Snapchat Filters at Zoom Meeting?
Now that you have enabled Snap camera on Zoom, here are the steps that you will have to follow to change the filters and restore to your original self without using the Snapchat filter.
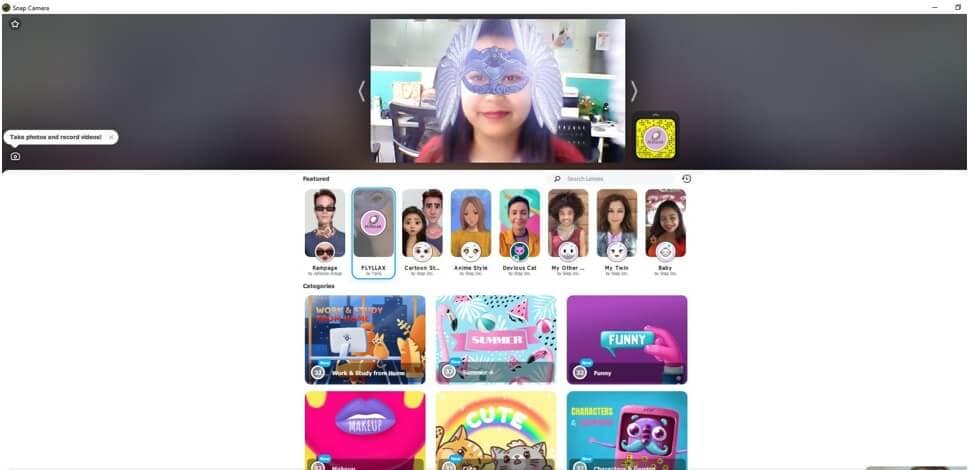
Step 1: To start your video, simply hit the Start Video option. You should be able to see yourself with the filter that you have applied.
Step 2: Snap camera has a lot of filters, and you can change it anytime. To change it, shuffle through the filters available on the Snap Camera app. Whatever filter you will select on the app will also be seen through Zoom.

Step 3: If you want to return to your normal appearance, click the filter again, and it will go away. If you want to close the Snap camera, go to Snap camera and close it.
Step 4: To restore to the original video camera source on Zoom meeting, go to your Zoom video settings, and change the source to primary camera and Snap Camera will be closed.
 CalendarBudget - Monthly subscription membership to CalendarBudget via web browser or mobile app. Support included.
 Part 4: How to Use Snap Cam with Zoom using Third-Party inputs?
If you want to use Snap Cam with Zoom using third-party inputs, such as the Iruin app and Canon EOS webcam, follow the steps below:
Step 1: Launch Snap Camera. Once you do that, you will see the default camera input.
Step 2: Now, select the settings option, which is the gear icon. It will be on the top right.
Step 3: You will see the “Choose Your Camera” option after getting into the settings page. Below will be the drop-down menu; please click on that to see all the camera input methods.
Step 4: Change the camera input to the one that you want. For example, to use Canon EOS or Iruin, you need to click on the Choose Your Camera option and select it as the camera input accordingly.
That’s about it. You have chosen the third-party camera input, which is now ready to use for Zoom meetings. One good thing about these third-party utilities is that they provide better video resolution.
 Allavsoft Batch Download Online Videos, Music Offline to MP4, MP3, MOV, etc format
Part 5: Best Snap Camera Filters and Lens for Zoom Meetings
To make your Zoom meetings a bit funny, you can choose from a plethora of Snapchat camera filters. You can apply these lenses to your Zoom meeting and have some fun. Since there are many filters to go for, we have curated a list of the best Snap Camera filters that you can save as your favorite in the Snap Camera app. Here they are:
1. The Potato Lens

The most popular Snap Camera filter is the potato lens. Phil Walton has created this filter. Once you use it, you will find yourself underground, and your face will be replaced by a potato. However, the potato will have your eyes and mouth. To search for this filter, use the search bar and search for potato.
2. Cat Filters
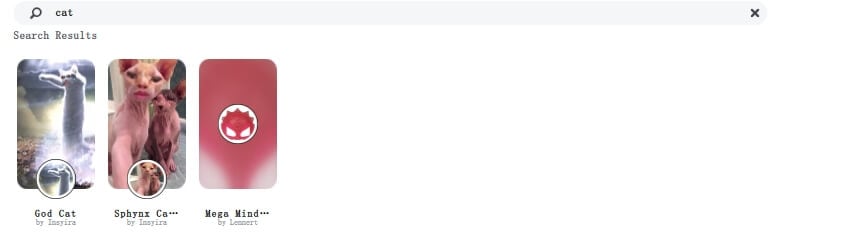
Another funny or rather an adorable filter to try is the cat filter. There is a multitude of cat filters available. You can check out the one that you like the most and try it out. This filter became popular after an awkward incident occurred during a virtual legal proceeding, where the advocate turned on the cat filter and appeared as a cat.
3. Cute Puppy Lens
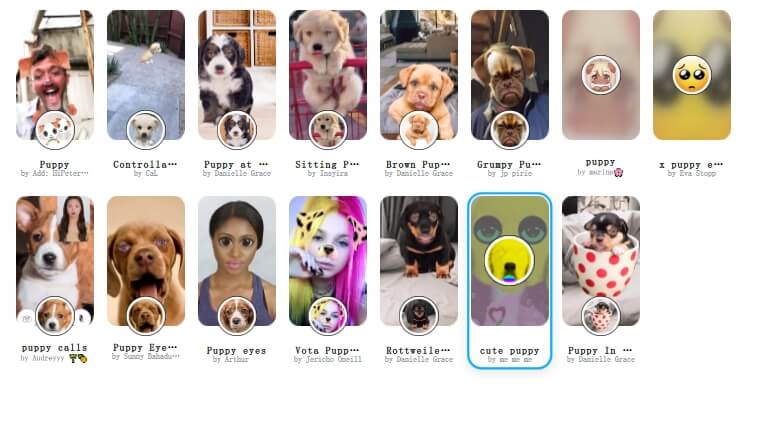
Peter Studio has created the cute puppy lens. It won’t really change you to a puppy, but the filter will add puppy ears on top of your head with an adorable puppy nose.
4. Donut Glasses Lens
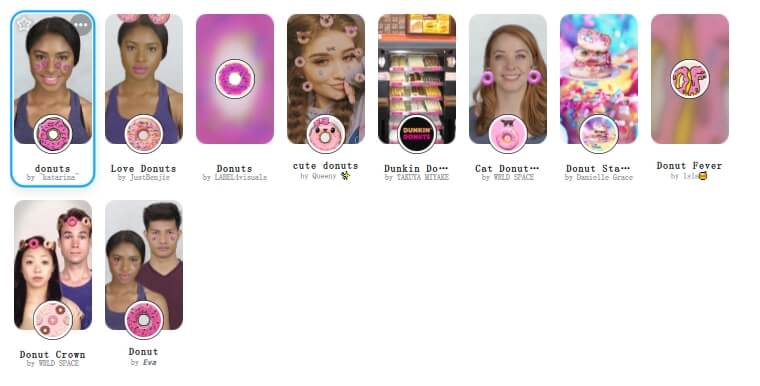
Another one that will turn any boring meeting into a daytime party is the donut glasses filter. Two donuts will appear on your eyes, and the background will change to pink frosting with yellow and green sprinkles.
5. Park at the Beach Lens
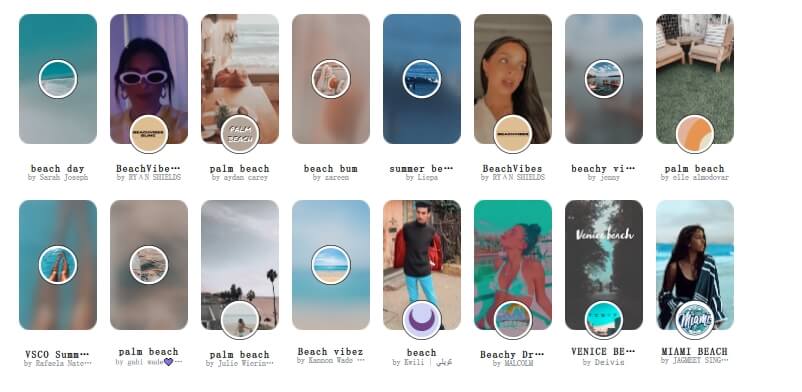
Here’s another one to try. If you are missing the beach, try the park at the beach lens. This lens is created by Pedro Cruz. It will make you look like you are at the beach.

Bonus: How to Add Video Filters on Zoom Meeting Directly?
For those who know about zoom filters and want to know how to add video filters on Zoom meetings directly, don’t worry; this article has got your back. The backgrounds will let you have enhanced webinar experiences and will also allow you to make your video look better and add some flair to it.
Follow these steps:
Step 1: Launch Zoom on your computer and sign in, and go to your profile by clicking on the profile picture.
Step 2: Now, go to the Settings option. On the left-side menu, you need to choose Background and Filters.
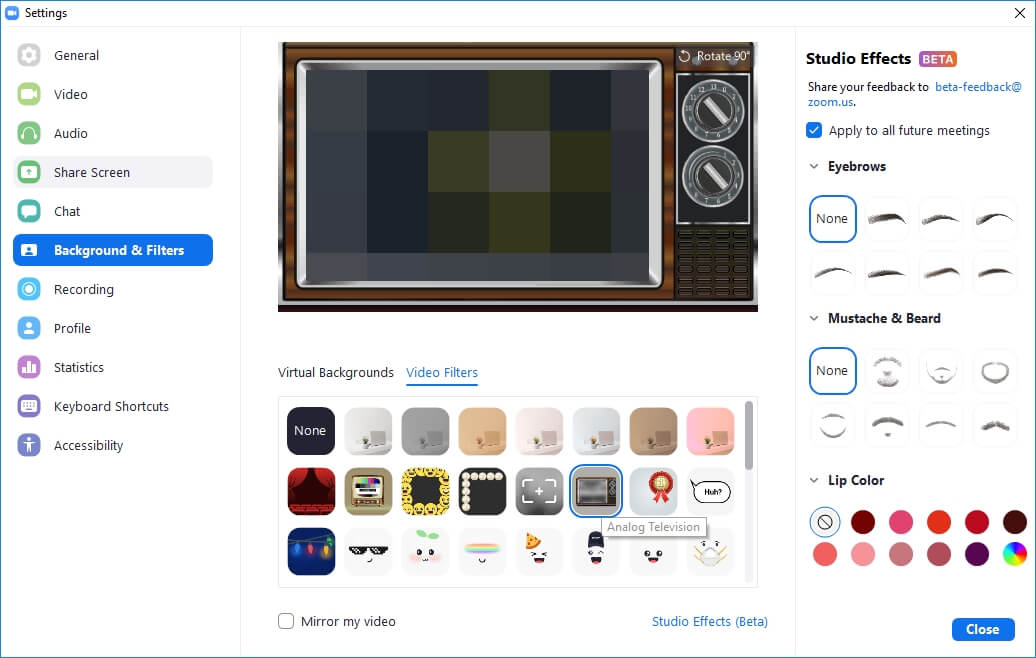
Step 3: Now, click on the Video Filters tab, and you will come across multiple filters. Click on the filter that you want to use, and that’s it.
Now you can conduct the meeting on Zoom using that video filter.
Conclusion
This is how you can use Snap Camera on Zoon. In case, Snap Camera is not working on Zoom, then try to force restart Snap Camera, ensure that your system meets the requirements to run Snap Camera, check if the webcam is turned on or not, and always choose the right webcam to enable Snap Camera. Other than that, using Snap Camera for Zoom meetings is incredibly easy, and you must try it out to add some personality to your video meetings, webinars, and video calls.
 SwifDoo PDF Perpetual (2-PC) Free upgrade. No monthly fees ever.
Richard Bennett
Richard Bennett is a writer and a lover of all things video.
Follow @Richard Bennett
Richard Bennett
Mar 27, 2024• Proven solutions
With the rise of zoom meetings , video collaboration has become an everyday thing for employees. Not just this, Zoom video calls are letting people feel connected to one another. However, have you thought of making your zoom collaboration a bit fun by being a potato for a while?
Constant meetings can be tremendously stressful and tedious; that’s why you should think of ways to keep everyone in sync and let them laugh a bit by applying snap camera filters on Zoom! Sounds fun, right. This article will guide you on how to use the Snap camera on Zoom. Keep reading to find out how to get Snapchat filters on Zoom.
Snap camera filters’ popularity has grown exponentially. Indeed, you won’t be adding the Snap camera to serious meetings, but you can definitely try to be a bit funny when it comes to weekly meetings. Snap Camera can be set up on any PC as a dedicated program, and you can use it while you are on a Zoom call by applying different filters, which will change your and the background appearance.
- Part 1: Getting Snap Camera App on Desktop
- Part 2: Setting up Snap Camera for Zoom Meeting
- Part 3: Applying and Changing Snapchat Filters at Zoom Meeting
- Part 4: Using Snap Cam with Third-Party inputs
- Part 5: Best Snap Camera Filters and Lens for Zoom Meetings
- Part 6: Adding Video Filters on Zoom Meeting without Snap Camera


Part 1: Download and Install Snap Camera
Snap camera works as a virtual webcam. When you enable Snap camera to Zoom, it will augment it with the lens that you select. However, before applying Snap camera filters, you will first have to download and install the Snap camera app on the computer to use it on the Zoom app.
Step 1: To start using the Snap camera, click here to download it. You will see the Download for Mac and Download for PC options. Select the correct version.
Step 2: Once you download the Snap Camera, click on it and follow the instructions on screen to install and set up accordingly.
Here are the system requirements for install Snap camera:
- Operating System: Windows 10 (64-bit) or newer. If you are using Mac OS, it should be 10.11 or more recent.
- Minimum Hardware Requirement: AMD FX 4300 2.6Ghz with 4 GB RAM or Intel Core i3 2.5Ghz or higher is preferred. The graphics should be AMD Radeon HD 6450/ Nvidia GeForce 710/ Intel HD Graphics 4000. The screen resolution should be 1280x768 or higher.
Part 2: How to Set up Snap Camera for Zoom?
To enable the Snap Camera for your Zoom video calls, you should set up them accordingly.
Step 1: Launch the Snap camera on your computer, and you will see a video stream.
Step 2: Now, go to the Settings option (the gear symbol) and select the camera option. If you want, go ahead and alter the camera resolution.
Step 3: Now, you need to go back and select the lens that you want to use. Browse through all the community and featured lenses. There are many categories to choose from.
Step 4: After selecting the filter you want to use, launch Zoom, click the Setting icon. Go to the Video setting, under the Camera setting, select Snap Camera as the camera source. This will change the default camera to the Snap Camera. Whether you’re starting a new video meeting, or joining a Zoom meeting, you will appear with the Snap Camera lens.
Part 3: How to Apply and Change Snapchat Filters at Zoom Meeting?
Now that you have enabled Snap camera on Zoom, here are the steps that you will have to follow to change the filters and restore to your original self without using the Snapchat filter.
Step 1: To start your video, simply hit the Start Video option. You should be able to see yourself with the filter that you have applied.
Step 2: Snap camera has a lot of filters, and you can change it anytime. To change it, shuffle through the filters available on the Snap Camera app. Whatever filter you will select on the app will also be seen through Zoom.
 PearlMountain Image Converter
Step 3: If you want to return to your normal appearance, click the filter again, and it will go away. If you want to close the Snap camera, go to Snap camera and close it.
Step 4: To restore to the original video camera source on Zoom meeting, go to your Zoom video settings, and change the source to primary camera and Snap Camera will be closed.
Part 4: How to Use Snap Cam with Zoom using Third-Party inputs?
If you want to use Snap Cam with Zoom using third-party inputs, such as the Iruin app and Canon EOS webcam, follow the steps below:
Step 1: Launch Snap Camera. Once you do that, you will see the default camera input.
Step 2: Now, select the settings option, which is the gear icon. It will be on the top right.
Step 3: You will see the “Choose Your Camera” option after getting into the settings page. Below will be the drop-down menu; please click on that to see all the camera input methods.
Step 4: Change the camera input to the one that you want. For example, to use Canon EOS or Iruin, you need to click on the Choose Your Camera option and select it as the camera input accordingly.
That’s about it. You have chosen the third-party camera input, which is now ready to use for Zoom meetings. One good thing about these third-party utilities is that they provide better video resolution.
Part 5: Best Snap Camera Filters and Lens for Zoom Meetings
To make your Zoom meetings a bit funny, you can choose from a plethora of Snapchat camera filters. You can apply these lenses to your Zoom meeting and have some fun. Since there are many filters to go for, we have curated a list of the best Snap Camera filters that you can save as your favorite in the Snap Camera app. Here they are:
1. The Potato Lens

The most popular Snap Camera filter is the potato lens. Phil Walton has created this filter. Once you use it, you will find yourself underground, and your face will be replaced by a potato. However, the potato will have your eyes and mouth. To search for this filter, use the search bar and search for potato.
2. Cat Filters
Another funny or rather an adorable filter to try is the cat filter. There is a multitude of cat filters available. You can check out the one that you like the most and try it out. This filter became popular after an awkward incident occurred during a virtual legal proceeding, where the advocate turned on the cat filter and appeared as a cat.
3. Cute Puppy Lens
 Lyric Video Creator Professional Version
Peter Studio has created the cute puppy lens. It won’t really change you to a puppy, but the filter will add puppy ears on top of your head with an adorable puppy nose.
4. Donut Glasses Lens
Another one that will turn any boring meeting into a daytime party is the donut glasses filter. Two donuts will appear on your eyes, and the background will change to pink frosting with yellow and green sprinkles.
5. Park at the Beach Lens
Here’s another one to try. If you are missing the beach, try the park at the beach lens. This lens is created by Pedro Cruz. It will make you look like you are at the beach.
Bonus: How to Add Video Filters on Zoom Meeting Directly?
For those who know about zoom filters and want to know how to add video filters on Zoom meetings directly, don’t worry; this article has got your back. The backgrounds will let you have enhanced webinar experiences and will also allow you to make your video look better and add some flair to it.
Follow these steps:
Step 1: Launch Zoom on your computer and sign in, and go to your profile by clicking on the profile picture.
Step 2: Now, go to the Settings option. On the left-side menu, you need to choose Background and Filters.
Step 3: Now, click on the Video Filters tab, and you will come across multiple filters. Click on the filter that you want to use, and that’s it.
Now you can conduct the meeting on Zoom using that video filter.
Conclusion
This is how you can use Snap Camera on Zoon. In case, Snap Camera is not working on Zoom, then try to force restart Snap Camera, ensure that your system meets the requirements to run Snap Camera, check if the webcam is turned on or not, and always choose the right webcam to enable Snap Camera. Other than that, using Snap Camera for Zoom meetings is incredibly easy, and you must try it out to add some personality to your video meetings, webinars, and video calls.

Richard Bennett
Richard Bennett is a writer and a lover of all things video.
Follow @Richard Bennett
Richard Bennett
Mar 27, 2024• Proven solutions
With the rise of zoom meetings , video collaboration has become an everyday thing for employees. Not just this, Zoom video calls are letting people feel connected to one another. However, have you thought of making your zoom collaboration a bit fun by being a potato for a while?
Constant meetings can be tremendously stressful and tedious; that’s why you should think of ways to keep everyone in sync and let them laugh a bit by applying snap camera filters on Zoom! Sounds fun, right. This article will guide you on how to use the Snap camera on Zoom. Keep reading to find out how to get Snapchat filters on Zoom.
Snap camera filters’ popularity has grown exponentially. Indeed, you won’t be adding the Snap camera to serious meetings, but you can definitely try to be a bit funny when it comes to weekly meetings. Snap Camera can be set up on any PC as a dedicated program, and you can use it while you are on a Zoom call by applying different filters, which will change your and the background appearance.
- Part 1: Getting Snap Camera App on Desktop
- Part 2: Setting up Snap Camera for Zoom Meeting
- Part 3: Applying and Changing Snapchat Filters at Zoom Meeting
- Part 4: Using Snap Cam with Third-Party inputs
- Part 5: Best Snap Camera Filters and Lens for Zoom Meetings
- Part 6: Adding Video Filters on Zoom Meeting without Snap Camera
Part 1: Download and Install Snap Camera
Snap camera works as a virtual webcam. When you enable Snap camera to Zoom, it will augment it with the lens that you select. However, before applying Snap camera filters, you will first have to download and install the Snap camera app on the computer to use it on the Zoom app.
Step 1: To start using the Snap camera, click here to download it. You will see the Download for Mac and Download for PC options. Select the correct version.
Step 2: Once you download the Snap Camera, click on it and follow the instructions on screen to install and set up accordingly.
Here are the system requirements for install Snap camera:
- Operating System: Windows 10 (64-bit) or newer. If you are using Mac OS, it should be 10.11 or more recent.
- Minimum Hardware Requirement: AMD FX 4300 2.6Ghz with 4 GB RAM or Intel Core i3 2.5Ghz or higher is preferred. The graphics should be AMD Radeon HD 6450/ Nvidia GeForce 710/ Intel HD Graphics 4000. The screen resolution should be 1280x768 or higher.
 With Screensaver Wonder you can easily make a screensaver from your own pictures and video files. Create screensavers for your own computer or create standalone, self-installing screensavers for easy sharing with your friends. Together with its sister product Screensaver Factory, Screensaver Wonder is one of the most popular screensaver software products in the world, helping thousands of users decorate their computer screens quickly and easily.
Part 2: How to Set up Snap Camera for Zoom?
To enable the Snap Camera for your Zoom video calls, you should set up them accordingly.
Step 1: Launch the Snap camera on your computer, and you will see a video stream.
 HD Video Converter Factory Pro
Step 2: Now, go to the Settings option (the gear symbol) and select the camera option. If you want, go ahead and alter the camera resolution.

Step 3: Now, you need to go back and select the lens that you want to use. Browse through all the community and featured lenses. There are many categories to choose from.
Step 4: After selecting the filter you want to use, launch Zoom, click the Setting icon. Go to the Video setting, under the Camera setting, select Snap Camera as the camera source. This will change the default camera to the Snap Camera. Whether you’re starting a new video meeting, or joining a Zoom meeting, you will appear with the Snap Camera lens.
Part 3: How to Apply and Change Snapchat Filters at Zoom Meeting?
Now that you have enabled Snap camera on Zoom, here are the steps that you will have to follow to change the filters and restore to your original self without using the Snapchat filter.
Step 1: To start your video, simply hit the Start Video option. You should be able to see yourself with the filter that you have applied.
Step 2: Snap camera has a lot of filters, and you can change it anytime. To change it, shuffle through the filters available on the Snap Camera app. Whatever filter you will select on the app will also be seen through Zoom.
Step 3: If you want to return to your normal appearance, click the filter again, and it will go away. If you want to close the Snap camera, go to Snap camera and close it.
Step 4: To restore to the original video camera source on Zoom meeting, go to your Zoom video settings, and change the source to primary camera and Snap Camera will be closed.
Part 4: How to Use Snap Cam with Zoom using Third-Party inputs?
If you want to use Snap Cam with Zoom using third-party inputs, such as the Iruin app and Canon EOS webcam, follow the steps below:
Step 1: Launch Snap Camera. Once you do that, you will see the default camera input.
Step 2: Now, select the settings option, which is the gear icon. It will be on the top right.
Step 3: You will see the “Choose Your Camera” option after getting into the settings page. Below will be the drop-down menu; please click on that to see all the camera input methods.
Step 4: Change the camera input to the one that you want. For example, to use Canon EOS or Iruin, you need to click on the Choose Your Camera option and select it as the camera input accordingly.
That’s about it. You have chosen the third-party camera input, which is now ready to use for Zoom meetings. One good thing about these third-party utilities is that they provide better video resolution.
Part 5: Best Snap Camera Filters and Lens for Zoom Meetings
To make your Zoom meetings a bit funny, you can choose from a plethora of Snapchat camera filters. You can apply these lenses to your Zoom meeting and have some fun. Since there are many filters to go for, we have curated a list of the best Snap Camera filters that you can save as your favorite in the Snap Camera app. Here they are:

1. The Potato Lens
The most popular Snap Camera filter is the potato lens. Phil Walton has created this filter. Once you use it, you will find yourself underground, and your face will be replaced by a potato. However, the potato will have your eyes and mouth. To search for this filter, use the search bar and search for potato.
2. Cat Filters
 LYRX is an easy-to-use karaoke software with the professional features karaoke hosts need to perform with precision. LYRX is karaoke show hosting software that supports all standard karaoke file types as well as HD video formats, and it’s truly fun to use.
Another funny or rather an adorable filter to try is the cat filter. There is a multitude of cat filters available. You can check out the one that you like the most and try it out. This filter became popular after an awkward incident occurred during a virtual legal proceeding, where the advocate turned on the cat filter and appeared as a cat.
3. Cute Puppy Lens
Peter Studio has created the cute puppy lens. It won’t really change you to a puppy, but the filter will add puppy ears on top of your head with an adorable puppy nose.

4. Donut Glasses Lens
 EmEditor Professional (Lifetime License, non-store app)
Another one that will turn any boring meeting into a daytime party is the donut glasses filter. Two donuts will appear on your eyes, and the background will change to pink frosting with yellow and green sprinkles.
 DEX 3 RE is Easy-To-Use DJ Mixing Software for MAC and Windows Designed for Today’s Versatile DJ.
Mix from your own library of music, iTunes or use the Pulselocker subsciprtion service for in-app access to over 44 million songs. Use with over 85 supported DJ controllers or mix with a keyboard and mouse.
DEX 3 RE is everything you need without the clutter - the perfect 2-deck mixing software solution for mobile DJs or hard-core hobbiests.
PCDJ DEX 3 RE (DJ Software for Win & MAC - Product Activation For 3 Machines)
5. Park at the Beach Lens
Here’s another one to try. If you are missing the beach, try the park at the beach lens. This lens is created by Pedro Cruz. It will make you look like you are at the beach.
Bonus: How to Add Video Filters on Zoom Meeting Directly?
For those who know about zoom filters and want to know how to add video filters on Zoom meetings directly, don’t worry; this article has got your back. The backgrounds will let you have enhanced webinar experiences and will also allow you to make your video look better and add some flair to it.
Follow these steps:
Step 1: Launch Zoom on your computer and sign in, and go to your profile by clicking on the profile picture.
Step 2: Now, go to the Settings option. On the left-side menu, you need to choose Background and Filters.
Step 3: Now, click on the Video Filters tab, and you will come across multiple filters. Click on the filter that you want to use, and that’s it.
Now you can conduct the meeting on Zoom using that video filter.
Conclusion
This is how you can use Snap Camera on Zoon. In case, Snap Camera is not working on Zoom, then try to force restart Snap Camera, ensure that your system meets the requirements to run Snap Camera, check if the webcam is turned on or not, and always choose the right webcam to enable Snap Camera. Other than that, using Snap Camera for Zoom meetings is incredibly easy, and you must try it out to add some personality to your video meetings, webinars, and video calls.
Richard Bennett
Richard Bennett is a writer and a lover of all things video.
Follow @Richard Bennett
Richard Bennett
Mar 27, 2024• Proven solutions
With the rise of zoom meetings , video collaboration has become an everyday thing for employees. Not just this, Zoom video calls are letting people feel connected to one another. However, have you thought of making your zoom collaboration a bit fun by being a potato for a while?
Constant meetings can be tremendously stressful and tedious; that’s why you should think of ways to keep everyone in sync and let them laugh a bit by applying snap camera filters on Zoom! Sounds fun, right. This article will guide you on how to use the Snap camera on Zoom. Keep reading to find out how to get Snapchat filters on Zoom.
Snap camera filters’ popularity has grown exponentially. Indeed, you won’t be adding the Snap camera to serious meetings, but you can definitely try to be a bit funny when it comes to weekly meetings. Snap Camera can be set up on any PC as a dedicated program, and you can use it while you are on a Zoom call by applying different filters, which will change your and the background appearance.
- Part 1: Getting Snap Camera App on Desktop
- Part 2: Setting up Snap Camera for Zoom Meeting
- Part 3: Applying and Changing Snapchat Filters at Zoom Meeting
- Part 4: Using Snap Cam with Third-Party inputs
- Part 5: Best Snap Camera Filters and Lens for Zoom Meetings
- Part 6: Adding Video Filters on Zoom Meeting without Snap Camera
Part 1: Download and Install Snap Camera
Snap camera works as a virtual webcam. When you enable Snap camera to Zoom, it will augment it with the lens that you select. However, before applying Snap camera filters, you will first have to download and install the Snap camera app on the computer to use it on the Zoom app.
Step 1: To start using the Snap camera, click here to download it. You will see the Download for Mac and Download for PC options. Select the correct version.
 The BootIt Collection covers multi-booting, partitioning, and disk imaging on traditional PC’s using the standard BIOS and newer PC’s using UEFI. The collection includes BootIt Bare Metal (BIBM) for standard BIOS systems and BootIt UEFI (BIU) for UEFI system.
Step 2: Once you download the Snap Camera, click on it and follow the instructions on screen to install and set up accordingly.
Here are the system requirements for install Snap camera:
- Operating System: Windows 10 (64-bit) or newer. If you are using Mac OS, it should be 10.11 or more recent.
- Minimum Hardware Requirement: AMD FX 4300 2.6Ghz with 4 GB RAM or Intel Core i3 2.5Ghz or higher is preferred. The graphics should be AMD Radeon HD 6450/ Nvidia GeForce 710/ Intel HD Graphics 4000. The screen resolution should be 1280x768 or higher.

WPS Office Premium ( File Recovery, Photo Scanning, Convert PDF)–Yearly
Part 2: How to Set up Snap Camera for Zoom?
To enable the Snap Camera for your Zoom video calls, you should set up them accordingly.
Step 1: Launch the Snap camera on your computer, and you will see a video stream.
Step 2: Now, go to the Settings option (the gear symbol) and select the camera option. If you want, go ahead and alter the camera resolution.
Step 3: Now, you need to go back and select the lens that you want to use. Browse through all the community and featured lenses. There are many categories to choose from.
Step 4: After selecting the filter you want to use, launch Zoom, click the Setting icon. Go to the Video setting, under the Camera setting, select Snap Camera as the camera source. This will change the default camera to the Snap Camera. Whether you’re starting a new video meeting, or joining a Zoom meeting, you will appear with the Snap Camera lens.
Part 3: How to Apply and Change Snapchat Filters at Zoom Meeting?
Now that you have enabled Snap camera on Zoom, here are the steps that you will have to follow to change the filters and restore to your original self without using the Snapchat filter.
Step 1: To start your video, simply hit the Start Video option. You should be able to see yourself with the filter that you have applied.
Step 2: Snap camera has a lot of filters, and you can change it anytime. To change it, shuffle through the filters available on the Snap Camera app. Whatever filter you will select on the app will also be seen through Zoom.
Step 3: If you want to return to your normal appearance, click the filter again, and it will go away. If you want to close the Snap camera, go to Snap camera and close it.
Step 4: To restore to the original video camera source on Zoom meeting, go to your Zoom video settings, and change the source to primary camera and Snap Camera will be closed.
Part 4: How to Use Snap Cam with Zoom using Third-Party inputs?
If you want to use Snap Cam with Zoom using third-party inputs, such as the Iruin app and Canon EOS webcam, follow the steps below:
Step 1: Launch Snap Camera. Once you do that, you will see the default camera input.
Step 2: Now, select the settings option, which is the gear icon. It will be on the top right.
Step 3: You will see the “Choose Your Camera” option after getting into the settings page. Below will be the drop-down menu; please click on that to see all the camera input methods.
Step 4: Change the camera input to the one that you want. For example, to use Canon EOS or Iruin, you need to click on the Choose Your Camera option and select it as the camera input accordingly.
That’s about it. You have chosen the third-party camera input, which is now ready to use for Zoom meetings. One good thing about these third-party utilities is that they provide better video resolution.
Part 5: Best Snap Camera Filters and Lens for Zoom Meetings
To make your Zoom meetings a bit funny, you can choose from a plethora of Snapchat camera filters. You can apply these lenses to your Zoom meeting and have some fun. Since there are many filters to go for, we have curated a list of the best Snap Camera filters that you can save as your favorite in the Snap Camera app. Here they are:
1. The Potato Lens
The most popular Snap Camera filter is the potato lens. Phil Walton has created this filter. Once you use it, you will find yourself underground, and your face will be replaced by a potato. However, the potato will have your eyes and mouth. To search for this filter, use the search bar and search for potato.
2. Cat Filters
Another funny or rather an adorable filter to try is the cat filter. There is a multitude of cat filters available. You can check out the one that you like the most and try it out. This filter became popular after an awkward incident occurred during a virtual legal proceeding, where the advocate turned on the cat filter and appeared as a cat.
3. Cute Puppy Lens
Peter Studio has created the cute puppy lens. It won’t really change you to a puppy, but the filter will add puppy ears on top of your head with an adorable puppy nose.
4. Donut Glasses Lens
Another one that will turn any boring meeting into a daytime party is the donut glasses filter. Two donuts will appear on your eyes, and the background will change to pink frosting with yellow and green sprinkles.
5. Park at the Beach Lens
Here’s another one to try. If you are missing the beach, try the park at the beach lens. This lens is created by Pedro Cruz. It will make you look like you are at the beach.
Bonus: How to Add Video Filters on Zoom Meeting Directly?
For those who know about zoom filters and want to know how to add video filters on Zoom meetings directly, don’t worry; this article has got your back. The backgrounds will let you have enhanced webinar experiences and will also allow you to make your video look better and add some flair to it.
Follow these steps:
Step 1: Launch Zoom on your computer and sign in, and go to your profile by clicking on the profile picture.
Step 2: Now, go to the Settings option. On the left-side menu, you need to choose Background and Filters.
Step 3: Now, click on the Video Filters tab, and you will come across multiple filters. Click on the filter that you want to use, and that’s it.
Now you can conduct the meeting on Zoom using that video filter.
Conclusion
This is how you can use Snap Camera on Zoon. In case, Snap Camera is not working on Zoom, then try to force restart Snap Camera, ensure that your system meets the requirements to run Snap Camera, check if the webcam is turned on or not, and always choose the right webcam to enable Snap Camera. Other than that, using Snap Camera for Zoom meetings is incredibly easy, and you must try it out to add some personality to your video meetings, webinars, and video calls.
Richard Bennett
Richard Bennett is a writer and a lover of all things video.
Follow @Richard Bennett
- Title: In 2024, Integrating Snaps Smoothly Into Your Zoom Schedule
- Author: Rowling
- Created at : 2024-07-21 06:50:22
- Updated at : 2024-07-22 06:50:22
- Link: https://remote-screen-capture.techidaily.com/in-2024-integrating-snaps-smoothly-into-your-zoom-schedule/
- License: This work is licensed under CC BY-NC-SA 4.0.