![[New] In 2024, Invisible Edits Ensuring Confidentiality in Media](https://thmb.techidaily.com/f6caddae96019a4142339a6d719f3ef49075dd557e8c99c8c7fa75aee528315d.jpg)
"[New] In 2024, Invisible Edits Ensuring Confidentiality in Media"
Invisible Edits: Ensuring Confidentiality in Media
How to Blur and Hide Private Information in Recorded Video

Max Wales
Mar 27, 2024• Proven solutions
Filmora Scrn is a screen recording software that is very easy to master. Still, while recording your screen, you can unintentionally record private information that you don’t want to share with the rest of the world. Wondershare’s screen recorder is equipped with tools that will enable you to blur and conceal every bit of info you don’t want others to see.
This article will take you through all the steps you need to take to hide private and sensitive info from the videos you captured using Filmora Scrn. If you are wondering why you should choose Filmora Scrn to protect your personal and sensitive information, below are the answers.
![]()

 vMix HD - Software based live production. vMix HD includes everything in vMix Basic HD plus 1000 inputs, Video List, 4 Overlay Channels, and 1 vMix Call
The All-in-One Screen Recorder & Video Editor
- Record desktop screen, voiceover, and webcam simultaneously
- Edit recorded clips quickly with a wide range of professional tools
- Built-in plentiful templates and effects
- Export to MP4, MOV, MKV, GIF and multiple formats
For Win 7 or later (64-bit)
For macOS 10.12 or later
 Secure Download
Part 1: Why Choose Filmora Scrn to Blur and Hide Private Information in a Video You Recorded?
1. One-Stop Service for Recording & Editing Videos
Besides being one of the best screen capturing computer programs for beginners in the industry, Wondershare’s Filmora Scrn also features a video editor that allows you to polish your videos immediately after the recording session without using third-party apps.
2. Record Everything on Desktop and Webcam
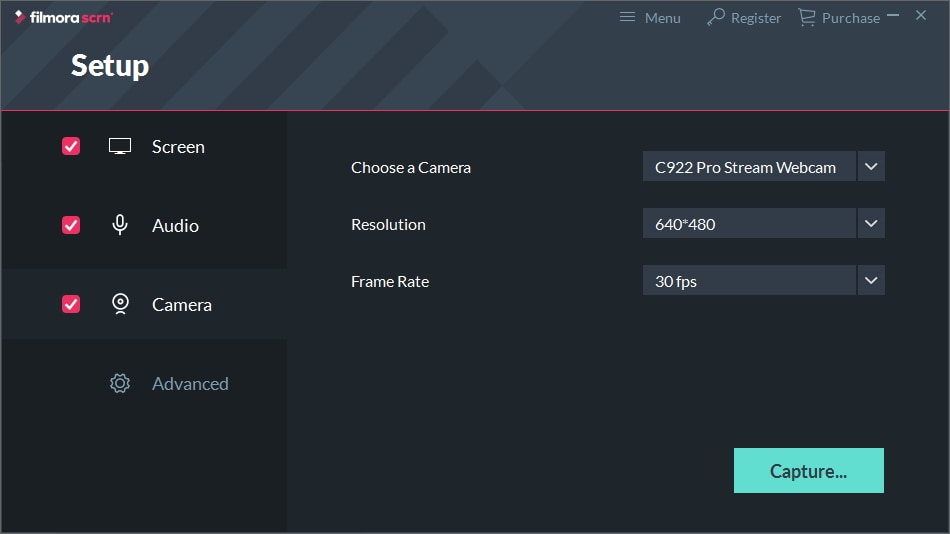
Filmora Scrn is perfectly equipped for recording all types of PIP videos that need to capture desktop activities while also recording the footage from a webcam. YouTubers and all other users of this software can feature themselves in the video. Filmora Scrn lets you capture videos with frame rates that go from 15 fps to 120 fps, and it also enables users to adjust the size of the screen area they want to capture.
Recording voice-over during the recording session, adding markers, or using HotKeys to start or pause recording sessions are just a few among the many amazing features Filmora Scrn offers.
3. Edit Video Footage with Creative Effects

All files captured with the screen recorder are displayed in the software’s video editor that allows you to trim or cut video clips, add captions, or use blending modes to merge the layers in your videos seamlessly.
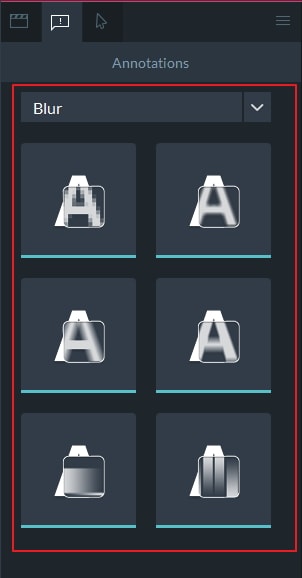
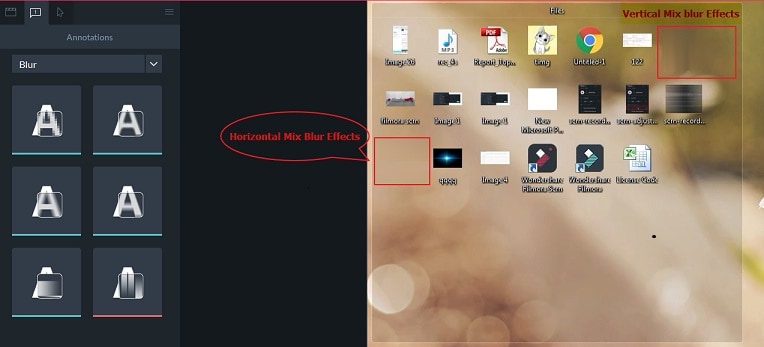
The Annotations tab lets you add captions, overlays, speech bubbles, and, most importantly, blur effects. The Mosaic, Linear, Vertical, Horizontal , Horizontal Mix, and Vertical Mix blur options are available to users who want to protect sensitive info in their screen recordings. Let’s have a look at how you can protect the privacy of the information in your screen recordings by blurring them in Filmora Scrn.
There are two extraordinary blur effects we must mention here, one is called Horizontal Mix, and the other is Vertical Mix. Words cannot express how amazing it is; let me show you some examples.
The original frame is shown below, and I want to blur and hide these two sensitive pictures (in red mark).
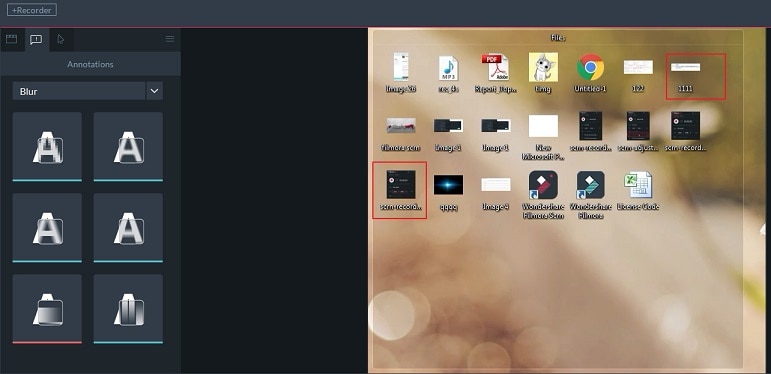
After I applied the Horizontal Mix blur and the Vertical Mix blur to these two pictures, below is what I got:


See, these two “private” pictures are hidden as if nothing were here. Do not believe the miracles? Why not follow the steps below to check it by yourself?

Part 2: How to Blur and Hide Private Information with Filmora Scrn
Hiding the identity of the people in your videos and concealing private information like bank account or telephone numbers is advised if you want to avoid any chance of misuse of these data.
Step 1. Record a video or import a video file into the editor

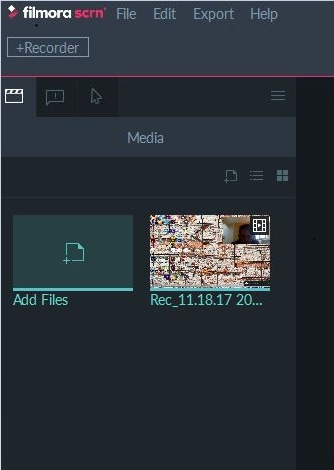
If you choose to capture a screen with the Filmora Scrn’s screen recorder, the video file you create will be automatically imported into the software’s video editor and placed into the Media Bin after the recording session is over.
Filmora Scrn’s video editor supports most video file formats, including AVI, MP4, or MOV files. If you want to add blur effects to videos that weren’t captured with Filmora Scrn, click on the Add Files icon in the editor’s Media Bin, find the video file you’d like to work on and click Open. The file you imported will be displayed in the Media Bin, so to start editing it, drag and drop it to the timeline.
Step 2. Applying the Blur Effects
After you’ve placed a video clip on the timeline, you should click on the Annotations icon next to the Media icon on the left side of the screen. Select the Blur option from the drop-down menu and proceed to select the blur effect you’d like to add to your video.
Drag the effect you like the most to the timeline or drag it to the Canvas directly, and adjust its duration by removing the effect’s end to the right.
Step 3. Tweaking the Effect’s Settings
 HD Video Converter Factory Pro
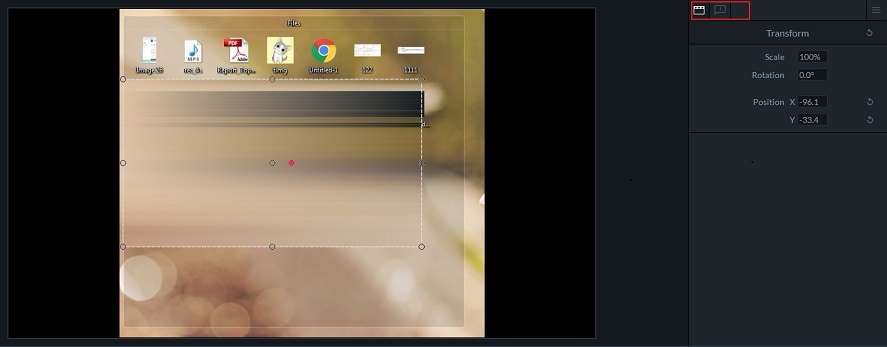
On the right side of the editor’s screen, you’ll be able to see Transform and Blur options. Use the Transform feature to place the blur effect over the area of the shot in which the sensitive info is located to hide it from the spectators. Alternatively, you can move or resize the blurred window by dragging it on the software’s preview screen.
Next to the Transform icon, you’ll be able to see the Annotations icon, click on it and proceed to adjust the blur Intensity and Opacity features. You should repeat this process as many times as necessary until all the sensitive information in your video clip is blurred.
Step 4. Export the Video
Finally, you can go ahead and click on the Export button if you’re happy with the results you achieved. Filmora Scrn lets you export your video files directly to YouTube, Vimeo, or Twitch, while you can also save your video clip to your hard drive in MP4, MOV, GIF, or MP3 file formats.
Ok, that’s it. Hope you have hidden and blurred the private info in your recorded video. Leave a comment below and let us know if it works for you perfectly.

Max Wales
Max Wales is a writer and a lover of all things video.
Follow @Max Wales
Max Wales
Mar 27, 2024• Proven solutions
Filmora Scrn is a screen recording software that is very easy to master. Still, while recording your screen, you can unintentionally record private information that you don’t want to share with the rest of the world. Wondershare’s screen recorder is equipped with tools that will enable you to blur and conceal every bit of info you don’t want others to see.
This article will take you through all the steps you need to take to hide private and sensitive info from the videos you captured using Filmora Scrn. If you are wondering why you should choose Filmora Scrn to protect your personal and sensitive information, below are the answers.
![]()
 PearlMountain Image Converter
The All-in-One Screen Recorder & Video Editor
- Record desktop screen, voiceover, and webcam simultaneously
- Edit recorded clips quickly with a wide range of professional tools
- Built-in plentiful templates and effects
- Export to MP4, MOV, MKV, GIF and multiple formats
For Win 7 or later (64-bit)
For macOS 10.12 or later
Secure Download
Part 1: Why Choose Filmora Scrn to Blur and Hide Private Information in a Video You Recorded?
1. One-Stop Service for Recording & Editing Videos
Besides being one of the best screen capturing computer programs for beginners in the industry, Wondershare’s Filmora Scrn also features a video editor that allows you to polish your videos immediately after the recording session without using third-party apps.
2. Record Everything on Desktop and Webcam
 Project Manager - Asset Browser for 3Ds Max
Filmora Scrn is perfectly equipped for recording all types of PIP videos that need to capture desktop activities while also recording the footage from a webcam. YouTubers and all other users of this software can feature themselves in the video. Filmora Scrn lets you capture videos with frame rates that go from 15 fps to 120 fps, and it also enables users to adjust the size of the screen area they want to capture.
Recording voice-over during the recording session, adding markers, or using HotKeys to start or pause recording sessions are just a few among the many amazing features Filmora Scrn offers.
3. Edit Video Footage with Creative Effects

All files captured with the screen recorder are displayed in the software’s video editor that allows you to trim or cut video clips, add captions, or use blending modes to merge the layers in your videos seamlessly.
The Annotations tab lets you add captions, overlays, speech bubbles, and, most importantly, blur effects. The Mosaic, Linear, Vertical, Horizontal , Horizontal Mix, and Vertical Mix blur options are available to users who want to protect sensitive info in their screen recordings. Let’s have a look at how you can protect the privacy of the information in your screen recordings by blurring them in Filmora Scrn.

There are two extraordinary blur effects we must mention here, one is called Horizontal Mix, and the other is Vertical Mix. Words cannot express how amazing it is; let me show you some examples.
The original frame is shown below, and I want to blur and hide these two sensitive pictures (in red mark).
After I applied the Horizontal Mix blur and the Vertical Mix blur to these two pictures, below is what I got:
See, these two “private” pictures are hidden as if nothing were here. Do not believe the miracles? Why not follow the steps below to check it by yourself?
Part 2: How to Blur and Hide Private Information with Filmora Scrn
Hiding the identity of the people in your videos and concealing private information like bank account or telephone numbers is advised if you want to avoid any chance of misuse of these data.
Step 1. Record a video or import a video file into the editor

If you choose to capture a screen with the Filmora Scrn’s screen recorder, the video file you create will be automatically imported into the software’s video editor and placed into the Media Bin after the recording session is over.
Filmora Scrn’s video editor supports most video file formats, including AVI, MP4, or MOV files. If you want to add blur effects to videos that weren’t captured with Filmora Scrn, click on the Add Files icon in the editor’s Media Bin, find the video file you’d like to work on and click Open. The file you imported will be displayed in the Media Bin, so to start editing it, drag and drop it to the timeline.
Step 2. Applying the Blur Effects
After you’ve placed a video clip on the timeline, you should click on the Annotations icon next to the Media icon on the left side of the screen. Select the Blur option from the drop-down menu and proceed to select the blur effect you’d like to add to your video.
Drag the effect you like the most to the timeline or drag it to the Canvas directly, and adjust its duration by removing the effect’s end to the right.
Step 3. Tweaking the Effect’s Settings
On the right side of the editor’s screen, you’ll be able to see Transform and Blur options. Use the Transform feature to place the blur effect over the area of the shot in which the sensitive info is located to hide it from the spectators. Alternatively, you can move or resize the blurred window by dragging it on the software’s preview screen.
Next to the Transform icon, you’ll be able to see the Annotations icon, click on it and proceed to adjust the blur Intensity and Opacity features. You should repeat this process as many times as necessary until all the sensitive information in your video clip is blurred.
Step 4. Export the Video
Finally, you can go ahead and click on the Export button if you’re happy with the results you achieved. Filmora Scrn lets you export your video files directly to YouTube, Vimeo, or Twitch, while you can also save your video clip to your hard drive in MP4, MOV, GIF, or MP3 file formats.
Ok, that’s it. Hope you have hidden and blurred the private info in your recorded video. Leave a comment below and let us know if it works for you perfectly.
Max Wales
Max Wales is a writer and a lover of all things video.
Follow @Max Wales
Max Wales
Mar 27, 2024• Proven solutions
Filmora Scrn is a screen recording software that is very easy to master. Still, while recording your screen, you can unintentionally record private information that you don’t want to share with the rest of the world. Wondershare’s screen recorder is equipped with tools that will enable you to blur and conceal every bit of info you don’t want others to see.
This article will take you through all the steps you need to take to hide private and sensitive info from the videos you captured using Filmora Scrn. If you are wondering why you should choose Filmora Scrn to protect your personal and sensitive information, below are the answers.
![]()
The All-in-One Screen Recorder & Video Editor
- Record desktop screen, voiceover, and webcam simultaneously
- Edit recorded clips quickly with a wide range of professional tools
- Built-in plentiful templates and effects
- Export to MP4, MOV, MKV, GIF and multiple formats
For Win 7 or later (64-bit)
For macOS 10.12 or later
Secure Download
Part 1: Why Choose Filmora Scrn to Blur and Hide Private Information in a Video You Recorded?
1. One-Stop Service for Recording & Editing Videos
Besides being one of the best screen capturing computer programs for beginners in the industry, Wondershare’s Filmora Scrn also features a video editor that allows you to polish your videos immediately after the recording session without using third-party apps.
2. Record Everything on Desktop and Webcam
Filmora Scrn is perfectly equipped for recording all types of PIP videos that need to capture desktop activities while also recording the footage from a webcam. YouTubers and all other users of this software can feature themselves in the video. Filmora Scrn lets you capture videos with frame rates that go from 15 fps to 120 fps, and it also enables users to adjust the size of the screen area they want to capture.
Recording voice-over during the recording session, adding markers, or using HotKeys to start or pause recording sessions are just a few among the many amazing features Filmora Scrn offers.
3. Edit Video Footage with Creative Effects
All files captured with the screen recorder are displayed in the software’s video editor that allows you to trim or cut video clips, add captions, or use blending modes to merge the layers in your videos seamlessly.
The Annotations tab lets you add captions, overlays, speech bubbles, and, most importantly, blur effects. The Mosaic, Linear, Vertical, Horizontal , Horizontal Mix, and Vertical Mix blur options are available to users who want to protect sensitive info in their screen recordings. Let’s have a look at how you can protect the privacy of the information in your screen recordings by blurring them in Filmora Scrn.
There are two extraordinary blur effects we must mention here, one is called Horizontal Mix, and the other is Vertical Mix. Words cannot express how amazing it is; let me show you some examples.
The original frame is shown below, and I want to blur and hide these two sensitive pictures (in red mark).
After I applied the Horizontal Mix blur and the Vertical Mix blur to these two pictures, below is what I got:
 ZoneAlarm Extreme Security NextGen
See, these two “private” pictures are hidden as if nothing were here. Do not believe the miracles? Why not follow the steps below to check it by yourself?
Part 2: How to Blur and Hide Private Information with Filmora Scrn
Hiding the identity of the people in your videos and concealing private information like bank account or telephone numbers is advised if you want to avoid any chance of misuse of these data.
Step 1. Record a video or import a video file into the editor
 Allavsoft Batch Download Online Videos, Music Offline to MP4, MP3, MOV, etc format

If you choose to capture a screen with the Filmora Scrn’s screen recorder, the video file you create will be automatically imported into the software’s video editor and placed into the Media Bin after the recording session is over.
Filmora Scrn’s video editor supports most video file formats, including AVI, MP4, or MOV files. If you want to add blur effects to videos that weren’t captured with Filmora Scrn, click on the Add Files icon in the editor’s Media Bin, find the video file you’d like to work on and click Open. The file you imported will be displayed in the Media Bin, so to start editing it, drag and drop it to the timeline.
Step 2. Applying the Blur Effects
After you’ve placed a video clip on the timeline, you should click on the Annotations icon next to the Media icon on the left side of the screen. Select the Blur option from the drop-down menu and proceed to select the blur effect you’d like to add to your video.
Drag the effect you like the most to the timeline or drag it to the Canvas directly, and adjust its duration by removing the effect’s end to the right.
Step 3. Tweaking the Effect’s Settings
On the right side of the editor’s screen, you’ll be able to see Transform and Blur options. Use the Transform feature to place the blur effect over the area of the shot in which the sensitive info is located to hide it from the spectators. Alternatively, you can move or resize the blurred window by dragging it on the software’s preview screen.
Next to the Transform icon, you’ll be able to see the Annotations icon, click on it and proceed to adjust the blur Intensity and Opacity features. You should repeat this process as many times as necessary until all the sensitive information in your video clip is blurred.
Step 4. Export the Video
Finally, you can go ahead and click on the Export button if you’re happy with the results you achieved. Filmora Scrn lets you export your video files directly to YouTube, Vimeo, or Twitch, while you can also save your video clip to your hard drive in MP4, MOV, GIF, or MP3 file formats.
Ok, that’s it. Hope you have hidden and blurred the private info in your recorded video. Leave a comment below and let us know if it works for you perfectly.
Max Wales
Max Wales is a writer and a lover of all things video.
Follow @Max Wales
Max Wales
Mar 27, 2024• Proven solutions
Filmora Scrn is a screen recording software that is very easy to master. Still, while recording your screen, you can unintentionally record private information that you don’t want to share with the rest of the world. Wondershare’s screen recorder is equipped with tools that will enable you to blur and conceal every bit of info you don’t want others to see.
This article will take you through all the steps you need to take to hide private and sensitive info from the videos you captured using Filmora Scrn. If you are wondering why you should choose Filmora Scrn to protect your personal and sensitive information, below are the answers.
 Greeting Card Builder
![]()
The All-in-One Screen Recorder & Video Editor
- Record desktop screen, voiceover, and webcam simultaneously
- Edit recorded clips quickly with a wide range of professional tools
- Built-in plentiful templates and effects
- Export to MP4, MOV, MKV, GIF and multiple formats
For Win 7 or later (64-bit)
For macOS 10.12 or later
Secure Download

Part 1: Why Choose Filmora Scrn to Blur and Hide Private Information in a Video You Recorded?
1. One-Stop Service for Recording & Editing Videos
Besides being one of the best screen capturing computer programs for beginners in the industry, Wondershare’s Filmora Scrn also features a video editor that allows you to polish your videos immediately after the recording session without using third-party apps.
2. Record Everything on Desktop and Webcam
Filmora Scrn is perfectly equipped for recording all types of PIP videos that need to capture desktop activities while also recording the footage from a webcam. YouTubers and all other users of this software can feature themselves in the video. Filmora Scrn lets you capture videos with frame rates that go from 15 fps to 120 fps, and it also enables users to adjust the size of the screen area they want to capture.
Recording voice-over during the recording session, adding markers, or using HotKeys to start or pause recording sessions are just a few among the many amazing features Filmora Scrn offers.
3. Edit Video Footage with Creative Effects
All files captured with the screen recorder are displayed in the software’s video editor that allows you to trim or cut video clips, add captions, or use blending modes to merge the layers in your videos seamlessly.
The Annotations tab lets you add captions, overlays, speech bubbles, and, most importantly, blur effects. The Mosaic, Linear, Vertical, Horizontal , Horizontal Mix, and Vertical Mix blur options are available to users who want to protect sensitive info in their screen recordings. Let’s have a look at how you can protect the privacy of the information in your screen recordings by blurring them in Filmora Scrn.
 PCDJ DEX 3 for Windows & MAC is the total entertainment DJ software solution, offering audio, video, and karaoke mixing ability. Automatic beat-sync, smart looping, 4 decks, DJ MIDI controller support, Karaoke Streaming and much more.
There are two extraordinary blur effects we must mention here, one is called Horizontal Mix, and the other is Vertical Mix. Words cannot express how amazing it is; let me show you some examples.
The original frame is shown below, and I want to blur and hide these two sensitive pictures (in red mark).
After I applied the Horizontal Mix blur and the Vertical Mix blur to these two pictures, below is what I got:
See, these two “private” pictures are hidden as if nothing were here. Do not believe the miracles? Why not follow the steps below to check it by yourself?
Part 2: How to Blur and Hide Private Information with Filmora Scrn
Hiding the identity of the people in your videos and concealing private information like bank account or telephone numbers is advised if you want to avoid any chance of misuse of these data.
Step 1. Record a video or import a video file into the editor

If you choose to capture a screen with the Filmora Scrn’s screen recorder, the video file you create will be automatically imported into the software’s video editor and placed into the Media Bin after the recording session is over.
Filmora Scrn’s video editor supports most video file formats, including AVI, MP4, or MOV files. If you want to add blur effects to videos that weren’t captured with Filmora Scrn, click on the Add Files icon in the editor’s Media Bin, find the video file you’d like to work on and click Open. The file you imported will be displayed in the Media Bin, so to start editing it, drag and drop it to the timeline.
Step 2. Applying the Blur Effects
After you’ve placed a video clip on the timeline, you should click on the Annotations icon next to the Media icon on the left side of the screen. Select the Blur option from the drop-down menu and proceed to select the blur effect you’d like to add to your video.
Drag the effect you like the most to the timeline or drag it to the Canvas directly, and adjust its duration by removing the effect’s end to the right.
Step 3. Tweaking the Effect’s Settings
On the right side of the editor’s screen, you’ll be able to see Transform and Blur options. Use the Transform feature to place the blur effect over the area of the shot in which the sensitive info is located to hide it from the spectators. Alternatively, you can move or resize the blurred window by dragging it on the software’s preview screen.
Next to the Transform icon, you’ll be able to see the Annotations icon, click on it and proceed to adjust the blur Intensity and Opacity features. You should repeat this process as many times as necessary until all the sensitive information in your video clip is blurred.
Step 4. Export the Video
Finally, you can go ahead and click on the Export button if you’re happy with the results you achieved. Filmora Scrn lets you export your video files directly to YouTube, Vimeo, or Twitch, while you can also save your video clip to your hard drive in MP4, MOV, GIF, or MP3 file formats.
Ok, that’s it. Hope you have hidden and blurred the private info in your recorded video. Leave a comment below and let us know if it works for you perfectly.
Max Wales
Max Wales is a writer and a lover of all things video.
Follow @Max Wales
- Title: [New] In 2024, Invisible Edits Ensuring Confidentiality in Media
- Author: Rowling
- Created at : 2024-07-21 08:35:09
- Updated at : 2024-07-22 08:35:09
- Link: https://remote-screen-capture.techidaily.com/new-in-2024-invisible-edits-ensuring-confidentiality-in-media/
- License: This work is licensed under CC BY-NC-SA 4.0.