![[New] In 2024, Merge PPT Deck with Cinematic Capabilities](https://thmb.techidaily.com/459b794516e41ca817af82c1c22066d193c455f4891dd7a8e040210befb5bf6c.jpg)
[New] In 2024, Merge PPT Deck with Cinematic Capabilities
Merge PPT Deck with Cinematic Capabilities
How to Save PowerPoint Presentation as Video on Windows and Mac OS

Max Wales
Mar 27, 2024• Proven solutions
Organizing information in a presentable way was the task Microsoft PowerPoint has performed brilliantly since the early 1990’s. However, sometimes it is not enough to arrange slides in a PowerPoint presentation, because PPT files this iconic software produces are not easily shared on social media. What’s more, saving your presentations as video files will enable you to protect them from unauthorized use and it will allow you to include them in your eLearning courses or online marketing campaigns.
That’s the reason why we decided to show you how you can save your PowerPoint presentations on 2016, 2013, 2010 and 2007 versions of PowerPoint on both Windows and Mac OS.
- Part 1:Save PowerPoint 2007 Presentations as Video on Windows OS
- Part 2: Saving a PowerPoint 2010 Presentation as a Video
- Part 3: How to Save a PowerPoint 2013 or 2016 Presentation as a video on Windows OS
- Part 4: Saving PowerPoint Presentation as video on Mac OS
![]()

The All-in-One Screen Recorder & Video Editor
- Record desktop screen, voiceover, and webcam simultaneously
- Edit recorded clips quickly with a wide range of professional tools
- Built-in plentiful templates and effects
- Export to MP4, MOV, MKV, GIF and multiple formats
For Win 7 or later (64-bit)
For macOS 10.12 or later
 Glarysoft File Recovery Pro - Helps to recover your lost file/data, even permanently deleted data.
 Secure Download
Part 1:How to Save a PowerPoint 2007 Presentation as a Video on Windows OS
All versions of the PowerPoint that were released since 2010 allow its users to save their presentations as videos, but older versions of the software are still frequently used. The process of converting a PPT file into a video file in PowerPoint 2007 may not be as simple as on the latest version of the software, but it is far from being complicated. Please note that if you have a 2013 PowerPoint and you want to save a PPT file created on the 2007 version of the software you can do so by clicking on the Create a Video option. Here’s how you can convert a PowerPoint presentation to video if you are still using PowerPoint 2007.
Before you proceed any further you’ll have to make sure that you have Windows Movie Maker installed on your PC. Afterward, you should save each slide you included in your presentation as an image file, preferably in the JPG file format. You can do this by clicking on the File menu. then opening the Save As submenu and choosing the Other Formats option.


When all the slides are saved as images, you should launch the Windows Movie Maker and import all images you previously created in PowerPoint. If you want to include narration in your PowerPoint video, you can import the audio file directly into the Windows Movie Maker and add it to your project.
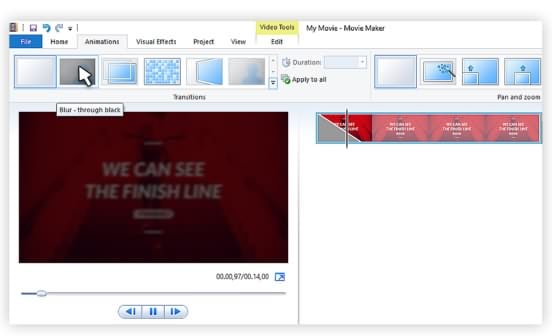
This method of saving a PowerPoint presentation as a video doesn’t allow you to keep animations, transitions or multimedia files, because you have to convert all slides into image files.
Part 2: Saving PowerPoint 2010 Presentation as Video
Unlike the previous version of the software, PowerPoint 2010 actually features an option that enables you to convert the PPT file into a video file format. Unfortunately, you can only save videos as WMV files, that have some major downsides. Be it as it may, the process of saving a PowerPoint presentation as a video on this version of the software won’t take too much of your time.
After you create a presentation, save it as you normally would. You should then proceed to insert timings or record narration if you want to add a voiceover to your PowerPoint video. Click on the File menu and locate the Save and Send feature.
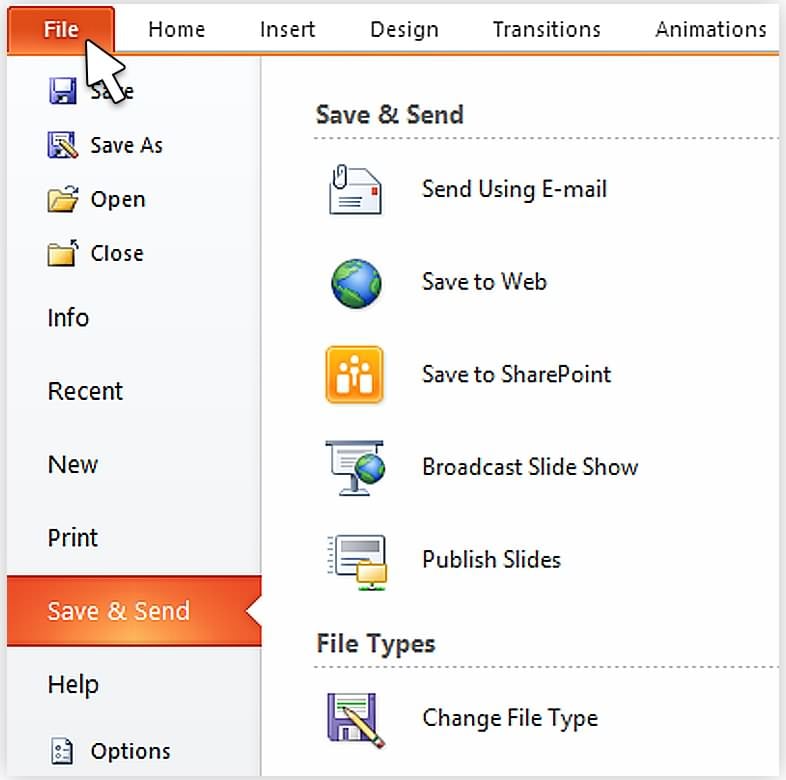
When the Save and Send menu appears on the screen you should find the Create a Video option and click on it.

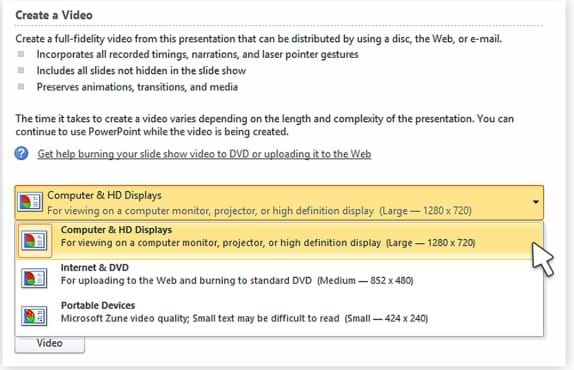
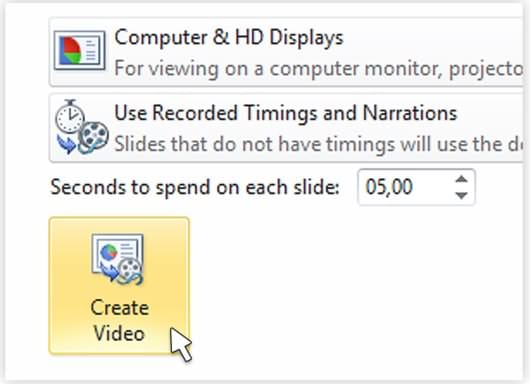
Create a Video box that contains video settings will pop up on the screen and you should click on the Computer&HD Displays option in order to adjust the size and the quality of your video.

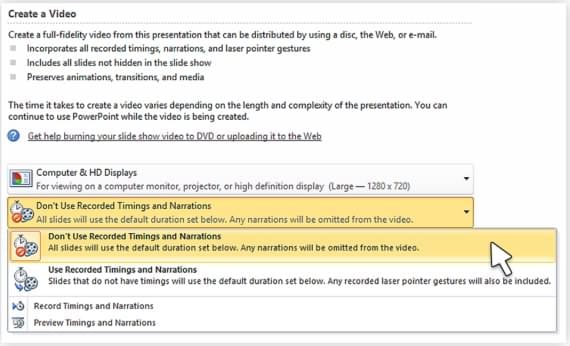
In the next step, you can switch off the default timings and narration by clicking on the Don’t Use Recorded Timings and Narration. Keep in mind that this step is only necessary if you want to adjust timings manually and use narration you recorded.
Click on the Create Video icon once you’ve made all adjustments and go ahead to select the destination on your hard drive where the video file will be saved and to insert a file name.
The conversion process will take a while, but after it is over, you’ll be able to share the PowerPoint presentation video on video sharing platforms or social media networks.
Part 3: How to Save a PowerPoint 2013 or 2016 Presentation as a video on Windows OS
The steps you’ll need to take in order to save your PPT 2013 or 2016 as a video are nearly identical to those on PowerPoint 2010. The only difference is that on recent versions of the software you can save the video in MP4 file format that is better suited for online distribution than the WMV file format. Here’s how you can convert PPT to video in PowerPoint 2013.
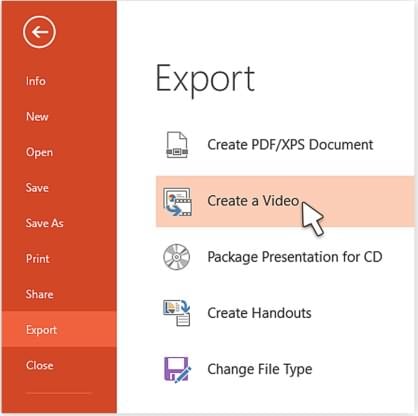
Collapse the File menu and select the Export option, then click on the Create a Video feature.
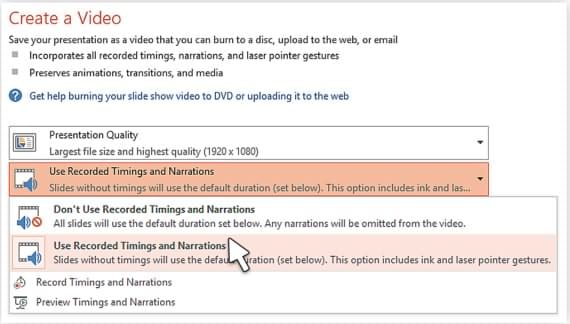
Once the Create a Video window emerges on the screen, you should click on the Computer and HD Displays option, so you can adjust the video quality and size settings.

After fine-tuning the video settings, you can proceed to click on the Use Recorded Timings and Narrations menu. If you don’t want to include narration or recorded timings in your video, you can set the duration of each slide individually with the Timings feature that is located at the bottom of the screen.
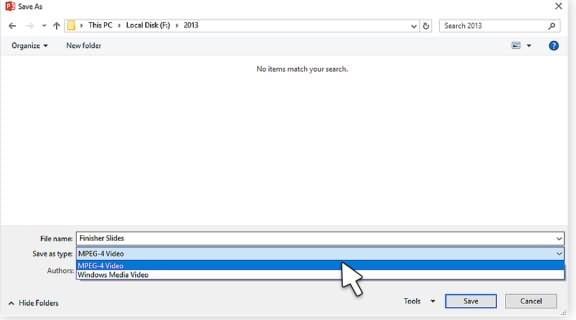
Hitting the Create a Video button will bring up the Save As window that will enable you to name the video file, select the location of the folder where the video file will be saved and choose the file format to which you want to convert the PPT file. When ready, click on the Save button to start the conversion, and that’s it, you’ve successfully turned a PPT file into a video.
Part 4: Saving PowerPoint Presentation as video on Mac OS
Mac users who want to save PPT files as videos can easily do so, but the videos they create can only be saved as .mov files that are compatible with QuickTime player and file conversion software. The Mac version of PowerPoint doesn’t allow you to include multimedia, transitions or animations in your videos, and for that reason, it is important to remove all such content from the presentation before you start the conversion process. The following steps are applicable in 2008 and 2011 PowerPoint for Mac
 The BootIt Collection covers multi-booting, partitioning, and disk imaging on traditional PC’s using the standard BIOS and newer PC’s using UEFI. The collection includes BootIt Bare Metal (BIBM) for standard BIOS systems and BootIt UEFI (BIU) for UEFI system.
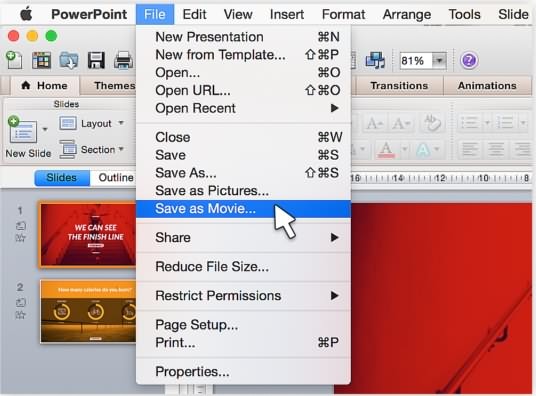
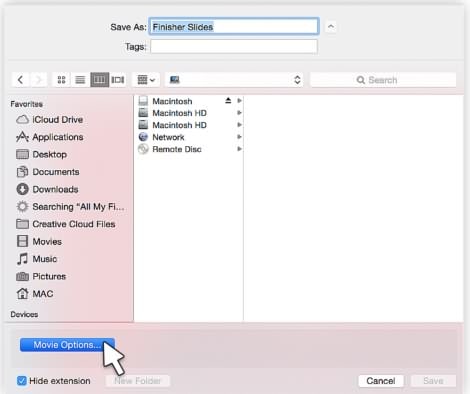
Click on the File menu and select the Save as Movie option. After the new window appears on the screen you should click on the Movie Options button, located near the bottom of the screen.
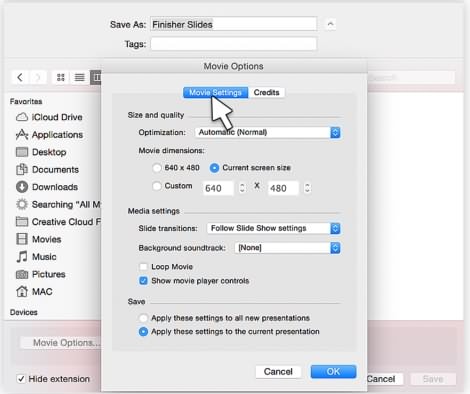
The Movie Options dialogue box will pop up, and you should click on the Movie Options icon to set slide durations, add transitions between slides, create a video loop or choose the size of the video and its quality.

Hit OK to close the Movie Options, and then click Save to convert the PPT into a video file.
Conclusion
Converting PPT files into videos is a simple process on both Mac and Windows operating systems that can help your PowerPoint presentations reach a wider audience. The limited output formats PowerPoint currently provides remain the main reason to use third-party apps such as Wondershare PPT to Video Pro that let you choose the video file format that best suits the demands of the project you’re working on.
Which method of converting PPT to video files do you like to use the most? Would you use some PPT to Video Converters to save ppt files as videos? Let us know in the comments below.

Max Wales
Max Wales is a writer and a lover of all things video.
Follow @Max Wales
Max Wales
Mar 27, 2024• Proven solutions
Organizing information in a presentable way was the task Microsoft PowerPoint has performed brilliantly since the early 1990’s. However, sometimes it is not enough to arrange slides in a PowerPoint presentation, because PPT files this iconic software produces are not easily shared on social media. What’s more, saving your presentations as video files will enable you to protect them from unauthorized use and it will allow you to include them in your eLearning courses or online marketing campaigns.
That’s the reason why we decided to show you how you can save your PowerPoint presentations on 2016, 2013, 2010 and 2007 versions of PowerPoint on both Windows and Mac OS.
- Part 1:Save PowerPoint 2007 Presentations as Video on Windows OS
- Part 2: Saving a PowerPoint 2010 Presentation as a Video
- Part 3: How to Save a PowerPoint 2013 or 2016 Presentation as a video on Windows OS
- Part 4: Saving PowerPoint Presentation as video on Mac OS
![]()

The All-in-One Screen Recorder & Video Editor
- Record desktop screen, voiceover, and webcam simultaneously
- Edit recorded clips quickly with a wide range of professional tools
- Built-in plentiful templates and effects
- Export to MP4, MOV, MKV, GIF and multiple formats
For Win 7 or later (64-bit)
For macOS 10.12 or later
Secure Download
Part 1:How to Save a PowerPoint 2007 Presentation as a Video on Windows OS
All versions of the PowerPoint that were released since 2010 allow its users to save their presentations as videos, but older versions of the software are still frequently used. The process of converting a PPT file into a video file in PowerPoint 2007 may not be as simple as on the latest version of the software, but it is far from being complicated. Please note that if you have a 2013 PowerPoint and you want to save a PPT file created on the 2007 version of the software you can do so by clicking on the Create a Video option. Here’s how you can convert a PowerPoint presentation to video if you are still using PowerPoint 2007.
Before you proceed any further you’ll have to make sure that you have Windows Movie Maker installed on your PC. Afterward, you should save each slide you included in your presentation as an image file, preferably in the JPG file format. You can do this by clicking on the File menu. then opening the Save As submenu and choosing the Other Formats option.
When all the slides are saved as images, you should launch the Windows Movie Maker and import all images you previously created in PowerPoint. If you want to include narration in your PowerPoint video, you can import the audio file directly into the Windows Movie Maker and add it to your project.
This method of saving a PowerPoint presentation as a video doesn’t allow you to keep animations, transitions or multimedia files, because you have to convert all slides into image files.
Part 2: Saving PowerPoint 2010 Presentation as Video
Unlike the previous version of the software, PowerPoint 2010 actually features an option that enables you to convert the PPT file into a video file format. Unfortunately, you can only save videos as WMV files, that have some major downsides. Be it as it may, the process of saving a PowerPoint presentation as a video on this version of the software won’t take too much of your time.
After you create a presentation, save it as you normally would. You should then proceed to insert timings or record narration if you want to add a voiceover to your PowerPoint video. Click on the File menu and locate the Save and Send feature.
When the Save and Send menu appears on the screen you should find the Create a Video option and click on it.
Create a Video box that contains video settings will pop up on the screen and you should click on the Computer&HD Displays option in order to adjust the size and the quality of your video.
In the next step, you can switch off the default timings and narration by clicking on the Don’t Use Recorded Timings and Narration. Keep in mind that this step is only necessary if you want to adjust timings manually and use narration you recorded.
Click on the Create Video icon once you’ve made all adjustments and go ahead to select the destination on your hard drive where the video file will be saved and to insert a file name.
Parental Control Software
The conversion process will take a while, but after it is over, you’ll be able to share the PowerPoint presentation video on video sharing platforms or social media networks.
Part 3: How to Save a PowerPoint 2013 or 2016 Presentation as a video on Windows OS
The steps you’ll need to take in order to save your PPT 2013 or 2016 as a video are nearly identical to those on PowerPoint 2010. The only difference is that on recent versions of the software you can save the video in MP4 file format that is better suited for online distribution than the WMV file format. Here’s how you can convert PPT to video in PowerPoint 2013.
Collapse the File menu and select the Export option, then click on the Create a Video feature.
Once the Create a Video window emerges on the screen, you should click on the Computer and HD Displays option, so you can adjust the video quality and size settings.
After fine-tuning the video settings, you can proceed to click on the Use Recorded Timings and Narrations menu. If you don’t want to include narration or recorded timings in your video, you can set the duration of each slide individually with the Timings feature that is located at the bottom of the screen.
Hitting the Create a Video button will bring up the Save As window that will enable you to name the video file, select the location of the folder where the video file will be saved and choose the file format to which you want to convert the PPT file. When ready, click on the Save button to start the conversion, and that’s it, you’ve successfully turned a PPT file into a video.
Part 4: Saving PowerPoint Presentation as video on Mac OS
Mac users who want to save PPT files as videos can easily do so, but the videos they create can only be saved as .mov files that are compatible with QuickTime player and file conversion software. The Mac version of PowerPoint doesn’t allow you to include multimedia, transitions or animations in your videos, and for that reason, it is important to remove all such content from the presentation before you start the conversion process. The following steps are applicable in 2008 and 2011 PowerPoint for Mac
Click on the File menu and select the Save as Movie option. After the new window appears on the screen you should click on the Movie Options button, located near the bottom of the screen.
The Movie Options dialogue box will pop up, and you should click on the Movie Options icon to set slide durations, add transitions between slides, create a video loop or choose the size of the video and its quality.
Hit OK to close the Movie Options, and then click Save to convert the PPT into a video file.
Conclusion
Converting PPT files into videos is a simple process on both Mac and Windows operating systems that can help your PowerPoint presentations reach a wider audience. The limited output formats PowerPoint currently provides remain the main reason to use third-party apps such as Wondershare PPT to Video Pro that let you choose the video file format that best suits the demands of the project you’re working on.
Which method of converting PPT to video files do you like to use the most? Would you use some PPT to Video Converters to save ppt files as videos? Let us know in the comments below.
Max Wales
Max Wales is a writer and a lover of all things video.
Follow @Max Wales
Max Wales
Mar 27, 2024• Proven solutions
Organizing information in a presentable way was the task Microsoft PowerPoint has performed brilliantly since the early 1990’s. However, sometimes it is not enough to arrange slides in a PowerPoint presentation, because PPT files this iconic software produces are not easily shared on social media. What’s more, saving your presentations as video files will enable you to protect them from unauthorized use and it will allow you to include them in your eLearning courses or online marketing campaigns.
That’s the reason why we decided to show you how you can save your PowerPoint presentations on 2016, 2013, 2010 and 2007 versions of PowerPoint on both Windows and Mac OS.
- Part 1:Save PowerPoint 2007 Presentations as Video on Windows OS
- Part 2: Saving a PowerPoint 2010 Presentation as a Video
- Part 3: How to Save a PowerPoint 2013 or 2016 Presentation as a video on Windows OS
- Part 4: Saving PowerPoint Presentation as video on Mac OS
![]()
The All-in-One Screen Recorder & Video Editor
- Record desktop screen, voiceover, and webcam simultaneously
- Edit recorded clips quickly with a wide range of professional tools
- Built-in plentiful templates and effects
- Export to MP4, MOV, MKV, GIF and multiple formats
For Win 7 or later (64-bit)
For macOS 10.12 or later
Secure Download
Part 1:How to Save a PowerPoint 2007 Presentation as a Video on Windows OS
All versions of the PowerPoint that were released since 2010 allow its users to save their presentations as videos, but older versions of the software are still frequently used. The process of converting a PPT file into a video file in PowerPoint 2007 may not be as simple as on the latest version of the software, but it is far from being complicated. Please note that if you have a 2013 PowerPoint and you want to save a PPT file created on the 2007 version of the software you can do so by clicking on the Create a Video option. Here’s how you can convert a PowerPoint presentation to video if you are still using PowerPoint 2007.
Before you proceed any further you’ll have to make sure that you have Windows Movie Maker installed on your PC. Afterward, you should save each slide you included in your presentation as an image file, preferably in the JPG file format. You can do this by clicking on the File menu. then opening the Save As submenu and choosing the Other Formats option.
When all the slides are saved as images, you should launch the Windows Movie Maker and import all images you previously created in PowerPoint. If you want to include narration in your PowerPoint video, you can import the audio file directly into the Windows Movie Maker and add it to your project.
This method of saving a PowerPoint presentation as a video doesn’t allow you to keep animations, transitions or multimedia files, because you have to convert all slides into image files.
Part 2: Saving PowerPoint 2010 Presentation as Video
Unlike the previous version of the software, PowerPoint 2010 actually features an option that enables you to convert the PPT file into a video file format. Unfortunately, you can only save videos as WMV files, that have some major downsides. Be it as it may, the process of saving a PowerPoint presentation as a video on this version of the software won’t take too much of your time.
After you create a presentation, save it as you normally would. You should then proceed to insert timings or record narration if you want to add a voiceover to your PowerPoint video. Click on the File menu and locate the Save and Send feature.
When the Save and Send menu appears on the screen you should find the Create a Video option and click on it.
Create a Video box that contains video settings will pop up on the screen and you should click on the Computer&HD Displays option in order to adjust the size and the quality of your video.
In the next step, you can switch off the default timings and narration by clicking on the Don’t Use Recorded Timings and Narration. Keep in mind that this step is only necessary if you want to adjust timings manually and use narration you recorded.
Click on the Create Video icon once you’ve made all adjustments and go ahead to select the destination on your hard drive where the video file will be saved and to insert a file name.
The conversion process will take a while, but after it is over, you’ll be able to share the PowerPoint presentation video on video sharing platforms or social media networks.
Part 3: How to Save a PowerPoint 2013 or 2016 Presentation as a video on Windows OS
The steps you’ll need to take in order to save your PPT 2013 or 2016 as a video are nearly identical to those on PowerPoint 2010. The only difference is that on recent versions of the software you can save the video in MP4 file format that is better suited for online distribution than the WMV file format. Here’s how you can convert PPT to video in PowerPoint 2013.
Collapse the File menu and select the Export option, then click on the Create a Video feature.
Once the Create a Video window emerges on the screen, you should click on the Computer and HD Displays option, so you can adjust the video quality and size settings.
After fine-tuning the video settings, you can proceed to click on the Use Recorded Timings and Narrations menu. If you don’t want to include narration or recorded timings in your video, you can set the duration of each slide individually with the Timings feature that is located at the bottom of the screen.
Hitting the Create a Video button will bring up the Save As window that will enable you to name the video file, select the location of the folder where the video file will be saved and choose the file format to which you want to convert the PPT file. When ready, click on the Save button to start the conversion, and that’s it, you’ve successfully turned a PPT file into a video.
Part 4: Saving PowerPoint Presentation as video on Mac OS
Mac users who want to save PPT files as videos can easily do so, but the videos they create can only be saved as .mov files that are compatible with QuickTime player and file conversion software. The Mac version of PowerPoint doesn’t allow you to include multimedia, transitions or animations in your videos, and for that reason, it is important to remove all such content from the presentation before you start the conversion process. The following steps are applicable in 2008 and 2011 PowerPoint for Mac
Click on the File menu and select the Save as Movie option. After the new window appears on the screen you should click on the Movie Options button, located near the bottom of the screen.
The Movie Options dialogue box will pop up, and you should click on the Movie Options icon to set slide durations, add transitions between slides, create a video loop or choose the size of the video and its quality.
Hit OK to close the Movie Options, and then click Save to convert the PPT into a video file.
Conclusion
Converting PPT files into videos is a simple process on both Mac and Windows operating systems that can help your PowerPoint presentations reach a wider audience. The limited output formats PowerPoint currently provides remain the main reason to use third-party apps such as Wondershare PPT to Video Pro that let you choose the video file format that best suits the demands of the project you’re working on.
Which method of converting PPT to video files do you like to use the most? Would you use some PPT to Video Converters to save ppt files as videos? Let us know in the comments below.
Max Wales
Max Wales is a writer and a lover of all things video.
Follow @Max Wales
Max Wales
Mar 27, 2024• Proven solutions
Organizing information in a presentable way was the task Microsoft PowerPoint has performed brilliantly since the early 1990’s. However, sometimes it is not enough to arrange slides in a PowerPoint presentation, because PPT files this iconic software produces are not easily shared on social media. What’s more, saving your presentations as video files will enable you to protect them from unauthorized use and it will allow you to include them in your eLearning courses or online marketing campaigns.
That’s the reason why we decided to show you how you can save your PowerPoint presentations on 2016, 2013, 2010 and 2007 versions of PowerPoint on both Windows and Mac OS.
- Part 1:Save PowerPoint 2007 Presentations as Video on Windows OS
- Part 2: Saving a PowerPoint 2010 Presentation as a Video
- Part 3: How to Save a PowerPoint 2013 or 2016 Presentation as a video on Windows OS
- Part 4: Saving PowerPoint Presentation as video on Mac OS
 PDF application, powered by AI-based OCR, for unified workflows with both digital and scanned documents.
 ![]()
The All-in-One Screen Recorder & Video Editor
- Record desktop screen, voiceover, and webcam simultaneously
- Edit recorded clips quickly with a wide range of professional tools
- Built-in plentiful templates and effects
- Export to MP4, MOV, MKV, GIF and multiple formats
For Win 7 or later (64-bit)
For macOS 10.12 or later
Secure Download
Part 1:How to Save a PowerPoint 2007 Presentation as a Video on Windows OS
All versions of the PowerPoint that were released since 2010 allow its users to save their presentations as videos, but older versions of the software are still frequently used. The process of converting a PPT file into a video file in PowerPoint 2007 may not be as simple as on the latest version of the software, but it is far from being complicated. Please note that if you have a 2013 PowerPoint and you want to save a PPT file created on the 2007 version of the software you can do so by clicking on the Create a Video option. Here’s how you can convert a PowerPoint presentation to video if you are still using PowerPoint 2007.
Before you proceed any further you’ll have to make sure that you have Windows Movie Maker installed on your PC. Afterward, you should save each slide you included in your presentation as an image file, preferably in the JPG file format. You can do this by clicking on the File menu. then opening the Save As submenu and choosing the Other Formats option.
When all the slides are saved as images, you should launch the Windows Movie Maker and import all images you previously created in PowerPoint. If you want to include narration in your PowerPoint video, you can import the audio file directly into the Windows Movie Maker and add it to your project.
 SwifDoo PDF Perpetual (2-PC) Free upgrade. No monthly fees ever.
This method of saving a PowerPoint presentation as a video doesn’t allow you to keep animations, transitions or multimedia files, because you have to convert all slides into image files.
Part 2: Saving PowerPoint 2010 Presentation as Video
Unlike the previous version of the software, PowerPoint 2010 actually features an option that enables you to convert the PPT file into a video file format. Unfortunately, you can only save videos as WMV files, that have some major downsides. Be it as it may, the process of saving a PowerPoint presentation as a video on this version of the software won’t take too much of your time.
After you create a presentation, save it as you normally would. You should then proceed to insert timings or record narration if you want to add a voiceover to your PowerPoint video. Click on the File menu and locate the Save and Send feature.

When the Save and Send menu appears on the screen you should find the Create a Video option and click on it.
Create a Video box that contains video settings will pop up on the screen and you should click on the Computer&HD Displays option in order to adjust the size and the quality of your video.
In the next step, you can switch off the default timings and narration by clicking on the Don’t Use Recorded Timings and Narration. Keep in mind that this step is only necessary if you want to adjust timings manually and use narration you recorded.
Click on the Create Video icon once you’ve made all adjustments and go ahead to select the destination on your hard drive where the video file will be saved and to insert a file name.
The conversion process will take a while, but after it is over, you’ll be able to share the PowerPoint presentation video on video sharing platforms or social media networks.
Part 3: How to Save a PowerPoint 2013 or 2016 Presentation as a video on Windows OS
The steps you’ll need to take in order to save your PPT 2013 or 2016 as a video are nearly identical to those on PowerPoint 2010. The only difference is that on recent versions of the software you can save the video in MP4 file format that is better suited for online distribution than the WMV file format. Here’s how you can convert PPT to video in PowerPoint 2013.
Collapse the File menu and select the Export option, then click on the Create a Video feature.
 Jet Profiler for MySQL, Enterprise Version: Jet Profiler for MySQL is real-time query performance and diagnostics tool for the MySQL database server. Its detailed query information, graphical interface and ease of use makes this a great tool for finding performance bottlenecks in your MySQL databases.
Once the Create a Video window emerges on the screen, you should click on the Computer and HD Displays option, so you can adjust the video quality and size settings.
After fine-tuning the video settings, you can proceed to click on the Use Recorded Timings and Narrations menu. If you don’t want to include narration or recorded timings in your video, you can set the duration of each slide individually with the Timings feature that is located at the bottom of the screen.
Hitting the Create a Video button will bring up the Save As window that will enable you to name the video file, select the location of the folder where the video file will be saved and choose the file format to which you want to convert the PPT file. When ready, click on the Save button to start the conversion, and that’s it, you’ve successfully turned a PPT file into a video.

Part 4: Saving PowerPoint Presentation as video on Mac OS
Mac users who want to save PPT files as videos can easily do so, but the videos they create can only be saved as .mov files that are compatible with QuickTime player and file conversion software. The Mac version of PowerPoint doesn’t allow you to include multimedia, transitions or animations in your videos, and for that reason, it is important to remove all such content from the presentation before you start the conversion process. The following steps are applicable in 2008 and 2011 PowerPoint for Mac
Click on the File menu and select the Save as Movie option. After the new window appears on the screen you should click on the Movie Options button, located near the bottom of the screen.
The Movie Options dialogue box will pop up, and you should click on the Movie Options icon to set slide durations, add transitions between slides, create a video loop or choose the size of the video and its quality.
Hit OK to close the Movie Options, and then click Save to convert the PPT into a video file.
Conclusion
Converting PPT files into videos is a simple process on both Mac and Windows operating systems that can help your PowerPoint presentations reach a wider audience. The limited output formats PowerPoint currently provides remain the main reason to use third-party apps such as Wondershare PPT to Video Pro that let you choose the video file format that best suits the demands of the project you’re working on.
Which method of converting PPT to video files do you like to use the most? Would you use some PPT to Video Converters to save ppt files as videos? Let us know in the comments below.
Max Wales
Max Wales is a writer and a lover of all things video.
Follow @Max Wales
- Title: [New] In 2024, Merge PPT Deck with Cinematic Capabilities
- Author: Rowling
- Created at : 2024-07-21 08:52:00
- Updated at : 2024-07-22 08:52:00
- Link: https://remote-screen-capture.techidaily.com/new-in-2024-merge-ppt-deck-with-cinematic-capabilities/
- License: This work is licensed under CC BY-NC-SA 4.0.