
"Ranking the Best Third-Place Recording Tools for iPad"
Ranking the Best Third-Place Recording Tools for iPad
Please think of the days when we were in an era where you had the facility only to listen and from various types of electronic media. You did not have the facility to store anything, and hence in due course, gradually, it faded away from your memory. Time has changed for the better now. We are in a new age of technology where we can work in a more innovative and organized way. You can practically capture anything you see and hear around you in the present era. Hence, be it your classroom notes or lectures or any similar process, you do not have to cause pain to your wrist. With the help of an iPad voice recorder, you can record anything for future use.
iPad is the new age technology that will help you to record what you need and even store them in the hard drive for future use. You do not have to feel worried about the battery running out, unlike the traditional sound recorders. In addition, you can convert the audio recording into any file format so that you can use it on any device.
Filmora Audio Recorder
Record computer system audio
Capture microphone audio
Customize recording volume
Record screen and webcam as well
1. Record audio on iPad with the Voice Memo
iPad is a multitasking device as it offers a variety of features. It is helpful to the students, journalists, and other professionals as they can instantly cover the events. Voice recording on iPad is simple and easy to use as the features are user-friendly. Thus, it makes recording easier for you with better sound quality. One of the essential features of a voice recorder on an iPad is saving it in any audio format. Hence, you can play on any device of your choice and send it across the net to your friends and loved ones.
Steps on how to record voice on iPad?
Recording a voice memo on an iPad is a cakewalk if you know the process. Following are the steps to record audio on iPad:

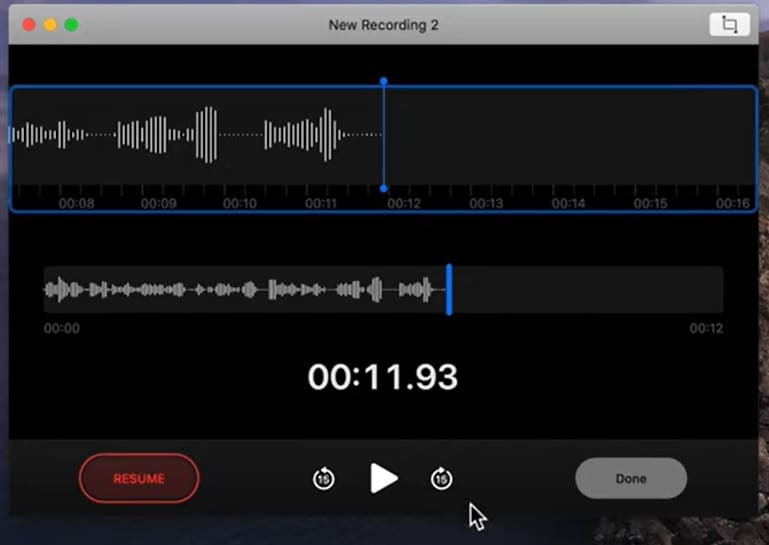
- If you want to start the recording on your iPad, you will have to tap the red button to start recording.
- Before you start the recording, adjust the recording level. If you find the voice is not clear, try to change the microphone.
- When you finish the recording tab on “Done”.
- You will find the recording on your hard disk.
- During the recording process, if you want to pause the recording, you can tap on the pause button and then tap the Resume button to start the process.
2. Record audio in Pages, Keynote, and Numbers on iPad
When you create a presentation or document, it becomes essential to add audio to it to understand better. It is helpful for teachers and other professionals who want to put their ideas across to their students or clients. You can easily add audio with a voice recorder on your iPad. It is easy and user-friendly as it does not require any prior knowledge. You can easily handle the fantastic features of an iPad with the help of some tutorials. Following are the guidelines to record audio in pages, keynotes, and numbers.
- Open the recording app on your iPad.
- You have to tab the Plus sign that you will find on top.
- Select the Media button on the right-hand side and click on the Record Audio option.
- Once you are ready, click on the Record option.
- After you finish the process, click on Stop.
- Automatically you will find the recording stored in the correct location of your phone.
- Click on Insert from the top and drag it to the file to insert the audio file.
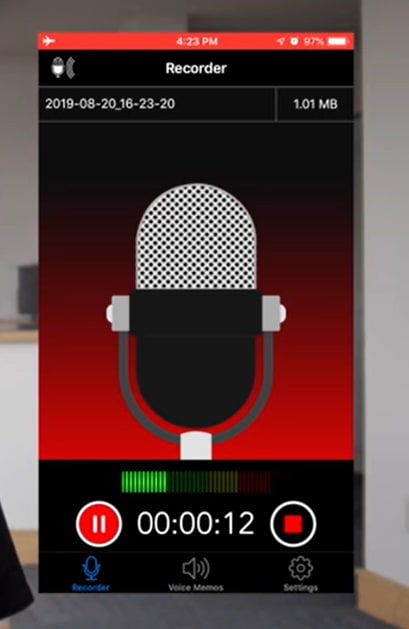
3. Use Voice Recorder Lite
Voice Recorder Lite is one of the best audio recorders where you can record live music or any other audio effortlessly. You can even edit the existing audio as it has some fantastic features. Moreover, it is a handy app as you can use it anytime. So, whether you are in a classroom attending long lectures or want to record a speech, you can easily do so with Voice recorder iPad. One of the essential features of Voice Recorder Lite is that you can record audio anything within the range of hundred meters. Moreover, you can record anything, even on the road, with its noise reduction technology.
Following are the steps to use Voice Recorder Lite:
- First, download the Voice Recorder app on your iPad.
- Next, find the Voice Recorder App on your phone and click on the Recording option to start the recording.
- Click on Stop to end the process.
FAQs
Q1. What is the format in which the iPad records audio?
Ans: iPad usually uses MPEG-4 codec to record and playback audio files. The Voice Momo app uses Advanced Audio Coding codes, a compressed file. Hence, it does not take much space on the hard drive of your iPad. You can also edit the files in the future and send them across to your friends and loved ones over the net.
Q2. Can you use another app while recording?
Ans: While you are recording, you can use another app. However, you must ensure that the app does not play audio, or the Voice memo will stop recording. Moreover, if you are using another app, you can return to your recording app by clicking on the orange icon. You will find the orange icon on the top of your iPad screen.
Q3. What happens if your Voice Memo is turned on in iCloud settings?
And: One of the fascinating features of the iPad is that if you turn on the iCloud setting of the Voice Memo, you will be able to access it from anywhere and from any device with the same ID. Hence, once you log in to your device with the same Apple ID, you will access all the recordings you have recorded earlier.
Q4. What are the advantages of using a Voice recorder app?
Ans: A Voice Recorder app is handy as you can record anything wherever you are. Moreover, since they have noise reduction technology, the recordings are clear and sharp, and hence you will be able to follow every syllable of the audio. Therefore, it is beneficial for students and journalists as you will share your notes easily.
Conclusion
There are varieties of voice recorders everywhere. Hence, it becomes difficult to choose the right one for you. However, the voice recorder app of iPad is the one that everyone prefers as it has a lot of added features that can make your life easier. Therefore, before choosing an audio recorder app, you must make sure that the audio is crystal clear and playback the recordings on any device.
1. Record audio on iPad with the Voice Memo
iPad is a multitasking device as it offers a variety of features. It is helpful to the students, journalists, and other professionals as they can instantly cover the events. Voice recording on iPad is simple and easy to use as the features are user-friendly. Thus, it makes recording easier for you with better sound quality. One of the essential features of a voice recorder on an iPad is saving it in any audio format. Hence, you can play on any device of your choice and send it across the net to your friends and loved ones.
Steps on how to record voice on iPad?
Recording a voice memo on an iPad is a cakewalk if you know the process. Following are the steps to record audio on iPad:
- If you want to start the recording on your iPad, you will have to tap the red button to start recording.
- Before you start the recording, adjust the recording level. If you find the voice is not clear, try to change the microphone.
- When you finish the recording tab on “Done”.
- You will find the recording on your hard disk.
- During the recording process, if you want to pause the recording, you can tap on the pause button and then tap the Resume button to start the process.
2. Record audio in Pages, Keynote, and Numbers on iPad
When you create a presentation or document, it becomes essential to add audio to it to understand better. It is helpful for teachers and other professionals who want to put their ideas across to their students or clients. You can easily add audio with a voice recorder on your iPad. It is easy and user-friendly as it does not require any prior knowledge. You can easily handle the fantastic features of an iPad with the help of some tutorials. Following are the guidelines to record audio in pages, keynotes, and numbers.
- Open the recording app on your iPad.
- You have to tab the Plus sign that you will find on top.
- Select the Media button on the right-hand side and click on the Record Audio option.
- Once you are ready, click on the Record option.
- After you finish the process, click on Stop.
- Automatically you will find the recording stored in the correct location of your phone.
- Click on Insert from the top and drag it to the file to insert the audio file.

3. Use Voice Recorder Lite
Voice Recorder Lite is one of the best audio recorders where you can record live music or any other audio effortlessly. You can even edit the existing audio as it has some fantastic features. Moreover, it is a handy app as you can use it anytime. So, whether you are in a classroom attending long lectures or want to record a speech, you can easily do so with Voice recorder iPad. One of the essential features of Voice Recorder Lite is that you can record audio anything within the range of hundred meters. Moreover, you can record anything, even on the road, with its noise reduction technology.
Following are the steps to use Voice Recorder Lite:
- First, download the Voice Recorder app on your iPad.
- Next, find the Voice Recorder App on your phone and click on the Recording option to start the recording.
- Click on Stop to end the process.
 WinUtilities Pro
FAQs
Q1. What is the format in which the iPad records audio?
Ans: iPad usually uses MPEG-4 codec to record and playback audio files. The Voice Momo app uses Advanced Audio Coding codes, a compressed file. Hence, it does not take much space on the hard drive of your iPad. You can also edit the files in the future and send them across to your friends and loved ones over the net.
Q2. Can you use another app while recording?
Ans: While you are recording, you can use another app. However, you must ensure that the app does not play audio, or the Voice memo will stop recording. Moreover, if you are using another app, you can return to your recording app by clicking on the orange icon. You will find the orange icon on the top of your iPad screen.
Q3. What happens if your Voice Memo is turned on in iCloud settings?
And: One of the fascinating features of the iPad is that if you turn on the iCloud setting of the Voice Memo, you will be able to access it from anywhere and from any device with the same ID. Hence, once you log in to your device with the same Apple ID, you will access all the recordings you have recorded earlier.
Q4. What are the advantages of using a Voice recorder app?
Ans: A Voice Recorder app is handy as you can record anything wherever you are. Moreover, since they have noise reduction technology, the recordings are clear and sharp, and hence you will be able to follow every syllable of the audio. Therefore, it is beneficial for students and journalists as you will share your notes easily.
Conclusion
There are varieties of voice recorders everywhere. Hence, it becomes difficult to choose the right one for you. However, the voice recorder app of iPad is the one that everyone prefers as it has a lot of added features that can make your life easier. Therefore, before choosing an audio recorder app, you must make sure that the audio is crystal clear and playback the recordings on any device.
1. Record audio on iPad with the Voice Memo
iPad is a multitasking device as it offers a variety of features. It is helpful to the students, journalists, and other professionals as they can instantly cover the events. Voice recording on iPad is simple and easy to use as the features are user-friendly. Thus, it makes recording easier for you with better sound quality. One of the essential features of a voice recorder on an iPad is saving it in any audio format. Hence, you can play on any device of your choice and send it across the net to your friends and loved ones.
 PCDJ DEX 3 for Windows & MAC is the total entertainment DJ software solution, offering audio, video, and karaoke mixing ability. Automatic beat-sync, smart looping, 4 decks, DJ MIDI controller support, Karaoke Streaming and much more.
Steps on how to record voice on iPad?
Recording a voice memo on an iPad is a cakewalk if you know the process. Following are the steps to record audio on iPad:

- If you want to start the recording on your iPad, you will have to tap the red button to start recording.
- Before you start the recording, adjust the recording level. If you find the voice is not clear, try to change the microphone.
- When you finish the recording tab on “Done”.
- You will find the recording on your hard disk.
- During the recording process, if you want to pause the recording, you can tap on the pause button and then tap the Resume button to start the process.
2. Record audio in Pages, Keynote, and Numbers on iPad
When you create a presentation or document, it becomes essential to add audio to it to understand better. It is helpful for teachers and other professionals who want to put their ideas across to their students or clients. You can easily add audio with a voice recorder on your iPad. It is easy and user-friendly as it does not require any prior knowledge. You can easily handle the fantastic features of an iPad with the help of some tutorials. Following are the guidelines to record audio in pages, keynotes, and numbers.
- Open the recording app on your iPad.
- You have to tab the Plus sign that you will find on top.
- Select the Media button on the right-hand side and click on the Record Audio option.
- Once you are ready, click on the Record option.
- After you finish the process, click on Stop.
- Automatically you will find the recording stored in the correct location of your phone.
- Click on Insert from the top and drag it to the file to insert the audio file.
3. Use Voice Recorder Lite
Voice Recorder Lite is one of the best audio recorders where you can record live music or any other audio effortlessly. You can even edit the existing audio as it has some fantastic features. Moreover, it is a handy app as you can use it anytime. So, whether you are in a classroom attending long lectures or want to record a speech, you can easily do so with Voice recorder iPad. One of the essential features of Voice Recorder Lite is that you can record audio anything within the range of hundred meters. Moreover, you can record anything, even on the road, with its noise reduction technology.
Following are the steps to use Voice Recorder Lite:
- First, download the Voice Recorder app on your iPad.
- Next, find the Voice Recorder App on your phone and click on the Recording option to start the recording.
- Click on Stop to end the process.
Q1. What is the format in which the iPad records audio?
Ans: iPad usually uses MPEG-4 codec to record and playback audio files. The Voice Momo app uses Advanced Audio Coding codes, a compressed file. Hence, it does not take much space on the hard drive of your iPad. You can also edit the files in the future and send them across to your friends and loved ones over the net.
Q2. Can you use another app while recording?
Ans: While you are recording, you can use another app. However, you must ensure that the app does not play audio, or the Voice memo will stop recording. Moreover, if you are using another app, you can return to your recording app by clicking on the orange icon. You will find the orange icon on the top of your iPad screen.
Q3. What happens if your Voice Memo is turned on in iCloud settings?
And: One of the fascinating features of the iPad is that if you turn on the iCloud setting of the Voice Memo, you will be able to access it from anywhere and from any device with the same ID. Hence, once you log in to your device with the same Apple ID, you will access all the recordings you have recorded earlier.
Q4. What are the advantages of using a Voice recorder app?
Ans: A Voice Recorder app is handy as you can record anything wherever you are. Moreover, since they have noise reduction technology, the recordings are clear and sharp, and hence you will be able to follow every syllable of the audio. Therefore, it is beneficial for students and journalists as you will share your notes easily.
Conclusion
There are varieties of voice recorders everywhere. Hence, it becomes difficult to choose the right one for you. However, the voice recorder app of iPad is the one that everyone prefers as it has a lot of added features that can make your life easier. Therefore, before choosing an audio recorder app, you must make sure that the audio is crystal clear and playback the recordings on any device.
1. Record audio on iPad with the Voice Memo
iPad is a multitasking device as it offers a variety of features. It is helpful to the students, journalists, and other professionals as they can instantly cover the events. Voice recording on iPad is simple and easy to use as the features are user-friendly. Thus, it makes recording easier for you with better sound quality. One of the essential features of a voice recorder on an iPad is saving it in any audio format. Hence, you can play on any device of your choice and send it across the net to your friends and loved ones.
Steps on how to record voice on iPad?
Recording a voice memo on an iPad is a cakewalk if you know the process. Following are the steps to record audio on iPad:

- If you want to start the recording on your iPad, you will have to tap the red button to start recording.
- Before you start the recording, adjust the recording level. If you find the voice is not clear, try to change the microphone.
- When you finish the recording tab on “Done”.
- You will find the recording on your hard disk.
- During the recording process, if you want to pause the recording, you can tap on the pause button and then tap the Resume button to start the process.
2. Record audio in Pages, Keynote, and Numbers on iPad
When you create a presentation or document, it becomes essential to add audio to it to understand better. It is helpful for teachers and other professionals who want to put their ideas across to their students or clients. You can easily add audio with a voice recorder on your iPad. It is easy and user-friendly as it does not require any prior knowledge. You can easily handle the fantastic features of an iPad with the help of some tutorials. Following are the guidelines to record audio in pages, keynotes, and numbers.
- Open the recording app on your iPad.
- You have to tab the Plus sign that you will find on top.
- Select the Media button on the right-hand side and click on the Record Audio option.
- Once you are ready, click on the Record option.
- After you finish the process, click on Stop.
- Automatically you will find the recording stored in the correct location of your phone.
- Click on Insert from the top and drag it to the file to insert the audio file.
3. Use Voice Recorder Lite
Voice Recorder Lite is one of the best audio recorders where you can record live music or any other audio effortlessly. You can even edit the existing audio as it has some fantastic features. Moreover, it is a handy app as you can use it anytime. So, whether you are in a classroom attending long lectures or want to record a speech, you can easily do so with Voice recorder iPad. One of the essential features of Voice Recorder Lite is that you can record audio anything within the range of hundred meters. Moreover, you can record anything, even on the road, with its noise reduction technology.
Following are the steps to use Voice Recorder Lite:
- First, download the Voice Recorder app on your iPad.
- Next, find the Voice Recorder App on your phone and click on the Recording option to start the recording.
- Click on Stop to end the process.
 KoolReport Pro is an advanced solution for creating data reports and dashboards in PHP. Equipped with all extended packages , KoolReport Pro is able to connect to various datasources, perform advanced data analysis, construct stunning charts and graphs and export your beautiful work to PDF, Excel, JPG or other formats. Plus, it includes powerful built-in reports such as pivot report and drill-down report which will save your time in building ones.
 It will help you to write dynamic data reports easily, to construct intuitive dashboards or to build a whole business intelligence cockpit.
KoolReport Pro package goes with Full Source Code, Royal Free, ONE (1) Year Priority Support, ONE (1) Year Free Upgrade and 30-Days Money Back Guarantee.
Developer License allows Single Developer to create Unlimited Reports, deploy on Unlimited Servers and able deliver the work to Unlimited Clients.
FAQs
Q1. What is the format in which the iPad records audio?
Ans: iPad usually uses MPEG-4 codec to record and playback audio files. The Voice Momo app uses Advanced Audio Coding codes, a compressed file. Hence, it does not take much space on the hard drive of your iPad. You can also edit the files in the future and send them across to your friends and loved ones over the net.
Q2. Can you use another app while recording?
Ans: While you are recording, you can use another app. However, you must ensure that the app does not play audio, or the Voice memo will stop recording. Moreover, if you are using another app, you can return to your recording app by clicking on the orange icon. You will find the orange icon on the top of your iPad screen.
Q3. What happens if your Voice Memo is turned on in iCloud settings?
And: One of the fascinating features of the iPad is that if you turn on the iCloud setting of the Voice Memo, you will be able to access it from anywhere and from any device with the same ID. Hence, once you log in to your device with the same Apple ID, you will access all the recordings you have recorded earlier.
Q4. What are the advantages of using a Voice recorder app?
Ans: A Voice Recorder app is handy as you can record anything wherever you are. Moreover, since they have noise reduction technology, the recordings are clear and sharp, and hence you will be able to follow every syllable of the audio. Therefore, it is beneficial for students and journalists as you will share your notes easily.
Conclusion
There are varieties of voice recorders everywhere. Hence, it becomes difficult to choose the right one for you. However, the voice recorder app of iPad is the one that everyone prefers as it has a lot of added features that can make your life easier. Therefore, before choosing an audio recorder app, you must make sure that the audio is crystal clear and playback the recordings on any device.
- Title: Ranking the Best Third-Place Recording Tools for iPad
- Author: Rowling
- Created at : 2024-07-21 09:11:22
- Updated at : 2024-07-22 09:11:22
- Link: https://remote-screen-capture.techidaily.com/ranking-the-best-third-place-recording-tools-for-ipad/
- License: This work is licensed under CC BY-NC-SA 4.0.