
"Top-Rated MP4 Video Save & Review"
Top-Rated MP4 Video Save & Review
There are a lot of circumstances when it very well may be important to catch screen content by utilizing any mp4 screen recorder, regardless of whether you are recording interactivity or making a video instructional exercise, yet the specific screen recorder mp4 for Chrome that can assist you with playing out this assignment are regularly very mind-boggling, and accordingly not appropriate for less experienced clients. AnyMP4 Screen Recorder is a component pressed program that empowers you to catch both video and sound from your work area or an associated recording gadget, and it includes a cutting edge, smoothed out UI. The application empowers you to catch your whole work area or a particular region, and you can tweak this locale by altering the elements of the determination box. If a webcam is associated, you can have the application show the feed in a window on your work area and add it to your recording.
While its name may recommend in any case, AnyMP4 Screen Recorder isn’t just a screen recorder yet additionally gives many related valuable capacities including catching screen captures, adding explanations, and altering the accounts continuously. What’s more, it can record any sort of materials like gathering gatherings, online classes, games, and Skype recordings in HD quality. AnyMP4 Screen Recorder is completely equipped for catching just sound substance, either from your framework or an associated receiver. Record any recordings on your PC. AnyMP4 Screen Grabber is the best video catch application. With its screen recorder mp4, you can record screen activities, including gameplay process, Skype call talks, video gatherings, internet web-based recordings, most loved pictures, video instructional exercises, introductions, etc. You can record any organization’s video on your PC, even 4K recordings.
Part 1. AnyMP4 Free Web-Based Screen Recorder
Part 2. AnyMP4 Desktop Screen Recorder
Part 3. Alternative Way to Record Computer Screen
 Easy and Safe Partition Software & Hard Disk Manager
1. AnyMP4 Free Web-Based Screen Recorder
AnyMP4 Screen Recorder is the most ideal decision for you to record screen developments and activities. With its natural and brisk interface, you can dominate it rapidly. It is an incredible application for video recording and can record all video documents and sounds that are played on the PC screen. Regardless of whether you need to record a real-time video or a Blu-beam film as a video document, record Skype calls or online courses, this tool compartment can help you. In the wake of recording, it saves the video documents in WMV or MP4 design.
The convenient gathering recorder empowers you to record all subtleties of the video gatherings, online courses or online gatherings and offer HD recordings and excellent screen captures right away. During the recording system, you can make the attracting to the screencast, trim the beginning and finishing focuses, change the tones/textual styles, and more different settings. It furnishes you with a choice to change the length and cut undesirable pieces of the video and sound accounts after the recording is finished.
Step 1. Download Recorder Launcher
Click Launch Free Recorder and it will provoke you to introduce the recorder launcher. You can set the time precisely on the second with AnyMP4 Screen Recorder, and the recording system will stop naturally when it arrives at the normal time. This Screen Recording ONLINE will keep the term interfering with history as a matter of course when you to the Screen Recorder or open it once more.

Step 2. Make Recording Settings
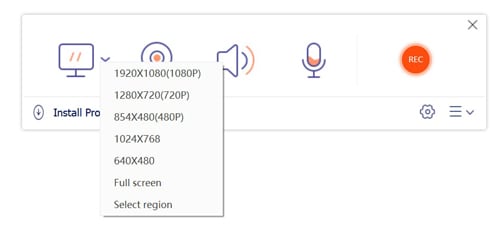
Modify the record screen size and position. This Screen Video Recorder empowers you to change the catch region by changing size and moving it to the appropriate position. With it, you can record video with full screen, just as redo recording part of the screen. AnyMP4 Screen Recorder permits you to utilize console alternate ways to begin, stop, interrupt and resume the catch cycle, just as snatch screen captures.
Step 3. Record PC Screen
At the point when you record a video, you can decide to record the voice of the actual video by utilizing the framework sound or record your voice by empowering the receiver voice. The previous one fits for recording films while the last one is good for making video introductions. Assuming you need to record meetings, you should turn the two of them on.
Step 4: Save the Recording to PC
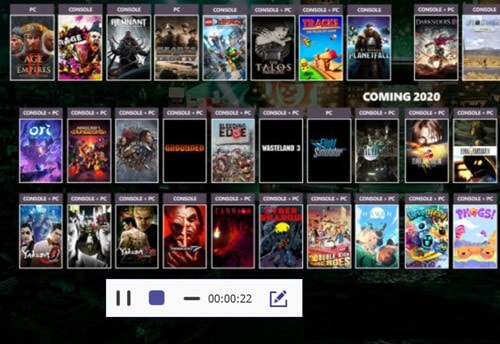
Once the recording system has been begun, you can limit the application to decrease work area mess, yet it is absurd to likewise conceal the choice box. The Video Screen Capture and Recording application will leap to the preview window when you get done with catching the screen, and it upholds you to take a depiction when you see the video. Simply save the video and appreciate them unreservedly.
 vMix 4K - Software based live production. vMix 4K includes everything in vMix HD plus 4K support, PTZ control, External/Fullscreen output, 4 Virtual Outputs, 1 Replay, 4 vMix Call, and 2 Recorders.
2. AnyMP4 Desktop Screen Recorder
AnyMP4 Screen Recorder empowers you to record any movement on your PC screen, for example, catch real-time video/sound, video gathering, video instructional exercises, introductions, record game interaction, etc. with next to no constraints. This Screen Recording Software permits you to set the record region and the size of the recorder screen. In addition, you can decide to record the actual video or record your voice through an amplifier with a superior grade.
Step 1. Install and Launch Application
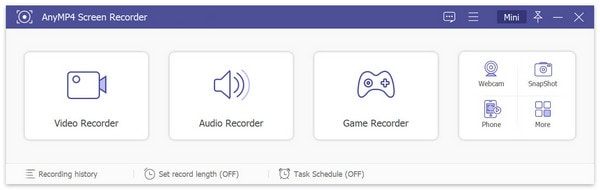
Introduce and dispatch AnyMP4 Screen Recorder on your PC, pick “Video Recorder” from the fundamental interface.

Step 2. Customize the Recording Screen
Then, at that point, you can choose the recording region on your PC screen by and by. You can record the full screen or snap “Custom” to choose a decent area in various sizes, which incorporate 1920*1080, 1280*720, 854*480, 1024*768 and 640*480.

Step 3. Set the Audio Source
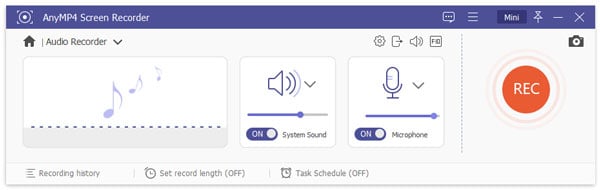
Select the sound asset of your interest. Assuming you want to record a film or video, simply turn the System Sound on. Assuming you will record a video meeting or a Skype call, and so on, you want to keep both System Sound and Microphone on. Select the recording region, empower or debilitate the webcam, select the recording sound from mic or framework sound.
Step 4. Start/Stop Recording
After that, you can tap the “REC” button on the right side to begin recording. Click the stop button, and it will save and download the recording document on your PC naturally.
3. Alternative Way to Record Computer Screen
AnyMP4 Screen Recorder is an incredible decision for both progressed clients and tenderfoots, as it enormously improves catch interaction. Nonetheless, it should be noticed that a fairly set number of result designs are upheld. In general, the program is extremely simple to utilize, and you can even characterize a preset catch time to have the product stop the recording naturally. Nonetheless, one of the significant imperfections of this video proofreader application is that it neglects to offer progressed altering highlights. Additionally, assuming you are simply hoping to assemble your recordings for YouTube, you might observe the interface as somewhat troublesome. With Filmora Screen Recorder , you can make your video cuts extraordinary and draw in as this instrument permits the editors to add advances, enhancements, sound, film channels, moving titles thus significantly more.
Filmora is made for the underlying altering works and the skill too. Along these lines, amateurish clients can think that it is not difficult to deal with it. Each of the necessary highlights is accessible for nothing. The best part is you can fill in according to your decision. You can without much of a stretch utilize the watermark to make a mark for your substance. Filmora lets the video recorder record screen and catches them consistently. It has sovereignty free music tracks and audio cues. The inbuilt sound library is for individual use. It additionally has fifteen shading video presets. The video editors don’t have to download the inbuilt stock media from elsewhere. Every one of them is accessible in the Filmora video proofreader. Additionally, it has a few embellishments, like overlays, channels, picture veils, and slant shift impacts. Filmora offers a high-level sound editorial manager that incorporates sound dodging, sound keyframes, and so on It has a polished word processor that offers essential and progressed altering.
For Win 7 or later (64-bit)
For macOS 10.12 or later
Step 1: Launch Filmora Recorder
To start using Filmora recorder, you need to download and install this toolkit to get started. For that, you can use this AnyMP4 alternative on the go. Just visit the Wondershare official platform on the web and from there, you can find both versions of Filmora software, i-e., Windows and Mac versions with the latest version.
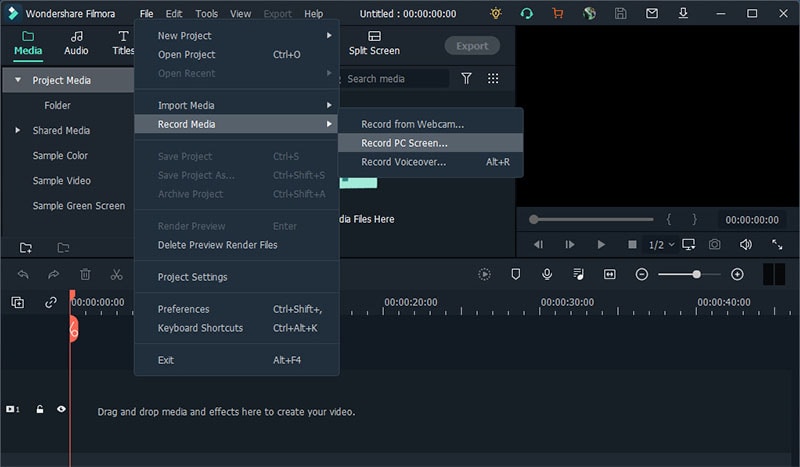
Now, you can proceed to the recorder by going to the File - Record Media and from there you can select your desired format of screen recording from the list as shown here. It’ll take you to the user-friendly UI of Filmora where you can pick up the recording feature on-spot as shown in the figure below:
Step 2: Initiate Recording
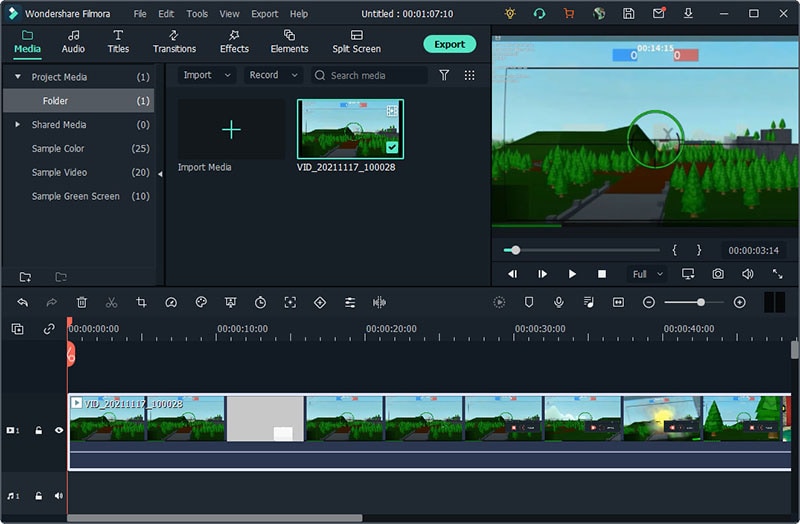
Whenever you’re done with the screen set up, that allows you to include the recording sources including webcam, microphone, system sound and much more, simply hit the Record button and it shall start recording your customized screen right away. Now as you’re done with the recording, you can hit the Stop button as same as the process how you’ve started the recording. Inside the editor, you can edit the content with full features as Filmora gives you numerous editing tools to utilize.

Step 3: Save or Upload the Recordings
When you’ve everything summed up, you can then save your edited recordings right from there. you have a lot of choices to select while sending out your screen catching and webcam chronicles after you’re finished with the altering part. For that, hit the Export button at the top-right corner of the product interface as follow
The best part with this AnyMP4 alternative is that Wondershare Filmora also allows you to upload your recorded and edited content directly to YouTube or some other renowned platform, you can without much of a stretch select your desired platform to share from there.
Conclusion
As we know, the market is overflowed with a few video editorial manager apparatuses and whether or not you ought to go ahead with this choice is an intense decision. AnyMP4 Screen Recorder is an across-the-board screen recorder that empowers you to catch interactivity recordings, video instructional exercises, online courses, and more others. Here you can learn more insights concerning the phenomenal elements and survey of AnyMP4 Screen Recorder. On the off chance that you want to catch sound documents on Windows and Mac, simply view as the suggested one here, the Filmora Screen Recorder that likewise offers you some predefined picture sizes. Furthermore, you can record the full picture of your work area. Record any sort of screen on PC like web-based recordings, games, favourite podcasts, online meetings, webcam recordings, online courses, talks and more with this.
Part 2. AnyMP4 Desktop Screen Recorder
Part 3. Alternative Way to Record Computer Screen
1. AnyMP4 Free Web-Based Screen Recorder
AnyMP4 Screen Recorder is the most ideal decision for you to record screen developments and activities. With its natural and brisk interface, you can dominate it rapidly. It is an incredible application for video recording and can record all video documents and sounds that are played on the PC screen. Regardless of whether you need to record a real-time video or a Blu-beam film as a video document, record Skype calls or online courses, this tool compartment can help you. In the wake of recording, it saves the video documents in WMV or MP4 design.
The convenient gathering recorder empowers you to record all subtleties of the video gatherings, online courses or online gatherings and offer HD recordings and excellent screen captures right away. During the recording system, you can make the attracting to the screencast, trim the beginning and finishing focuses, change the tones/textual styles, and more different settings. It furnishes you with a choice to change the length and cut undesirable pieces of the video and sound accounts after the recording is finished.
Step 1. Download Recorder Launcher
Click Launch Free Recorder and it will provoke you to introduce the recorder launcher. You can set the time precisely on the second with AnyMP4 Screen Recorder, and the recording system will stop naturally when it arrives at the normal time. This Screen Recording ONLINE will keep the term interfering with history as a matter of course when you to the Screen Recorder or open it once more.

Step 2. Make Recording Settings
Modify the record screen size and position. This Screen Video Recorder empowers you to change the catch region by changing size and moving it to the appropriate position. With it, you can record video with full screen, just as redo recording part of the screen. AnyMP4 Screen Recorder permits you to utilize console alternate ways to begin, stop, interrupt and resume the catch cycle, just as snatch screen captures.
Step 3. Record PC Screen
At the point when you record a video, you can decide to record the voice of the actual video by utilizing the framework sound or record your voice by empowering the receiver voice. The previous one fits for recording films while the last one is good for making video introductions. Assuming you need to record meetings, you should turn the two of them on.
Step 4: Save the Recording to PC
Once the recording system has been begun, you can limit the application to decrease work area mess, yet it is absurd to likewise conceal the choice box. The Video Screen Capture and Recording application will leap to the preview window when you get done with catching the screen, and it upholds you to take a depiction when you see the video. Simply save the video and appreciate them unreservedly.
2. AnyMP4 Desktop Screen Recorder
AnyMP4 Screen Recorder empowers you to record any movement on your PC screen, for example, catch real-time video/sound, video gathering, video instructional exercises, introductions, record game interaction, etc. with next to no constraints. This Screen Recording Software permits you to set the record region and the size of the recorder screen. In addition, you can decide to record the actual video or record your voice through an amplifier with a superior grade.
Step 1. Install and Launch Application
Introduce and dispatch AnyMP4 Screen Recorder on your PC, pick “Video Recorder” from the fundamental interface.
Step 2. Customize the Recording Screen
Then, at that point, you can choose the recording region on your PC screen by and by. You can record the full screen or snap “Custom” to choose a decent area in various sizes, which incorporate 1920*1080, 1280*720, 854*480, 1024*768 and 640*480.
Step 3. Set the Audio Source
Select the sound asset of your interest. Assuming you want to record a film or video, simply turn the System Sound on. Assuming you will record a video meeting or a Skype call, and so on, you want to keep both System Sound and Microphone on. Select the recording region, empower or debilitate the webcam, select the recording sound from mic or framework sound.
Step 4. Start/Stop Recording
After that, you can tap the “REC” button on the right side to begin recording. Click the stop button, and it will save and download the recording document on your PC naturally.
3. Alternative Way to Record Computer Screen
AnyMP4 Screen Recorder is an incredible decision for both progressed clients and tenderfoots, as it enormously improves catch interaction. Nonetheless, it should be noticed that a fairly set number of result designs are upheld. In general, the program is extremely simple to utilize, and you can even characterize a preset catch time to have the product stop the recording naturally. Nonetheless, one of the significant imperfections of this video proofreader application is that it neglects to offer progressed altering highlights. Additionally, assuming you are simply hoping to assemble your recordings for YouTube, you might observe the interface as somewhat troublesome. With Filmora Screen Recorder , you can make your video cuts extraordinary and draw in as this instrument permits the editors to add advances, enhancements, sound, film channels, moving titles thus significantly more.
Filmora is made for the underlying altering works and the skill too. Along these lines, amateurish clients can think that it is not difficult to deal with it. Each of the necessary highlights is accessible for nothing. The best part is you can fill in according to your decision. You can without much of a stretch utilize the watermark to make a mark for your substance. Filmora lets the video recorder record screen and catches them consistently. It has sovereignty free music tracks and audio cues. The inbuilt sound library is for individual use. It additionally has fifteen shading video presets. The video editors don’t have to download the inbuilt stock media from elsewhere. Every one of them is accessible in the Filmora video proofreader. Additionally, it has a few embellishments, like overlays, channels, picture veils, and slant shift impacts. Filmora offers a high-level sound editorial manager that incorporates sound dodging, sound keyframes, and so on It has a polished word processor that offers essential and progressed altering.
For Win 7 or later (64-bit)
For macOS 10.12 or later
Step 1: Launch Filmora Recorder
To start using Filmora recorder, you need to download and install this toolkit to get started. For that, you can use this AnyMP4 alternative on the go. Just visit the Wondershare official platform on the web and from there, you can find both versions of Filmora software, i-e., Windows and Mac versions with the latest version.
 NeoDownloader - Fast and fully automatic image/video/music downloader.
Now, you can proceed to the recorder by going to the File - Record Media and from there you can select your desired format of screen recording from the list as shown here. It’ll take you to the user-friendly UI of Filmora where you can pick up the recording feature on-spot as shown in the figure below:
Step 2: Initiate Recording
Whenever you’re done with the screen set up, that allows you to include the recording sources including webcam, microphone, system sound and much more, simply hit the Record button and it shall start recording your customized screen right away. Now as you’re done with the recording, you can hit the Stop button as same as the process how you’ve started the recording. Inside the editor, you can edit the content with full features as Filmora gives you numerous editing tools to utilize.
 SwifDoo PDF Perpetual (2-PC) Free upgrade. No monthly fees ever.
Step 3: Save or Upload the Recordings
When you’ve everything summed up, you can then save your edited recordings right from there. you have a lot of choices to select while sending out your screen catching and webcam chronicles after you’re finished with the altering part. For that, hit the Export button at the top-right corner of the product interface as follow

The best part with this AnyMP4 alternative is that Wondershare Filmora also allows you to upload your recorded and edited content directly to YouTube or some other renowned platform, you can without much of a stretch select your desired platform to share from there.

Conclusion
As we know, the market is overflowed with a few video editorial manager apparatuses and whether or not you ought to go ahead with this choice is an intense decision. AnyMP4 Screen Recorder is an across-the-board screen recorder that empowers you to catch interactivity recordings, video instructional exercises, online courses, and more others. Here you can learn more insights concerning the phenomenal elements and survey of AnyMP4 Screen Recorder. On the off chance that you want to catch sound documents on Windows and Mac, simply view as the suggested one here, the Filmora Screen Recorder that likewise offers you some predefined picture sizes. Furthermore, you can record the full picture of your work area. Record any sort of screen on PC like web-based recordings, games, favourite podcasts, online meetings, webcam recordings, online courses, talks and more with this.
Part 2. AnyMP4 Desktop Screen Recorder
Part 3. Alternative Way to Record Computer Screen
1. AnyMP4 Free Web-Based Screen Recorder
AnyMP4 Screen Recorder is the most ideal decision for you to record screen developments and activities. With its natural and brisk interface, you can dominate it rapidly. It is an incredible application for video recording and can record all video documents and sounds that are played on the PC screen. Regardless of whether you need to record a real-time video or a Blu-beam film as a video document, record Skype calls or online courses, this tool compartment can help you. In the wake of recording, it saves the video documents in WMV or MP4 design.
The convenient gathering recorder empowers you to record all subtleties of the video gatherings, online courses or online gatherings and offer HD recordings and excellent screen captures right away. During the recording system, you can make the attracting to the screencast, trim the beginning and finishing focuses, change the tones/textual styles, and more different settings. It furnishes you with a choice to change the length and cut undesirable pieces of the video and sound accounts after the recording is finished.
Step 1. Download Recorder Launcher
Click Launch Free Recorder and it will provoke you to introduce the recorder launcher. You can set the time precisely on the second with AnyMP4 Screen Recorder, and the recording system will stop naturally when it arrives at the normal time. This Screen Recording ONLINE will keep the term interfering with history as a matter of course when you to the Screen Recorder or open it once more.
Step 2. Make Recording Settings
Modify the record screen size and position. This Screen Video Recorder empowers you to change the catch region by changing size and moving it to the appropriate position. With it, you can record video with full screen, just as redo recording part of the screen. AnyMP4 Screen Recorder permits you to utilize console alternate ways to begin, stop, interrupt and resume the catch cycle, just as snatch screen captures.
Step 3. Record PC Screen
At the point when you record a video, you can decide to record the voice of the actual video by utilizing the framework sound or record your voice by empowering the receiver voice. The previous one fits for recording films while the last one is good for making video introductions. Assuming you need to record meetings, you should turn the two of them on.
Step 4: Save the Recording to PC
Once the recording system has been begun, you can limit the application to decrease work area mess, yet it is absurd to likewise conceal the choice box. The Video Screen Capture and Recording application will leap to the preview window when you get done with catching the screen, and it upholds you to take a depiction when you see the video. Simply save the video and appreciate them unreservedly.
2. AnyMP4 Desktop Screen Recorder
AnyMP4 Screen Recorder empowers you to record any movement on your PC screen, for example, catch real-time video/sound, video gathering, video instructional exercises, introductions, record game interaction, etc. with next to no constraints. This Screen Recording Software permits you to set the record region and the size of the recorder screen. In addition, you can decide to record the actual video or record your voice through an amplifier with a superior grade.
Step 1. Install and Launch Application
Introduce and dispatch AnyMP4 Screen Recorder on your PC, pick “Video Recorder” from the fundamental interface.
Step 2. Customize the Recording Screen
Then, at that point, you can choose the recording region on your PC screen by and by. You can record the full screen or snap “Custom” to choose a decent area in various sizes, which incorporate 1920*1080, 1280*720, 854*480, 1024*768 and 640*480.
Step 3. Set the Audio Source
Select the sound asset of your interest. Assuming you want to record a film or video, simply turn the System Sound on. Assuming you will record a video meeting or a Skype call, and so on, you want to keep both System Sound and Microphone on. Select the recording region, empower or debilitate the webcam, select the recording sound from mic or framework sound.
Step 4. Start/Stop Recording
After that, you can tap the “REC” button on the right side to begin recording. Click the stop button, and it will save and download the recording document on your PC naturally.
3. Alternative Way to Record Computer Screen
AnyMP4 Screen Recorder is an incredible decision for both progressed clients and tenderfoots, as it enormously improves catch interaction. Nonetheless, it should be noticed that a fairly set number of result designs are upheld. In general, the program is extremely simple to utilize, and you can even characterize a preset catch time to have the product stop the recording naturally. Nonetheless, one of the significant imperfections of this video proofreader application is that it neglects to offer progressed altering highlights. Additionally, assuming you are simply hoping to assemble your recordings for YouTube, you might observe the interface as somewhat troublesome. With Filmora Screen Recorder , you can make your video cuts extraordinary and draw in as this instrument permits the editors to add advances, enhancements, sound, film channels, moving titles thus significantly more.
Filmora is made for the underlying altering works and the skill too. Along these lines, amateurish clients can think that it is not difficult to deal with it. Each of the necessary highlights is accessible for nothing. The best part is you can fill in according to your decision. You can without much of a stretch utilize the watermark to make a mark for your substance. Filmora lets the video recorder record screen and catches them consistently. It has sovereignty free music tracks and audio cues. The inbuilt sound library is for individual use. It additionally has fifteen shading video presets. The video editors don’t have to download the inbuilt stock media from elsewhere. Every one of them is accessible in the Filmora video proofreader. Additionally, it has a few embellishments, like overlays, channels, picture veils, and slant shift impacts. Filmora offers a high-level sound editorial manager that incorporates sound dodging, sound keyframes, and so on It has a polished word processor that offers essential and progressed altering.
For Win 7 or later (64-bit)
For macOS 10.12 or later
Step 1: Launch Filmora Recorder
To start using Filmora recorder, you need to download and install this toolkit to get started. For that, you can use this AnyMP4 alternative on the go. Just visit the Wondershare official platform on the web and from there, you can find both versions of Filmora software, i-e., Windows and Mac versions with the latest version.
Now, you can proceed to the recorder by going to the File - Record Media and from there you can select your desired format of screen recording from the list as shown here. It’ll take you to the user-friendly UI of Filmora where you can pick up the recording feature on-spot as shown in the figure below:
Step 2: Initiate Recording
Whenever you’re done with the screen set up, that allows you to include the recording sources including webcam, microphone, system sound and much more, simply hit the Record button and it shall start recording your customized screen right away. Now as you’re done with the recording, you can hit the Stop button as same as the process how you’ve started the recording. Inside the editor, you can edit the content with full features as Filmora gives you numerous editing tools to utilize.
Step 3: Save or Upload the Recordings
When you’ve everything summed up, you can then save your edited recordings right from there. you have a lot of choices to select while sending out your screen catching and webcam chronicles after you’re finished with the altering part. For that, hit the Export button at the top-right corner of the product interface as follow
The best part with this AnyMP4 alternative is that Wondershare Filmora also allows you to upload your recorded and edited content directly to YouTube or some other renowned platform, you can without much of a stretch select your desired platform to share from there.
Conclusion
As we know, the market is overflowed with a few video editorial manager apparatuses and whether or not you ought to go ahead with this choice is an intense decision. AnyMP4 Screen Recorder is an across-the-board screen recorder that empowers you to catch interactivity recordings, video instructional exercises, online courses, and more others. Here you can learn more insights concerning the phenomenal elements and survey of AnyMP4 Screen Recorder. On the off chance that you want to catch sound documents on Windows and Mac, simply view as the suggested one here, the Filmora Screen Recorder that likewise offers you some predefined picture sizes. Furthermore, you can record the full picture of your work area. Record any sort of screen on PC like web-based recordings, games, favourite podcasts, online meetings, webcam recordings, online courses, talks and more with this.
Part 2. AnyMP4 Desktop Screen Recorder
Part 3. Alternative Way to Record Computer Screen

1. AnyMP4 Free Web-Based Screen Recorder
AnyMP4 Screen Recorder is the most ideal decision for you to record screen developments and activities. With its natural and brisk interface, you can dominate it rapidly. It is an incredible application for video recording and can record all video documents and sounds that are played on the PC screen. Regardless of whether you need to record a real-time video or a Blu-beam film as a video document, record Skype calls or online courses, this tool compartment can help you. In the wake of recording, it saves the video documents in WMV or MP4 design.
The convenient gathering recorder empowers you to record all subtleties of the video gatherings, online courses or online gatherings and offer HD recordings and excellent screen captures right away. During the recording system, you can make the attracting to the screencast, trim the beginning and finishing focuses, change the tones/textual styles, and more different settings. It furnishes you with a choice to change the length and cut undesirable pieces of the video and sound accounts after the recording is finished.
Step 1. Download Recorder Launcher
Click Launch Free Recorder and it will provoke you to introduce the recorder launcher. You can set the time precisely on the second with AnyMP4 Screen Recorder, and the recording system will stop naturally when it arrives at the normal time. This Screen Recording ONLINE will keep the term interfering with history as a matter of course when you to the Screen Recorder or open it once more.
Step 2. Make Recording Settings
Modify the record screen size and position. This Screen Video Recorder empowers you to change the catch region by changing size and moving it to the appropriate position. With it, you can record video with full screen, just as redo recording part of the screen. AnyMP4 Screen Recorder permits you to utilize console alternate ways to begin, stop, interrupt and resume the catch cycle, just as snatch screen captures.

Step 3. Record PC Screen
At the point when you record a video, you can decide to record the voice of the actual video by utilizing the framework sound or record your voice by empowering the receiver voice. The previous one fits for recording films while the last one is good for making video introductions. Assuming you need to record meetings, you should turn the two of them on.
Step 4: Save the Recording to PC
Once the recording system has been begun, you can limit the application to decrease work area mess, yet it is absurd to likewise conceal the choice box. The Video Screen Capture and Recording application will leap to the preview window when you get done with catching the screen, and it upholds you to take a depiction when you see the video. Simply save the video and appreciate them unreservedly.
2. AnyMP4 Desktop Screen Recorder
AnyMP4 Screen Recorder empowers you to record any movement on your PC screen, for example, catch real-time video/sound, video gathering, video instructional exercises, introductions, record game interaction, etc. with next to no constraints. This Screen Recording Software permits you to set the record region and the size of the recorder screen. In addition, you can decide to record the actual video or record your voice through an amplifier with a superior grade.
Step 1. Install and Launch Application
Introduce and dispatch AnyMP4 Screen Recorder on your PC, pick “Video Recorder” from the fundamental interface.
Step 2. Customize the Recording Screen
Then, at that point, you can choose the recording region on your PC screen by and by. You can record the full screen or snap “Custom” to choose a decent area in various sizes, which incorporate 1920*1080, 1280*720, 854*480, 1024*768 and 640*480.
Step 3. Set the Audio Source
Select the sound asset of your interest. Assuming you want to record a film or video, simply turn the System Sound on. Assuming you will record a video meeting or a Skype call, and so on, you want to keep both System Sound and Microphone on. Select the recording region, empower or debilitate the webcam, select the recording sound from mic or framework sound.
Step 4. Start/Stop Recording
After that, you can tap the “REC” button on the right side to begin recording. Click the stop button, and it will save and download the recording document on your PC naturally.
3. Alternative Way to Record Computer Screen
AnyMP4 Screen Recorder is an incredible decision for both progressed clients and tenderfoots, as it enormously improves catch interaction. Nonetheless, it should be noticed that a fairly set number of result designs are upheld. In general, the program is extremely simple to utilize, and you can even characterize a preset catch time to have the product stop the recording naturally. Nonetheless, one of the significant imperfections of this video proofreader application is that it neglects to offer progressed altering highlights. Additionally, assuming you are simply hoping to assemble your recordings for YouTube, you might observe the interface as somewhat troublesome. With Filmora Screen Recorder , you can make your video cuts extraordinary and draw in as this instrument permits the editors to add advances, enhancements, sound, film channels, moving titles thus significantly more.
Filmora is made for the underlying altering works and the skill too. Along these lines, amateurish clients can think that it is not difficult to deal with it. Each of the necessary highlights is accessible for nothing. The best part is you can fill in according to your decision. You can without much of a stretch utilize the watermark to make a mark for your substance. Filmora lets the video recorder record screen and catches them consistently. It has sovereignty free music tracks and audio cues. The inbuilt sound library is for individual use. It additionally has fifteen shading video presets. The video editors don’t have to download the inbuilt stock media from elsewhere. Every one of them is accessible in the Filmora video proofreader. Additionally, it has a few embellishments, like overlays, channels, picture veils, and slant shift impacts. Filmora offers a high-level sound editorial manager that incorporates sound dodging, sound keyframes, and so on It has a polished word processor that offers essential and progressed altering.
For Win 7 or later (64-bit)
For macOS 10.12 or later
Step 1: Launch Filmora Recorder
To start using Filmora recorder, you need to download and install this toolkit to get started. For that, you can use this AnyMP4 alternative on the go. Just visit the Wondershare official platform on the web and from there, you can find both versions of Filmora software, i-e., Windows and Mac versions with the latest version.
Now, you can proceed to the recorder by going to the File - Record Media and from there you can select your desired format of screen recording from the list as shown here. It’ll take you to the user-friendly UI of Filmora where you can pick up the recording feature on-spot as shown in the figure below:
Step 2: Initiate Recording
Whenever you’re done with the screen set up, that allows you to include the recording sources including webcam, microphone, system sound and much more, simply hit the Record button and it shall start recording your customized screen right away. Now as you’re done with the recording, you can hit the Stop button as same as the process how you’ve started the recording. Inside the editor, you can edit the content with full features as Filmora gives you numerous editing tools to utilize.
Step 3: Save or Upload the Recordings
When you’ve everything summed up, you can then save your edited recordings right from there. you have a lot of choices to select while sending out your screen catching and webcam chronicles after you’re finished with the altering part. For that, hit the Export button at the top-right corner of the product interface as follow
The best part with this AnyMP4 alternative is that Wondershare Filmora also allows you to upload your recorded and edited content directly to YouTube or some other renowned platform, you can without much of a stretch select your desired platform to share from there.
Conclusion
As we know, the market is overflowed with a few video editorial manager apparatuses and whether or not you ought to go ahead with this choice is an intense decision. AnyMP4 Screen Recorder is an across-the-board screen recorder that empowers you to catch interactivity recordings, video instructional exercises, online courses, and more others. Here you can learn more insights concerning the phenomenal elements and survey of AnyMP4 Screen Recorder. On the off chance that you want to catch sound documents on Windows and Mac, simply view as the suggested one here, the Filmora Screen Recorder that likewise offers you some predefined picture sizes. Furthermore, you can record the full picture of your work area. Record any sort of screen on PC like web-based recordings, games, favourite podcasts, online meetings, webcam recordings, online courses, talks and more with this.
- Title: Top-Rated MP4 Video Save & Review
- Author: Rowling
- Created at : 2024-07-21 07:05:57
- Updated at : 2024-07-22 07:05:57
- Link: https://remote-screen-capture.techidaily.com/top-rated-mp4-video-save-and-review/
- License: This work is licensed under CC BY-NC-SA 4.0.