
"Ultimate Guide Top Screen Capture Tools Roundup"
Ultimate Guide: Top Screen Capture Tools Roundup
Assuming you are searching for a screen recorder with adaptable elements and top-calibre, then, at that point, IObit Screen Recorder is ideal for you. It covers every necessity that is identified with the screen recorder application. It assists you with game features, online classes, meeting minutes, or video sections on the screen for replay to give an extreme encounter. With insignificant CPU and memory utilization, the application comes stacked with highlights to make the screen catch simple. Likewise, on account of its various result/change designs, you can record a video in MP4 or make a GIF without any problem. The recorder IObit product is accessible for Windows 10, 8, 7, and Vista. This is the kind of thing that is particularly important assuming we need to make live transmissions, record our ongoing interactions or make instructional exercises and afterwards transfer them to Steps like YouTube.
IObit Screen Recorder is a free screen catch application. It catches any full screens, explicit windows, or any chosen district to record excellent recordings. It additionally records sound from the mouthpiece and the speaker. There is the capacity to record any space of the screen, record HD video without watermarks, limitless recording time, and considerably more. IObit Screen Recorder (ISR) is a pristine free screen recording application with product and arrangement change choices, no time limit, no promotions, and no irritating watermarks. It is consistently available for potential emergencies by giving you a one-stop administration to make it bother free for you. IObit Screen Recorder isn’t only an all-rounder, yet it is completely specific. Even though assuming you would rather not introduce anything on your PC, it likewise has a web-based screen recorder viable with Chrome, Firefox, and Opera.
Part 1. System Requirements and Features of IObit Recorder
IObit Screen Recorder application is an ideal screen recorder for any individual who has the requirements for simple and smooth video recording, essential video altering, and advantageous sharing to famous web-based video Steps.
The IObit Screen Recorder has loads of highlights. These highlights made it an ideal device for recording video meetings, online classes, addresses, introductions, and so forth Curiously, you can likewise take screen captures while recording. There is no record time constraint and no watermark set on your recordings. However, it is free. So have a look at a portion of the awe-inspiring highlights of the free screen recorder here.
Flexibility in Screen Recording: In the space you wish to catch, you need to drag the cursor to make a little exchange box on the screen, it is entirely adaptable, to the point that you can simply catch everything about keeping away from each impediment. Consequently, giving you the specific screen show you want to.
Range of Formats to Choose From: Well, this Screen Recorder is a gift to those wishing to save the accounts in various arrangements like MP4, AVI, FLV, MKV, MOV, TS, and GIF. Multiple sorts of arrangements are being helped by it, in this manner making it one of the easiest to understand Screen Recorder. The recordings are upheld by your most recent android just as an old mp4 player too.
Take Screen Captures While Recording: This Screen Recorder gives the interface which has had the option to get through the hindrances of detail between the visual and sound recording and screen catch all the while. It is a stupendous component and an incredible group is behind this large number of endeavours whose primary point is to give its clients the best at any point insight and along these lines, they try constantly.
Video Altering: The component which upgrades the usefulness of the Screen Recorder is that as well as making it workable for you to record full recordings and screen shows, it additionally permits you to pick specific regions, recording them. It guarantees top-notch recordings of up to 4k. This is all gratitude to the light implicit video manager.
Customized Features: This IObit Screen Recorder allows its clients to make options all alone, by adding their touch in the video through the assistance of activity. In this way a redid video is made toward the end according to the necessities of the client. To feature or bring up explicit points of interest the client can add mouse click-like impacts which incorporates featuring the cursor
Splendid Highlights: Some cool altering choices, for example, parting, managing, or cutting recordings saved by online screen recording are generally present in IObit screen Recorder.
Part 2. How to Use IObit Screen Recorder
IObit Screen Recorder free is a 100% free program, viable with all renditions of Windows, like Vista, 7, 8, 8.1, and 10, and that we can download from its site. Despite being free, it doesn’t add watermarks or assault with irritating promotions. What’s more, it doesn’t have a recording limit so we can record as long as we need. The establishment document that we downloaded possesses 24 MB and the establishment is done rapidly through the wizard without attempting to get us to introduce undesirable outsider applications. Utilize the IObit Screen Recorder for your work and make it simple. With this recorder, you can record recordings, use them and offer them.
Step 1: Launch and Customize Screen
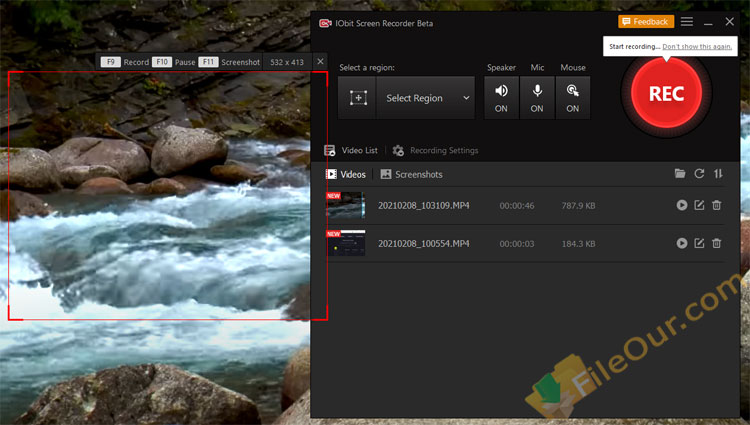
Select the region on the screen you need to record. Pick the mic/sound settings. When beginning the recording, the main thing to do is select the piece of the screen; that we need to record from the button «Select a region». Squeezing opens a drop-down menu where we can choose assuming we need to record the full screen, a window, a piece of the screen, a section in 4: 3 arrangements, or a section in 16: 9 configurations. Begin recording the screen as it plays. There will be no delays or jerks.
Step 2: Start Recording
Once we have made the proper changes, we just need to press the red REC button. When squeezed, a three-second commencement shows up before the recording starts. The recording region is set apart with a case with red lines from where we can respite or stop the recording; see the time that has passed, just as a button to take catches.
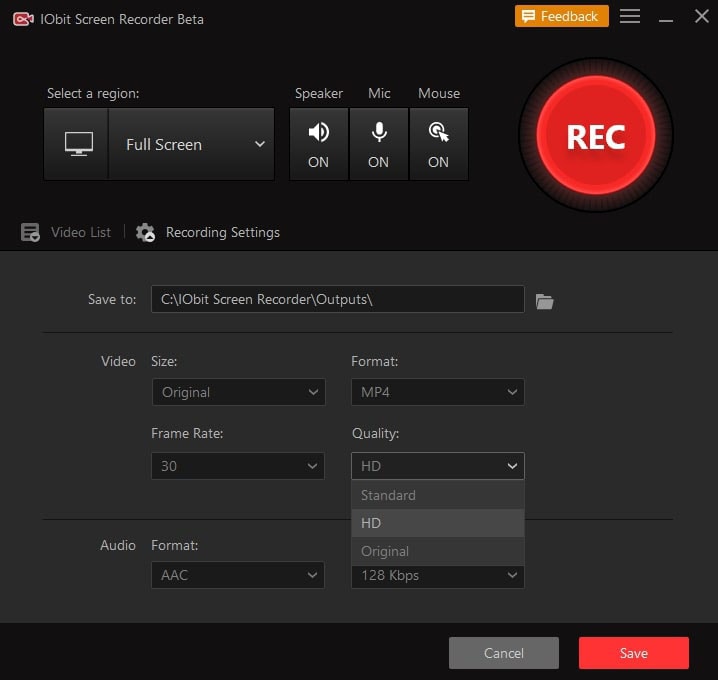
Step 3: Save and Upload the Recording
Finally, it ought to be noticed that by right-tapping on the video we have recorded; a little context-oriented menu will show up with the “Transfer” choice. From here we can transfer our accounts to Steps like YouTube, Vimeo, Facebook, Google Drive, and Dropbox. For this, it will be fundamental that we are bought in and signed in with our record. Save the recording in any configuration you like and alter it (trimming, sound changes, and so on) Share it any place you need.

Part 3. IObit Review to the Core Features
Many screen recorders in the market just proposition five minutes of recording time for nothing. Nonetheless, the IObit Screen Recorder isn’t caring for that since it offers limitless recording time. You can get incredible highlights without paying cash. It is a free screen recording on the web that assists you with catching the developments on the screen alongside its sound. IObit Screen Recorder is superior to different recorders on the lookout. This is because it has numerous appealing and valuable highlights. Here is a portion of the things that make it the best.
Performance: It gives you amazingly smooth recording conceivable by accomplishing a normal 8% CPU use. Regardless of whether you are utilizing sound or video, every casing is influenced quite a bit. It has the ideal answer for incongruence. It upholds 17 standard arrangements through which it tends to be moved commonly and limitlessly. The recorded and saved recordings can be played on any gadget.
User Interface: IObit Screen Recorder attempts to cover the requests of various gatherings. It catches everything about, various shows, and cuts off each impedance. Each progression is intricately planned by IObit Screen Recorder to make it easy to understand. Regardless of whether you are an amateur or no-everything, they have covered all.
Video Quality: The recorder assists individuals with recording top-notch video which is an extraordinary choice. The numerous choices accessible in this screen recorder are not found on different recorders. Alongside the video, you can likewise catch the sound. So it is an incredible apparatus for you to use in your video introductions, online courses, talks, and video meetings.
Part 4. Alternative Tool to Record Screen
IObit Screen Recorder is a simple to-utilize and amazing answer for work on your PC’s security and execution. Regularly while recording the screen, you begin pondering, “Which is the new best screen recording application?” But, the rise of Filmora Screen Recorder for PC has liberated you from this large number of problems. Wondershare Filmora is a notable video altering application. This device is advertised to individuals who are into altering and making excellent recordings. This product highlights altering support for 4K recordings, which isn’t accessible for some other video-altering apparatuses on the lookout. Assuming you have a little spending plan for altering a decent quality video then Filmora can be your best option.
The features of the Filmora application play an extremely fragile task to intrigue its clients to utilize and adhere to it over the long haul. The simple taking care of, just as valuable highlights, characterize the use of the application. Assuming you take the case of the most recent form of Filmora, it can without much of a stretch clear out the questions of altering the music recordings, short movies, narrative movies quite well. Even though the Wondershare Filmora application offers you a not insignificant rundown of amazing elements, it isn’t costly to buy. In addition, you can even alter sound with this product separated from video altering. The Filmora application is an ideal instrument for amateurs who are keen on making accolades, commitments, and stories alongside voiceovers. It gives you broad help for some, unique video designs. The UI is practically natural and fledgling well-disposed simultaneously.
Step 1: Install and Launch Filmora
To initiate the process of recording with this OIbit alternative, download and install the Filmora software inside your system to get started. For that, you can use this TinyTake alternative on the go. Just visit the Wondershare official platform on the web and from there, you can find both versions of Filmora software, i-e., Windows and Mac versions with the latest version. As you can see here after the successful installation, open the application and you shall face the following interface
For Win 7 or later (64-bit)
For macOS 10.12 or later
Step 2: Customize the Recording Screen
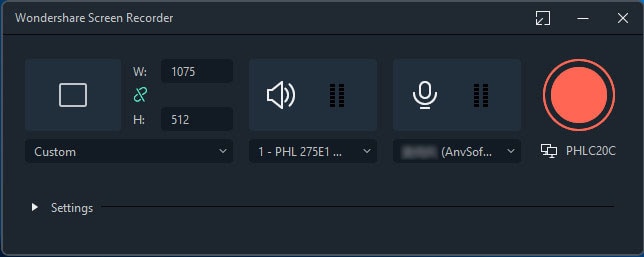
If you want to customize your recording screen, you can do that inside the recorder as well. For that, go to the File > Record Media and from there select your desired customization of the screen from the list as shown here. Whatever your choice is, the recorder will then take you to the recording venue where you can pick up the recording feature on-spot as shown in the figure below:

Now, inside the recorder interface, you can also set up some notable sources including webcam, microphone, system sound and much more.
Step 3: Begin Recording
As soon as you’re done with the screen set up, you can hit the Record button as shown below and it shall start recording your customized screen right away. Similarly, when you’re done with the recording, you can then hit the Stop button that’ll take you inside the video editor to polish your recorded content. You can also use the Pause recording button to adjust the screen during the recording, it’ll resume as you continue afterwards.
Step 4: Save Your Recordings
Lastly, when you hit the stop button; it will open up the Filmora video editor. From this built-in editor, you can have basic to pro-level editing introduced to your just recorded content easily. Afterwards, to proceed with the savings of your project, you can use the export button as shown here. This allows you to save your recordings. you have a lot of choices to select while sending out your screen catching and webcam chronicles after you’re finished with the altering part.

Conclusion
In outline, IObit Screen Recorder is a decent screen recorder for you on the off chance that you have the requirements for simple and smooth video recording, essential video altering, and helpful sharing to famous web-based video Steps. That is the reason the IObit Screen Recorder is an extraordinary screen recorder for business just as close to home use. Wondershare Filmora is a noteworthy video altering application as its alternative, in the workplace is a great apparatus that can cover various necessities. Since it is novice agreeable, the apparatus isn’t convoluted to utilize, in any event, for less experienced clients. Clients can rapidly foster proficient recordings without the requirement for a broad information base in video altering.
For macOS 10.12 or later
Step 2: Customize the Recording Screen
If you want to customize your recording screen, you can do that inside the recorder as well. For that, go to the File > Record Media and from there select your desired customization of the screen from the list as shown here. Whatever your choice is, the recorder will then take you to the recording venue where you can pick up the recording feature on-spot as shown in the figure below:
Now, inside the recorder interface, you can also set up some notable sources including webcam, microphone, system sound and much more.
Step 3: Begin Recording
As soon as you’re done with the screen set up, you can hit the Record button as shown below and it shall start recording your customized screen right away. Similarly, when you’re done with the recording, you can then hit the Stop button that’ll take you inside the video editor to polish your recorded content. You can also use the Pause recording button to adjust the screen during the recording, it’ll resume as you continue afterwards.
Step 4: Save Your Recordings
Lastly, when you hit the stop button; it will open up the Filmora video editor. From this built-in editor, you can have basic to pro-level editing introduced to your just recorded content easily. Afterwards, to proceed with the savings of your project, you can use the export button as shown here. This allows you to save your recordings. you have a lot of choices to select while sending out your screen catching and webcam chronicles after you’re finished with the altering part.
Conclusion
In outline, IObit Screen Recorder is a decent screen recorder for you on the off chance that you have the requirements for simple and smooth video recording, essential video altering, and helpful sharing to famous web-based video Steps. That is the reason the IObit Screen Recorder is an extraordinary screen recorder for business just as close to home use. Wondershare Filmora is a noteworthy video altering application as its alternative, in the workplace is a great apparatus that can cover various necessities. Since it is novice agreeable, the apparatus isn’t convoluted to utilize, in any event, for less experienced clients. Clients can rapidly foster proficient recordings without the requirement for a broad information base in video altering.
Also read:
- [New] Best Ways to Document Smartphone Use for 2024
- [New] ProArt PA 329Q Review The Ultimate 4K Workstation Display
- [Updated] In 2024, Exhaustive Analysis of Gecata Playback Device
- [Updated] In 2024, Explore 8 Inexpensive Virtual Gatherings Mac & Windows Compatibility
- [Updated] MMO Universe Guidebook Best 10 Free Roleplaying Games
- 2024 Approved Unlocking ASMR's Wellness Boost for You
- 2024 Approved Unmasked Influence Introducing the Power Players of Insta
- A Comprehensive Approach to Documenting Google Meet Discussions
- In 2024, How to Bypass Google FRP Lock on Xiaomi 13 Ultra Devices
- In 2024, How to Change Location on TikTok to See More Content On your Infinix Hot 40 Pro | Dr.fone
- Premier iOS Devices to Play PSP Games in High Fidelity, 2023 Edition
- Updated 2024 Approved GoPro Video Editing Simplified A Free Online Resource
- Title: Ultimate Guide Top Screen Capture Tools Roundup
- Author: Rowling
- Created at : 2025-01-09 22:33:52
- Updated at : 2025-01-13 17:11:23
- Link: https://remote-screen-capture.techidaily.com/ultimate-guide-top-screen-capture-tools-roundup/
- License: This work is licensed under CC BY-NC-SA 4.0.